Category Archives: Nail Art

Launch Party Collection

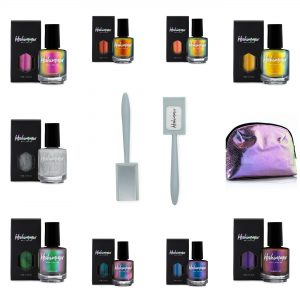
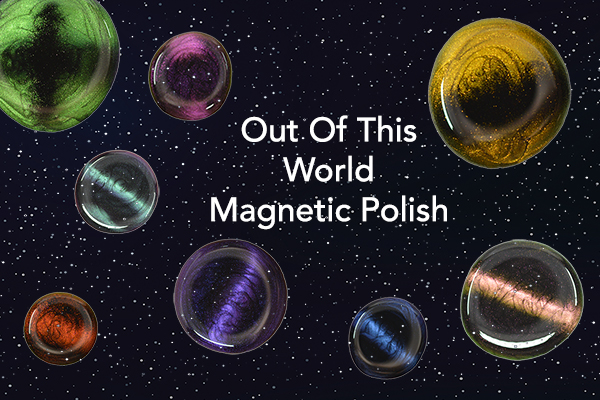
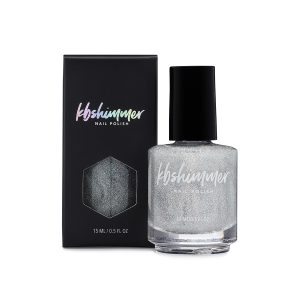
This March 15th, KBShimmer is launching its debut collection featuring the all new look.  Matte black and holographic foil accented boxes, brushed silver logo imprinted on the bottle, and 5 free base set the bar high for KBShimmer’s 10th year in business.  The 9 piece space themed collection features 8 multichrome and duochrome polishes and a galaxy holographic top coat.  Retailing for $10 each, this out of this world collection launches Thursday March 15th at KBShimmer.com and select retailers.

 Just A Phase – Just like the phases of the moon, this magnetic multichrome polish has many different looks.  This polish shifts from shades of red, bright pink, gold, green, copper and peach.

Solar Flair – If you are looking for a fiery polish, this magnetic multichrome is it!  Like the molten flares of the sun, this polish shifts from shades of gold and yellow, to hot oranges and reds.

Let’s Do Launch – When the space shuttle was launched going off to the moon, I can only image the  families gathered around the television, in the pastel shades of the late 60’s, anxiously awaiting those first lunar steps.  This magnetic multichrome echoes those soft peach and pinks, lime green, and grass green shades of that eras fashion.

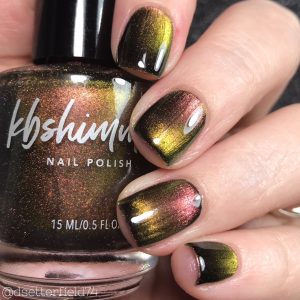
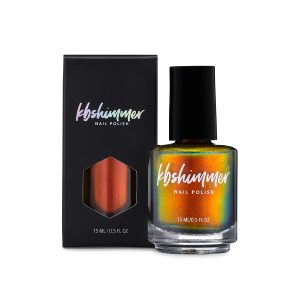
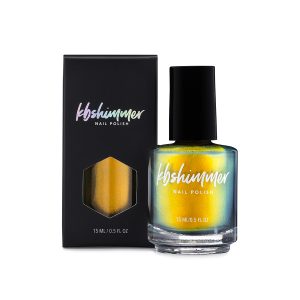
Thrust Issues – Burning bright in the sky, the golden flames of the rockets carrying astronauts into orbit are etched in the minds of those that have viewed space launches.  This magnetic multichrome shade imitates those golden hues with a range of yellows, gold and oranges that dance like flames on nails.

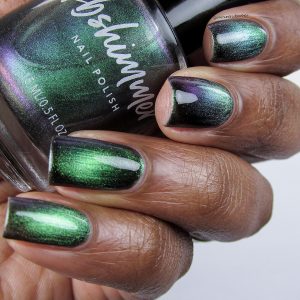
You Rocket My World – Earth, with is rolling hills of green, vast blue oceans, and rich and vibrant jungles must be a wondrous site to see in space.  This magnetic multichrome starts with vibrant shades of green and shifts through shades of lavender and silver.

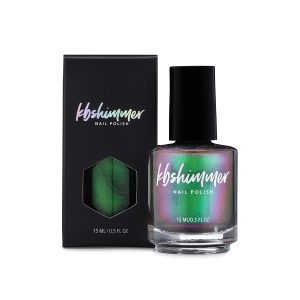
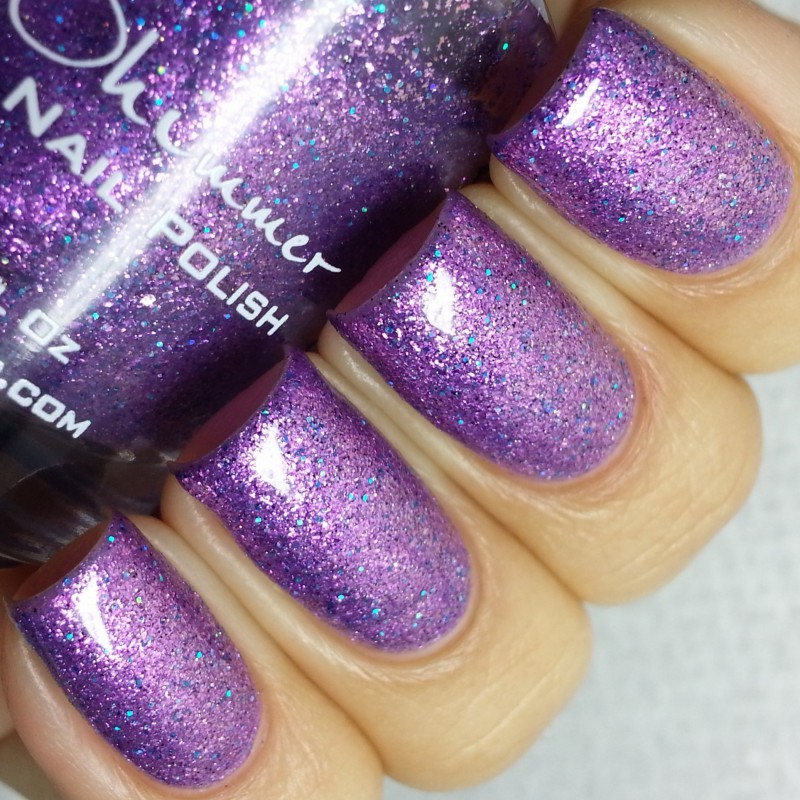
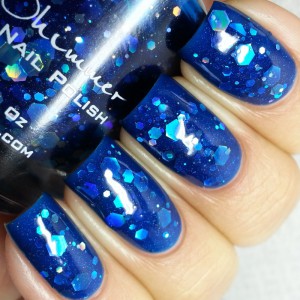
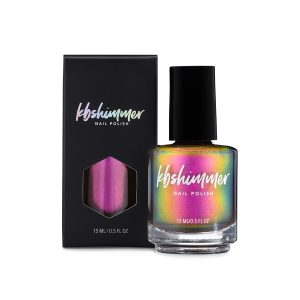
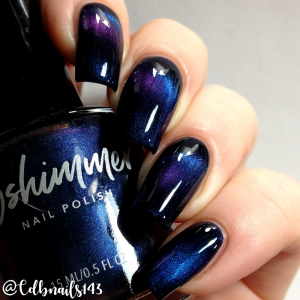
No Comet – Like a comet shooting through the sky, this magnetic multichrome shade mimics the colors of those nightly wonders.  This magnetic duochrome shows off a vibrant blue, flipping to a majestic purple.  Top with A Star If Formed for galaxy like nails.


Spaced Out – This magnetic multichrome is full of fantastic flipping pigment.  Purple and pink hues give way to shades of green blues and in photos and almost silver color appears.  This is one shade you won’t want to take off!

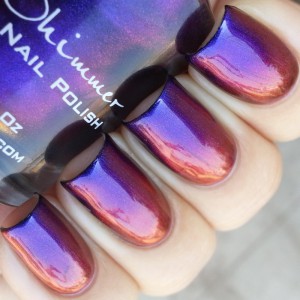
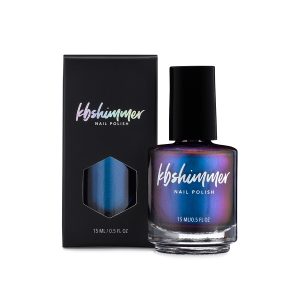
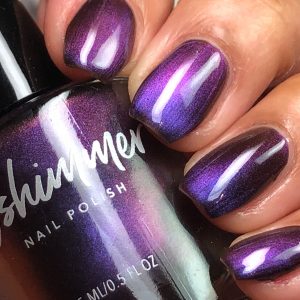
Orbits and Pieces – Throughout space, orbiting around planets you will find billions of pieces of stars, planets, and even stuff from earth.  Imagine finding technology from earth light years away, crazy!  This magnetic duochrome polish is crazy as those pieces of space junk.  A vibrant magenta pink hue flips to a bold blue toned purple, for a shade fit for infinity and beyond.


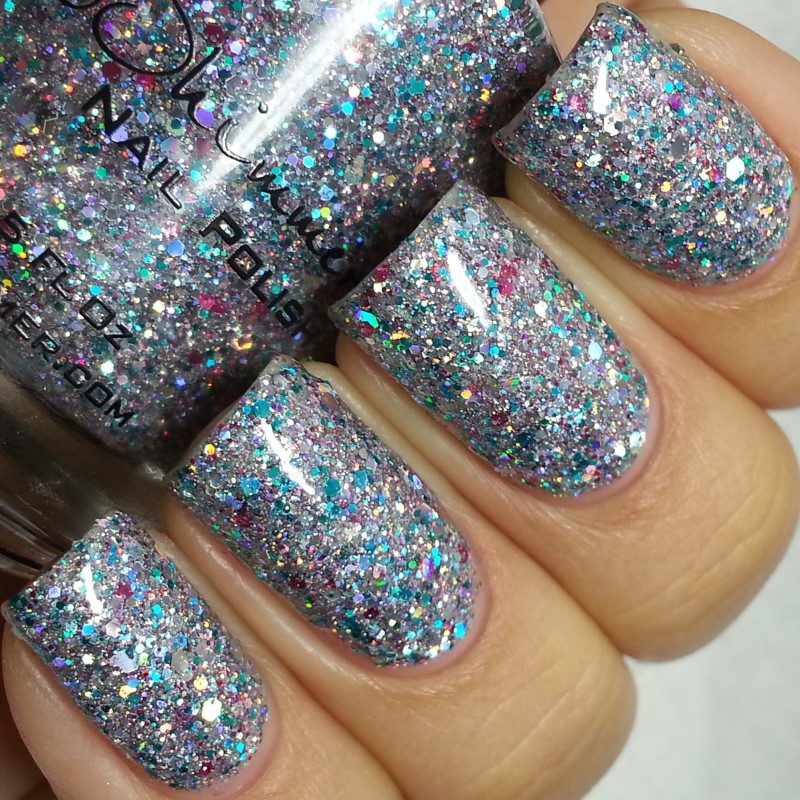
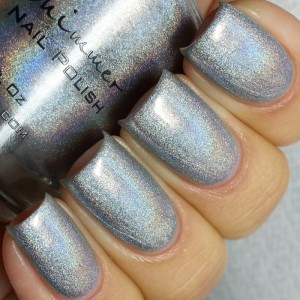
A Star Is Formed – What is a space collection without the stars?  This holographic top coat is loaded with micro holo flakes that shimmer and sparkle in the light.  While not quite a linear holo, theses micro flakes produce a beautiful holo flame that paired with any of our magnetic polishes twinkle more than any galaxy in the sky.

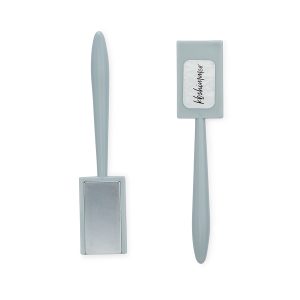
KBShimmer Magnet – A strong magnet with the “cat’s eye” or linear pattern.  Retails for $3.00

The countdown has started, KBShimmer’s new look and the Launch Party Collection will blast off 03/15/18. Polishes will retail for $10; other product pricing will vary. For a limited time, get the whole collection, magnet, and multichrome bag for $90.00.

The Fish Ate My Feet!

Every since I was introduced to pedicures, getting my feet worked on has been my simple pleasure!  I have had pedicures on vacation, at home, used online products to peel away the dry skin, dipped my feet in wax, but nothing has been as strange as having a fish pedicure!
Fish1
I recently traveled to Playa Mia Resort for a day trip while on a cruise.  At the resort, they have a tiny stand where the Garra Rufa fish live.  These fish are sometimes referred to as Doctor fish, as they eat the dead skin, leaving fresh, healthy skin behind.

I asked a few questions before having my pedicure.  How are the tanks cleaned, is the water fresh, and do you feed the fish?  The tanks are cleaned daily, and the water recirculates through a filter (you can see the tanks look super clean and water crystal clear).  The fish are also fed daily like normal fish, so they do not starve them!

Fish2

Unlike normal pedicures where you have an tech that works on your feet, here you just place your feet in the water (after being washed off and sanitized) and the fish go to town!  You instantly feed a slight buzzing, nothing that tickled me or my husband (yes, I made him try it too!).

Fish3
For the next 20 minutes we sat, chatted, and listed to soothing music while the fish did their thing.  It was a very relaxing break from the hot sun, and after my feet felt smooth and silky.  There was not any polish or lotions involved, just the fish, so I guess I would call this a modified pedicure.

fish4

Here is a video of the fish in action.  It is cool to see the little “whiskers” moving while they are searching for nom noms.

Not sure how you feel about fish pedicures, here is the CDC’s take on them.  Do I think I would do it weekly, no, but for a fun vacation treat, yes!
https://www.cdc.gov/healthywater/hygiene/body/fish_pedicures.html

What is the strangest, or best pedicure you have had.  Let me know by commenting on this post!

Berricle & Birthstone Giveaway

Giveaway Alert! We’d love to introduce you to our favorite conflict-free jewelry brand BERRICLE @berricle! They have lust-worthy styles that are wonderfully affordable and incredibly dazzling!

And now you have the chance to win a complete birthstone collection products from us + a $100 gift card from @berricle! 

To Enter visit: www.berricle.com/kbshimmer

wondrously-polished_BERRICLE_KBShimmer_nail-art_jewelry 6 wondrously-polished_BERRICLE_KBShimmer_nail-art_jewelry 7 wondrously-polished_BERRICLE_KBShimmer_nail-art_jewelry 11 wondrously-polished_BERRICLE_KBShimmer_nail-art_jewelry 17 wondrously-polished_BERRICLE_KBShimmer_nail-art_jewelry 19 wondrously-polished_BERRICLE_KBShimmer_nail-art_jewelry 20

Photos by Lindsey of  http://www.wondrouslypolished.com/

P.S. Spring collection previews are going up at your favorite blog sites and on Instagram.  Two 7 piece collections launch 03/15.  We will be sharing all the blog posts that we see on our Facebook Page, so head over to check them out!

SpringCollage2000


Color Me Chic: 5 Ways to Match Your Jewelry and Nails

Color Me Chic: 5 Ways to Match Your Jewelry and Nails

by Jade McCampbell of Jewelry TV | Jun 01, 2015

Color Me Chic: 5 Ways to Match Your Jewelry and Nails

Summer is all about vibrant color and fun in the sun. Kick up your color this summer by matching your polish with colorful gemstone rings and bracelets! Jewelry TV has partnered with KBShimmer to bring you perfect pairs of nail polish with juicy, gemstone jewelry. KBShimmer is your one stop shop for dynamic nails – from holographic shimmer to multichrome metallics your mani is sure to shine!

Turquoise Waters

The color turquoise is always a summer staple – it immediately brings me to memories of floating in the pool on hot summer days, or looking out on beautiful, blue water at the beach. Take one look and you’ll know that this Glacier Topaz™ jewelry is anything but cold! They match perfectly with the “Laugh Myself Lily” nail polish – a soft turquoise color inspired by floating water lilies.

Topaz and “Laugh Myself Lily” KBShimmer Polish (SKUS: ANH195, EOH249, DOCZ199, DOCZ812B)

Topaz and “Laugh Myself Lily” KBShimmer Polish (SKUS: ANH195, EOH249, DOCZ199, DOCZ812B)

Lilac Love

Rose gold and lilac collide in a gorgeous match! I love how light and airy this combination is. Kelsey’s orchid amethyst jewelry in rose gold over sterling silver absolutely glow with her holographic, purple-pink manicure. The ring to the right was probably my favorite of the shoot – I’m truly a sucker for lilac colored gems and this ring is even more luscious in person, if you can believe it!

Orchid Amethyst and “Thistle Be The Day” KBShimmer Polish (SKUS: MAE040, STJ494, STJ279)

Orchid Amethyst and “Thistle Be The Day” KBShimmer Polish (SKUS: MAE040, STJ494, STJ279)

 Keeping Chrome

Mirrored sunglasses are everywhere right now, and with the help of Mystic® Topaz jewelry and “Look on the Nightside” nail polish you can keep the chrome even when your shades come off. It’s amazing that KBShimmer has a polish that imitates the shifting shades of my Mystic® Topaz Rings and bracelet– from green, to violet, to blue! Try this look and you’re sure to stand out this summer, the nail polish alone is a conversation starter!

Mystic Topaz and “Look on The Nightside” KBShimmer Polish (SKUS: ANH161, JWH108, MKH065, JWH109)

Mystic Topaz and “Look on The Nightside” KBShimmer Polish (SKUS: ANH161, JWH108, MKH065, JWH109)

Punch of Purple

Jewel tones aren’t off limits this summer. Add a little guilt-free drama to your ensemble with these striking deep purple amethyst rings. Personally, I love all shades of purple and the darker hues give a rich and exotic feel. Even if you don’t have a vacation planned to an exotic locale this summer, you can put these on and still feel like a jetsetter! These rich amethyst hues pair perfectly with “Pigment of My Imagination” polish.

Amethyst and “Pigment of My Imagination” KBShimmer Polish (SKUS: STZ028B, STI881, STZ028R)

Amethyst and “Pigment of My Imagination” KBShimmer Polish (SKUS: STZ028B, STI881, STZ028R)

Pretty in Pink 

Melissa is pretty in pink with her pink Bella Luce® and Pure Pink™ Mystic® Topaz rings and bracelets. No color is quite as flirty and feminine as pink! Her pink jewelry and manicure capture the fun, carefree spirit of summertime. Spend an afternoon in the sunshine and you’ll see how they peachy rose-colored polish, “Blush Money”, shimmers with hints of gold!

Melisssa RED

Pink Jewelry and “Blush Money” KBShimmer Polish (SKUS: MLH186, BJJ900, BJK082, BJK294)

Who doesn’t love a fresh manicure and new jewelry? No one! Get out there and make a statement this summer. It’s as easy as a fresh coat of polish and a cocktail ring!

Nail hands all together

Jade


Do you want to win a KBShimmer prize pack and $300 Jewelry TV shopping spree?  Click the linked picture below to find out how!

SparkleShimmer_Banner

Gel, Jelly, Crelly, What ?!?

Nail polish and nail art are rapidly growing beauty staples.  As nail polish grows, so does the terms we use to describe nail polish.  Have you wondered what a creally is?  What is the different between gel and jelly?  Listed below are some of the most used terms below with examples, hopefully this helps you navigate the polish world!

Did we miss anything, have a burning question?  Ask below in the comments and we will do our best to answer, and add to the post if needed!

Terms:

3 Free:   A polish that does not contain Toulene, Dibutyl Phthalate (DBP) & Formaldehyde in its ingredients.

4 Free:   A polish that does not contain Toulene, Dibutyl Phthalate (DBP) & Formaldehyde, and Formaldehyde Resin. KBShimmer is 4 Free.

5 Free: A polish that does not contain Toulene, Dibutyl Phthalate (DBP) & Formaldehyde, and Formaldehyde Resin and Camphor.

Boutique/Boutique Polish: Polish companies that may be owned and designed by one (or a few) people, but are made and bottled in labs. RBL, Cult Nails are examples. Some companies in this category may select predesigned polishes from a lab vs. designing on their own, but still often connect directly with the consumer.

Crelly:   A polish finish that can be layered to cover the nail line, but still has some sheerness to allow glitters to show through.

Example: Oh Splat!  A white crelly polish that has a rainbows worth of glitters that shine through.

IMG_20140120_173642

Crème/Cream:   An opaque polish with a glossy finish.  Usually opaque in 1-2 coats and that completely covers the nail line.

Example: Stonewashed, an opaque polish that covers in 1 coat.

StonewashedSwatch3

Duochrome:  A polish that shifts between two colors depending on the angle and lighting.

Example: Lilac Dreams (Now discontinued), a lavender polish that shifts to pink depending on angle

IMG_20140121_152526

Foil Method:   The technique used to remove glitter (and gel) nail polish.  A cotton ball/cotton pad and pure acetone is placed on nail, the foil is wrapped around the finger and cotton and left for 5-10 minutes.  Glitter or gel polish should slide right off.  Tutorial Here

FoilMethodRemoval

Gel: Polish that is cured or hardened with a special light. This polish is most often found in salons, and will not harden without the use of special lights.  This is a type of polish, not a finish.

Glitter Top Coat:   A type of polish finish that has glitter suspended in a clear base, best worn over a cream color.

Example: Clown Puke, our multi-colored glitter topper.

IMG_20140203_142715

Holo/Holographic:   A type of glitter that reflects and refracts light, giving off a rainbow shine when viewed in the light.

Example: Hexy BikiniIMG_20140712_173846

Indie or Indie Polish:   Nail polish that is designed, created, and sold by independent owners. Most often, this term is used to mean that polish is hand blended and bottled by the designer directly for sale to the public. Indie company owners often connect via social media directly with the consumer. KBShimmer is owned by Jason and Christy Rose, who still hand make most of the products offered, and are proud to offer unique glitter combinations to adorn your nails.  You can find Christy running the KBShimmer Facebook and Instagram Page.

Jelly: A colored polish that has a transparent finish that may show the nail line. Jelly polishes are not the same as gel polish.

Example: I Got A Crush On Blue, a blue jelly polish with holographic glitters

IMG_20140123_120901

Linear Holographic:   A version of holographic glitter finish that is so micro fine, when applied the glitters line up to form the rainbow effect in a line, strongest in sunlight or direct light.

Example: PT Young Thing, a silver linear holographic polish

IMG_20140514_064233

KBShimmer PT Young Thing outside

Mainstream:   A polish made by a large company such as Zoya, China Glaze, OPI, which can be found in larger stores such as Wal-Mart, Ulta, Sally’s Beauty. These polishes are mass made and there is little, if any direct interaction between the owner(s) and consumers.

Multichrome:   A polish that shifts between multiple colors depending on the angle and lighting.

Example: Pigment Of My Imagination, a polish that shifts from golds, to reds and orange, to blue and indigo depending on the angle.

IMG_20140205_102945

Nail Line/Visible Nail Line (VNL): The nail line is the area where the nail passes the skin at the tip of the finger, often this area is whiter in color and therefore can show if polish is sheer or if too few coats of polish are used.

Example: You can see the slight VNL on the ring finger, this is our jelly polish, Bell Of the Mall

kbshimmerbelleofthemall2

Quick Dry: A type of polish that is designed to dry to the touch in 1-2 minutes, and get fully hard within 5-10 minutes. Clearly On Top is a Quick Dry Top Coat, but KBShimmer polishes themselves are not quick dry.

Example: Clearly On Top

ClearlyOnTop1

Texture: A glitter polish that dries to a rough, bumpy finish.

Example: Partners In Lime

IMG_20140513_075932

Vinyl Nail Decal: A sticky nail art sticker made of vinyl that can be left of the nail to create nail art.

Example: Tribal Pieces from the Tribal Vinyl Decal Sheet.

Gradient Tribal

Vinyl Nail Stencil: A vinyl nail piece that is intended to be placed on a nail, then removed to show the color underneath in a pattern.

Example: Wavy Lines

KBShimmer Anniversary Trio Nail Art 3

Big Thanks to all the bloggers who have sent us photos to use, including The PolishAholic, Nail Polish Wars, Adventures in Acetone and LacquerLoon.


And lets not forget to throw in a few memes.

589f0ef4bf7a99b168d28cc5e399bb76

10987331

NailPolishHappy

swatch-hand

How To Use KBShimmer Nail Vinyl Decals

We are so excited to now be offering our vinyl nail decal sheets in 6 different patterns (set for launch 06/20/14).  These are a new product for a lot of people, so we have a step-by-step tutorial below showing how to use the vinyl pieces as a peel off stencil.  To see how we use them as a leave on sticker, see our Tribal Nail Art post.


For a long lasting manicure, start with clean nails.  Use KBShimmer pH Prep to clean and prep nails for base coat.

DecalTutorialStep1

Follow by applying a base coat like Basic Training.  Let dry before moving on to next step.  Completely dry polish is key when using vinyl decals.

DecalTutorialStep2

Use a polish that applies in 1-2 coats.  You want polish to be dry, and too many coats will risk the bottom layers not being dry enough.  I am using Radiant Orchid for my bottom color.

DecalTutorialStep3

Cleaning up now will make final clean up much easier.

DecalTutorialStep4

I strongly suggest that you use a quick dry top coat like Clearly On Top to ensure your nails are dry before the next step.  Using a quick dry top coat will also make cleaning up any mistakes easier.

DecalTutorialStep5

Again, making sure the polish is dry is key for a good turn out.  Wet polish will pull up with the vinyl.

DecalTutorialStep6

I find using a tweezers to remove the vinyl from the sheet works best for me, preserving the manicure on my other nails!  Here we are using our Zig Zag Nail Vinyl Decals.

DecalTutorialStep7

Stick the vinyl to your hand to help remove some of the stick.  If they are too sticky, they can be difficult to remove, or can pull up polish.

DecalTutorialStep8

Using a tweezers helps me place the vinyl pieces, but you can use your fingers.  There are so many ways and design possibilities with these, but I have chosen to line them up for a repeating zig zag pattern.

DecalTutorialStep9

Press the vinyl pieces firmly.  Doing so will help polish not seep under the vinyl, leaving you with crisp lines.

DecalTutorialStep10

Now is the fun part.  Cover the vinyls with 1 coat of your accent color.  I love textures, holographic colors, polishes that cover well in one coat and have visual interest.  For this tutorial, I am using She Twerks Out.  If you want your color only in certain areas, or want different colors between the stripes, use the brush carefully apply polish between the vinyl pieces.  Since I am wanting the same color over the whole nail, I don’t worry about “coloring” between the lines.

DecalTutorialStep11

Once your coat of polish is on, you want to start removing the vinyl pieces as soon as possible.  If you wait too long, you risk pulling up the accent polish you just applied along with the vinyl pieces.  Only paint the accent color one nail at a time to prevent the polish drying before you can get the vinyl removed.

DecalTutorialStep12

Here is the nail after vinyl decals are removed.

DecalTutorialStep13

Clean up any polish you got on the skin and cuticle area.  If you used a quick dry clear coat before applying vinyl pieces, you can also use the clean up brush dipped in acetone to clean up any polish that may have bled under the vinyl.  Lightly dab polish you want to remove with the brush.  Repeat if needed, keeping brush damp, but not dripping wet with acetone.

DecalTutorialStep14

I now follow-up with Clearly On Top to smooth out the manicure, add shine and protect the nails.  Make sure to apply top coat to the very tip of the nail to reduce chips.

DecalTutorialStep15

Finished nails!!  Repeat on additional nails if desired, or use technique as an accent nail.

DecalTutorialStep16


We think our new nail vinyl decals are a easy way to add a fun look to manicures.  Do you have a manicure using KBShimmer nail vinyl decals and polishes?  Send it to us to share on our website and social media outlets.  customerservice@kbshimmer.com  We would love to see them!


NailVinylDecaCollegeNormall

Gradient Tribal Nail Art Using KBShimmer Nail Vinyl Decals

TribalSheetWeeded

Nail vinyl decals are a fun way to add art and design to your manicure.  Today, I am going to show you step by step how to create the summer look below using a gradient technique with Life Rose On, You’re So Shellfish and Chick Me Out along with Eclipse and our new Tribal Themed Nail Vinyl Decals.

Step34


First, start with a white base to make the gradient colors pop.  I used a white from Wet and Wild, but any white will do.  You can see the white on my middle two fingers.

Step1

Next, using a cosmetic wedge, paint on a stripe of each color.  I did this twice for each color as the sponge sucks in the polish.

Step2

Take the sponge and position above nail you want to paint.  In a dabbing motion, use sponge to apply polish to nails.  Try and move it top to bottom a tiny bit to blend the color.  Do this quickly and lightly, as too many dabs or lots of pressure will pick up the polish from the nail leaving bald spots.

Step3

Step4

Repeat on additional nails by again painting stripes on the wedge, touch up any blank spots around nail edge with corner of sponge.

Step5

Clean up fingers with acetone and brush.  Cleaning up now will make additional clean-up easier later in the process.

Step6


Here is the look after clean-up.

Step7

At this point, you can just let the colors dry.  But I like to use Clearly On Top to ensure that the polish is completely dry before moving on to the next step.

Step8

Either way, make sure to wait at least 20 minutes before moving on to the next step so vinyl decals do not ruin polish when removed later on.  Adding a top coat will also help smooth out the look of the gradient and, if you happen to get some polish that seeps under the vinyl decals, the clear coat will provide enough of a barrier between the gradient design that you can use a clean up brush and acetone to remove it.

Step9

When removing nail vinyl decals from the sheet, I like to use a tweezer to grab and place vinyl.  These fine point Tweezerman tweezers are my go to.  Some pieces may have additional cutouts inside that need to be removed before use.

Step10

I remove the desired vinyl pieces from the sheet and place on my hand.  I then remove and place on my hand once more for pieces I want to later remove (those being used like stencils).  This will help remove some of the adhesive that can pull up polish (if polish is not fully dry).

Step11

Using your tweezers, place the vinyl decals into nails in the desired positions.  Press firmly to ensure that polish will not seep under vinyl decals.  Some of these pieces will actually stay on the nail, but for longer pieces like straight lines, let one end overlap the nail for easier removal later.

Step12

We will start with the pinky nail. Paint on a coat of Eclipse, a black cream.  Use a polish that covers in one coat, as you do not want polish to dry before removing vinyl and do not have time for multiple coats.

Step13

Here is the pinky nail covered with paint.  Wait not more then 20-30 seconds before removing vinyl.  If using a quick dry polish, remove right after you finish painting.  Only paint one nail at a time, if you do more the polish may dry before all pieces are removed.

Step14

Using your tweezers, remove vinyl by pulling the free edge up that touches the skin or hangs off the end of the nail. Pull away from your nail in a steady motion.

Step15

Step16

Then, move onto the point finger nail and repeat process on that nail.

Step17

Step18

Step20

The thumb is next.  The thumb has three pieces to remove.

Step21

Step22

Step23

Next, we will move to the middle finger.  This finger has two pieces that overlap for easy removal, and in the middle, the large diamond will also be removed.  Since there are no areas of the diamond, we will use a different technique for removal.

Step24

Paint the nail like the others. Quickly remove both the upper and lower stepped vinyl decals.

Step25

Using the pointy tip of the tweezers, carefully pierce the center of the diamond vinyl.  “Hook” the tip of the tweezers, and pinch tips to help pull up the diamond piece.  You can also use a safety pin.  If you prefer, you can also try and catch the edge of the diamond and pull up to remove.

Step26

Here is it removed.  At this point, the ring finger has a vinyl piece on that we will be leaving in place as a nail sticker. Clean up excess polish on cuticles as done previously with brush and acetone.

Step27

We can also use the bonus smaller diamonds and triangles as accent pieces.  For the middle finger, we will be using a smaller diamond from inside the ring finger piece.

Step28

Center  in the blank diamond area and place on the nail with the tweezers.  Press down firmly.

Step29

From the pointer finger vinyl decal pattern, we can pull tiny triangles to use as accents on the pink nail.

Step30

Place on the pinky in desired positions.

Step31

When last decals are placed, ensure all pieces are stuck to the nail by pressing firmly and follow with 1-2 coats of Clearly On Top to add shine and a protective finish to the nails.  It is perfectly fine to use top coat over the vinyl decals to seal in place. Nail Vinyl decals are not reusable.

Step32

There you go!  A fun, summery tribal look made easy with vinyl decals.

Step33

Step34


Mix And Match Manis – Guest Post From Jenny of Lavish Layerings

Hi everyone! This is Jenny from Lavish Layerings and I’m honored to be guest posting for KBShimmer today! I’ve long been a huge fan of their glitter polishes and I have recently been doing a number of nail art looks utilizing their new creme line, which is equally fantastic!How many of you would like to give nail art a try but just don’t have the time? I really enjoy nail art and I often do full blown nail art manis when time permits, but sometimes I cheat a bit. If you only do the nail art on a few nails instead of ALL of your nails, the task doesn’t seem quite as daunting. I have seen more and more ladies on my favorite blogs and on Instagram doing looks like these, and I like to call them Mix and Match Manis or accent nails. There are so many nail art techniques that are very simple, but when incorporated in the right way can add a lot of pizzazz to your manis without a lot of fuss.

First up, I thought we would start with a simple glitter gradient. I started off with a base of Sky Jinks on all of my nails. I then used 1 coat of Squared Away on all of my nails except the middle two. On the middle and ring finger only, I did a glitter gradient. No special tools needed; just use the brush parallel to the nail to dab on glitter to about halfway down the nail.
Sky Jinks and Squared Away

The trick to a glitter gradient is to wipe off most of the excess polish before you begin dabbing so that you don’t get big clumps of glitter in one spot. If you want, you can even place glitter pieces exactly where you want them using the tip of your brush. Once you get your gradient how you like it, just topcoat and you are done! Now you have a little more interest in what would have been just a normal glitter mani with very little extra effort! Squared Away is discontinued from KBShimmer’s line (I’m sure you can find it on blog sales still), but you can use this technique with any glitter topper. It would look very cool with one of their newer glitter toppers, Rush Flower Traffic.

Next I have a mani that I doesn’t really incorporate nail art so much, but it still has some added visual interest. For this mani, I chose two polishes that I thought complimented each other well: A Touch of Glass and Laugh Myself Lily. I used Laugh Myself Lily on the middle two nails and A Touch of Glass on all of  my other nails. After A Touch of Glass had dried completely, I added a single pink stud at the base of each of those nails. Be sure to seal in the studs with topcoat after you apply them (I used 2 coats of topcoat).

A Touch of Glass and Laugh Myself Lily
The contrast of the glitter and creme polishes is really nice and the studs compliment the pink glitters in Laugh Myself Lily to make a really cohesive look. If you don’t have any nail art studs (or don’t like something sticking up off of your nail), you can use pieces of glitter in the place of them or even use a dot of a contrasting polish made with dotting tool/bobby pin to acheive a similar look.

This next look incorporates a nail art technique from The Nailasaurus, a blogger who (to me) is one of the pioneers of the idea of these Mix and Match Manis.  This mani was inspired by Watercolor, which I used on my pointer and pinky nail here. The name and beautiful colors of this polish made me want to incorporate a nail art look that looked like a watercolor painting. I had recently seen The Nailasaurus’s tutorial for Nimbus Nail Art, and thought this technique would be perfect to acheive that effect.

Life Rose On, Watercolor, and Sky Jinks

For this technique, you only need a few creme polishes, acetone, and cotton swabs (Q-Tips). I started off with a white base and then used Life Rose On and Sky Jinks to do the Nimbus effect. Basically, you dab some of your creme polish on a disposable surface (I used a paper plate) and then thin it out with acetone until it is very runny. Then you use a cotton swab to dab random dots all over your nails and then repeat with your other color(s). The Nailasaurus’s tutorial is very thorough, so I will let you refer to that for a full rundown of the technique. I will say that I believe that I thinned my polishes even more than hers and made sure that my cotton swab was completely soaked in acetone so that the effect was very light and ethereal, like a watercolor painting.

Finally, I have a little more of an advanced technique for you. I know so many people want to give water marbling a try but are hesistant to do it because it is SO time consuming. I good way to get your feet wet is to start out with only doing a few marbled accent nails. For this mani, I used Honeydew List and Life Rose On. I used Honeydew List as my base and then added the marbled accents on my middle nails. After I got done with the marble, I went back in and added a few random dots of Life Rose On with my dotting tool to add a bit more interest.

Honeydew List and Life Rose On

There are a million tutorials for water marbling out there that you can find via Google search, so I will not bore you with yet another one. I will however give you a few tips and tricks that I have learned along the way to help you have a successful water marbling experience.

1) Be sure you are using filtered water (I used bottled water) and not tap water for your marble. If you don’t do this your polish won’t spread properly.
2) Be sure your water is room temperature or even lukewarm to help the polish spread well across the water’s surface.
3) Do not set up your marbling station in front of a fan or vent. The blowing air will cause the polish on the surface of the water to dry too quickly and you won’t be able to create your designs.
4) After you tape off the skin around your nails, brushing a little nail oil on the small bit of skin/cuticle that is between your nail and the tape will really aid in clean-up.
5) After you dip your nail in the water, be sure to completely remove the excess polish off of the surface of the water before bringing your nail back out of the water or it will get on your nail and mess up your design. Just blow on the surface of the water to dry the excess polish (if it is not already dry) and drag an orangewood stick across the surface of the water to collect the dried polish.

I really hope that you all have enjoyed my post! Although it may be a bit basic for you nail art experts out there, I hope it will inspire some of you nail art newbies and those of you who are pressed for time to explore these techniques a bit! Another cool thing about Mix and Match designs is, you don’t have to stop at two different nail designs if you don’t want to! You can take a peek at ChitChatNails to see the history of the Skittlette Mani where you have 3 or more different complementary nails. Basically, the possibilities are endless with this sort of Mix and Match mani.

A special thanks to Christy for allowing me to share with you today! If you want to see more of my nail art designs, be sure to check out my blog, Facebook, and Instagram!

Nail Art For “Shorties” – Guest Post by Dani of From Polish With Love

Good morning Polish Peeps!! I’m Dani and I’m the nails behind From Polish, with Love! I’m so excited to be doing a guest post over at KBShimmer’s blog!! KBShimmer is one of my favorite indie polish brands so this is quite the honor!! Christy sent me some of the new Spring 2014 Collection to review and I knew as soon as I saw the creams that I wanted to do some nail art but I recently had a break so I figured what better opportunity than to do some nubbin’ ( or shorties ) friendly nail art!! The techniques I’m showing you today are so easy to do and really will work for any length. This is also my first step-by-step tutorial so please bear with me!!

This is what you will need. If you don’t have dotting tools, household items will work!! You can use the end of a bobby pin, toothpick, anything really!

Polishes are Pansy-Monium, Sky Jinks, and A Touch of Glass. You will need a good base coat and top coat. I used KBShimmer’s Basic Training base coat and Clearly on Top top coat. Tools needed are a striping brush and dotting tools of various sizes
First you want to start off by prepping your nails with a good base coat. I like using KBShimmer Basic Training Base Coat. It really helps the polish cling to your nail and extends the life of your manicure!! It also helps to create a smooth base to start.

I applied A Touch of Glass on all nails and let completely dry. You really need to allocate time for this so you don’t disturb your base. If you’re pressed for time, just apply a coat of Clearly On Top and let dry for a few minutes and you should be set to continue with the art since it dries pretty quickly!

1. For my index finger, I decided to do a funky french tip with just some simple lines. I started off with applying Sky Jinks with my striping brush in two over-lapping lines.

2. I then applied Pansy-Monium in two thicker lines just below Sky Jinks. Apply top coat and you’re done!!

3. For the middle nail I decided to do a combo of lines and dots! I started off by taking my striping brush and with Pansy-Monium, making 3 lines vertically down the whole length of my nail but leaving plenty of space in between each line. This is where the dots will go!!

4. Then using a small end of your dotting tool and Sky Jinks, make dots down each “row”. Seal with top coat!

5. For the index I decided to do a simple “cloud” design!!

I started by taking Pansy-Monium and using the applicator brush, making 3 thick lines starting at a bit above the middle of the nail bed and making my way down to the tip. You want to cover the whole nail, no spaces. The edge of your cloud needs to be staggered so it’s best to not make them all the same height. If your “cloud” edge isn’t as rounded the first time, you can always take some more polish on your brush to the ends of the cloud to fine tune them!

6. Let Pansy-Monium dry or apply Clearly On Top and you can finish off the cloud with the same above steps using Sky Jinks!!

7. For my pinky I decided to do a funky gradient “dotticure” so you will need various sized dots for this one.

I started off randomly dotting Sky Jinks in different sizes on my pinky. *Please excuse the blurry pics. My camera decided to misbehave and wouldn’t focus as hard as I begged!

8. Then taking Pansy-Monium, I filled in some of the empty spaces with assorted sized dots. I then took Sky Jinks once more and made a few more dots til it was to my liking!

I hope you liked the easy nail art I created with these 3 shades! I know sometimes having shorter nails makes you feel like you have no room for nail art but hopefully these designs will change your mind! I have short nail beds and I find these all very flattering!! Show those nubbins some love!!!!

I want to give a huge thanks to Christy for having me today!! I hope you all enjoyed my very first step-by-step tutorial!!! Now that I have gotten my feet wet this won’t be my last! Make sure to check out my blog and Facebook for more nail art!! Have a great day!!!


BIG thanks to Dani for such a detailed guest post.  I rock short nails often, so it is lovely to see nail art that works for any length of nail.  Thanks again Dani!  Christy – KBShimmer

Stamping With The Spring Creams – Guest Post by Kirby of The Mercurial Magpie

Hey, everyone! I’m Kirby, the blogger behind The Mercurial Magpie!  I’ve been a big fan of KBShimmer ever since I discovered the world of handmade polish and I’m super excited to be posting here today!

So, let’s talk creams. To a polish lover, are they always the most exciting thing? Your first thought might be no, but I say…YES! You see, they’re incredibly versatile. On their own, they can be a nice palette cleanser or pop of color for an accent nail, maybe even a base for nail art! But oh, reader, their appeal for me doesn’t stop there. One word- stamping!

It’s the first question on anyone’s minds when they read about new cream colors- “Yes, yes, you claim it will fold my clothes, wash my car and have dinner on the table when I get home from work, but WILL IT STAMP?” Is that just me? It is? Oh. Well, regardless, it’s certainly the first thought that I had when the press release for these came out. I’m happy to report that for the most part, they do! I tested them all out and some of the lighter shades are very subtle if not stamped over a light base, but the darker colors all work perfectly. I have three combos to show you here today!  The first combination I did was to use Pansy-monium over My Life’s Porpoise. I used KBShimmer Clearly On Top as a top coat for each of these. I used a flower design from the Moyou London Suki 01 plate that kind of reminded me of the  KBShimmer logo.

kbshimmer-my-life's-porpoise-with-pansy-monium-stamping

The second combination I did was using Eclipse over Chick Me Out. This color combo was screaming for a bee stamp, but unfortunately I didn’t have one! What I do have is a plate full of awesome bird stamps, so I used a couple of designs from Messy Mansion’s MM14 plate.

kbshimmer-chick-me-out-with-kbshimmer-eclipse-stamping

The last combination I did was using Sky Jinks over A Touch Of Glass This felt like a very ocean-y duo so I decided to use this cute fish stamp from Moyou London’s Sailor 05 plate.

kbshimmer-a-touch-of-glass-with-kbshimmer-sky-jinks-stamping

There are plenty of ways these shades can be mixed and matched for stamping & I hope this post inspires you to try some out yourself! I’d love to see them if you do! If you’d like to see more from me (including some future KBShimmer-centric posts!) you can check out my blog (http://www.themercurialmagpie.com/), my Facebook (https://www.facebook.com/themercurialmagpie) and my Instagram (http://instagram.com/themercurialmagpie#).  Thanks for reading!