Category Archives: News

Winter 2015 – So Much New and Winter Promotion

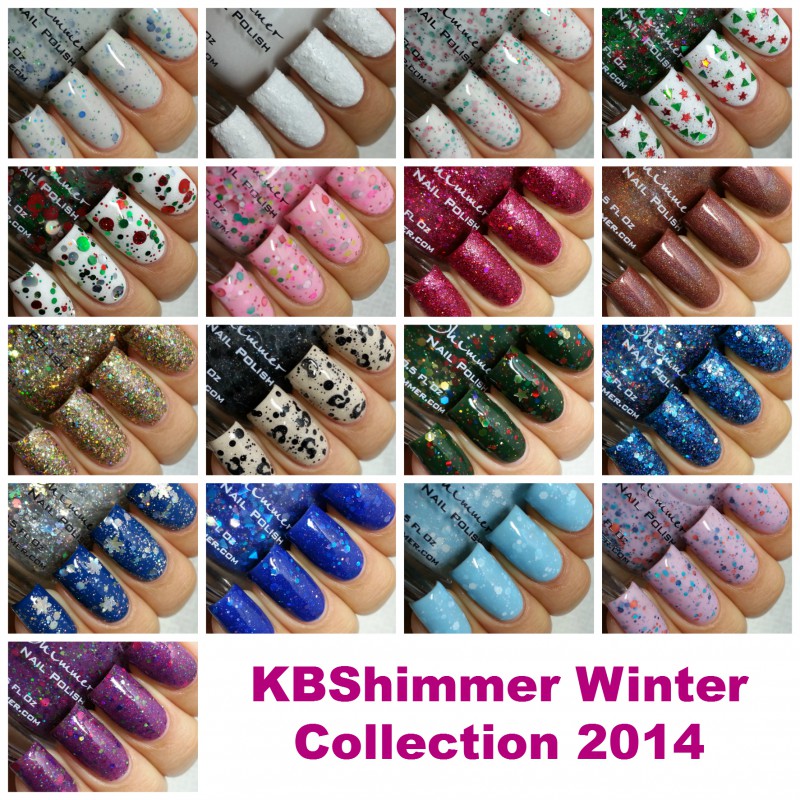
This winter we have a lot of new coming your way.  New polishes, new water slide decals, new nail vinyls, new lotion bottles, limited edition mani shots, whew, I exhausted myself typing all of that!

On Monday, November 2nd, these new items launch on KBShimmer.com.  Read below for a preview of the new items, and details on our winter promotion!
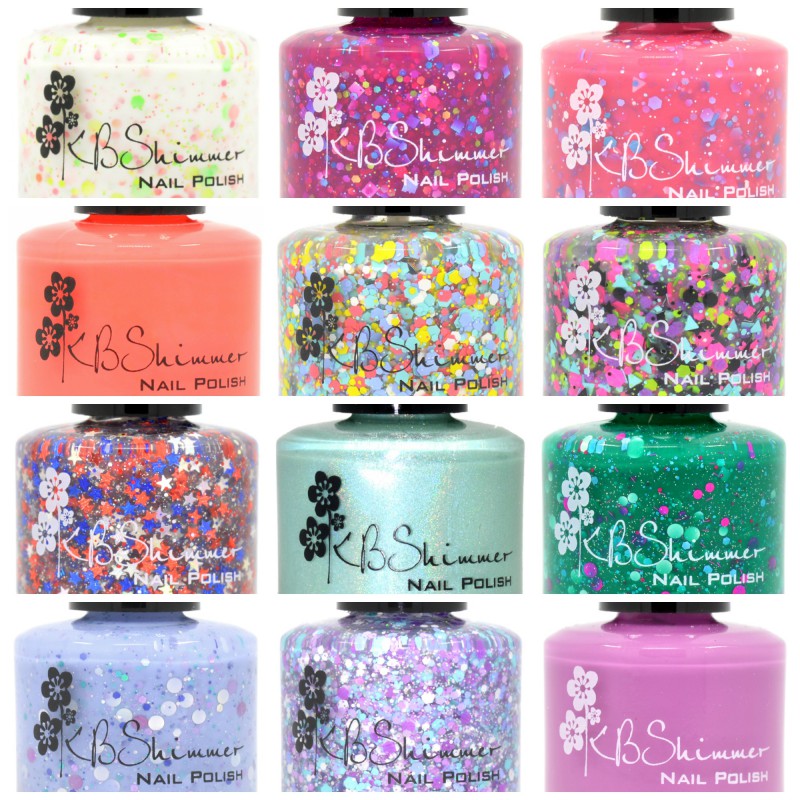
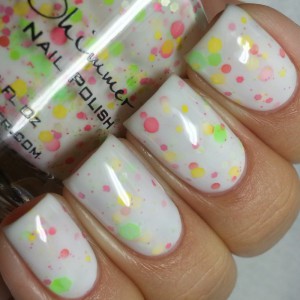
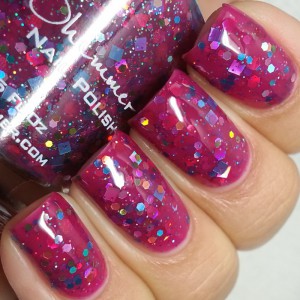
WINTER POLISHES

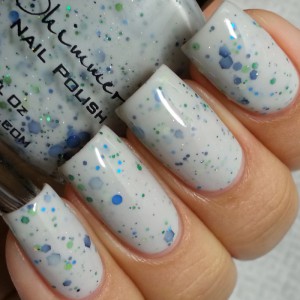
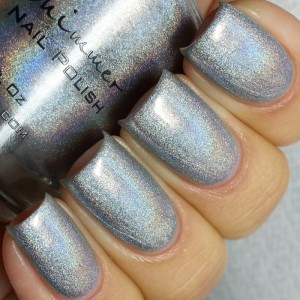
Fleece Navidad – A soft silvery light grey polish with holographic sparkle and blue micro flakes that shimmer in the sun.

IMG_20151012_110558

Smoke Signal- A smoky light gray polish with orange, red and aqua holographic glitters. This crelly is best in 3 coats.

IMG_20151011_181853

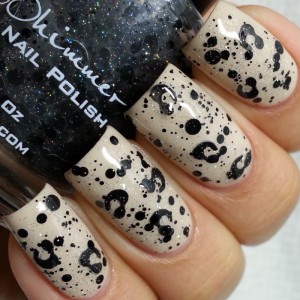
Owl Miss You – A soft beige neutral tan, this feathery polish is filled with golden metallic flakes and a bit of coppery metallic shimmer.

OwlMissYou2

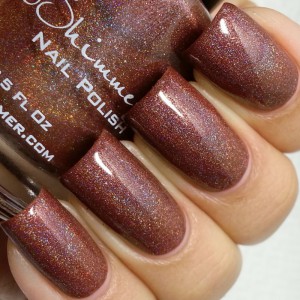
Yule Worthy-  A warm burgundy leaning, chocolate brown polish with micro metallic flakes.

IMG_20151012_150210

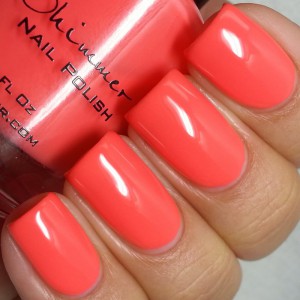
Chilly Pepper- A true Christmas red cream with full coverage in 2-3 coats.

IMG_20151012_135855

For Fox Sake – A dusty red leaning orange, this cream is perfectly fox in 1-2 coats.

IMG_20151012_123129

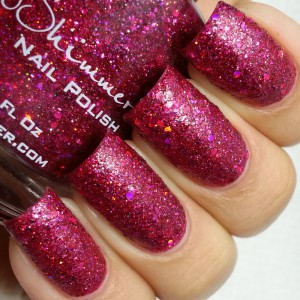
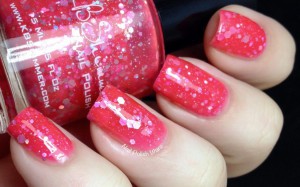
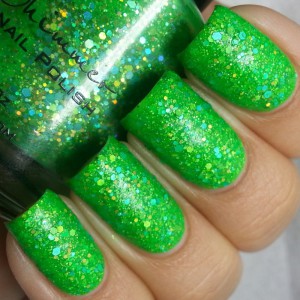
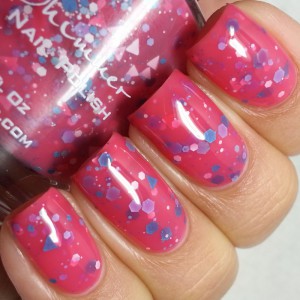
How Corn-y – An Indian corn inspired polish with burgundy, gold, red, and orange glitters in a creamy orange base.

IMG_20151011_165622

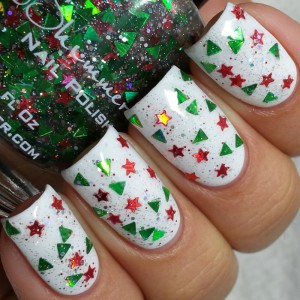
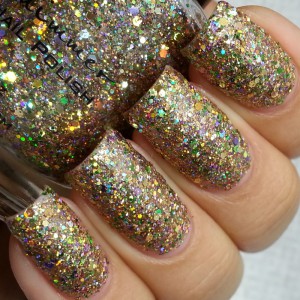
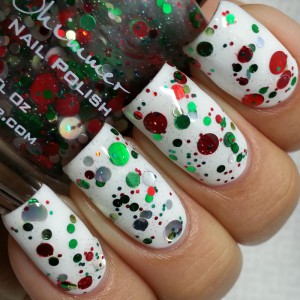
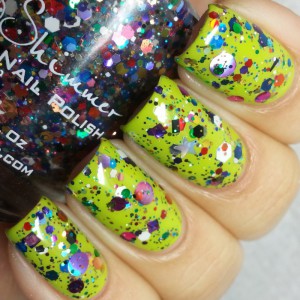
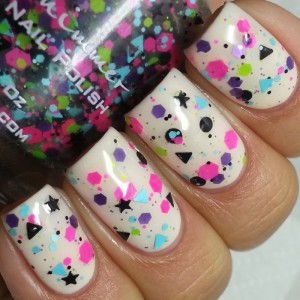
Toying Around – 2015 Toys For Tots Polish – When imagining Santa’s workshop, we can’t help but think it is an explosion of colorful toy parts and wrapping paper.  This toy inspired polish is filled with a rainbow of colorful matte glitters in stars, squares, circles, triangles and hexes. A bit of micro sparkle adds the perfect touch to this glitter topper.  Ideal for jazzing up any holiday manicure or as a stocking stuffer, $4 from the purchase of each bottle will be donated to Toys For Tots.

IMG_20151008_182957

toys-for-tots-logo-vector2

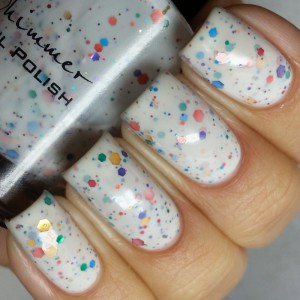
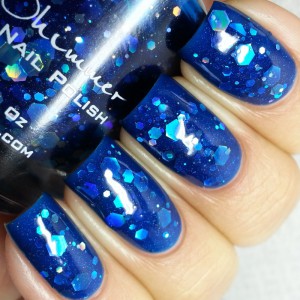
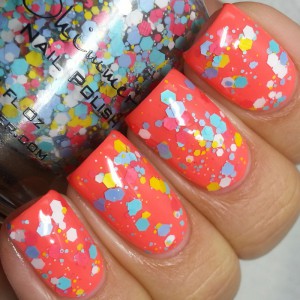
sELFie – A holiday holographic glitter topper perfect for pairing with Chilly Pepper, or use alone for a full coverage textured look.

IMG_20151012_143008

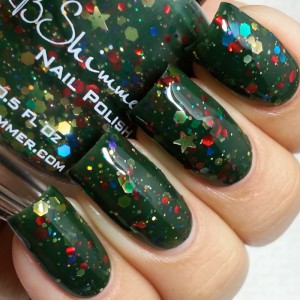
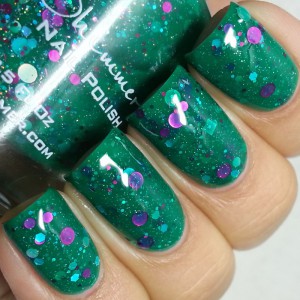
Kind Of A Big Dill –Perfect for those that love a pickle on their Christmas Tree, this deep, near forest, green is loaded with micro and small silver holographic glitters that shine in the light. Perfect in 2-3 coats.

IMG_20151012_144459

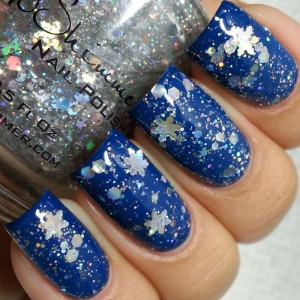
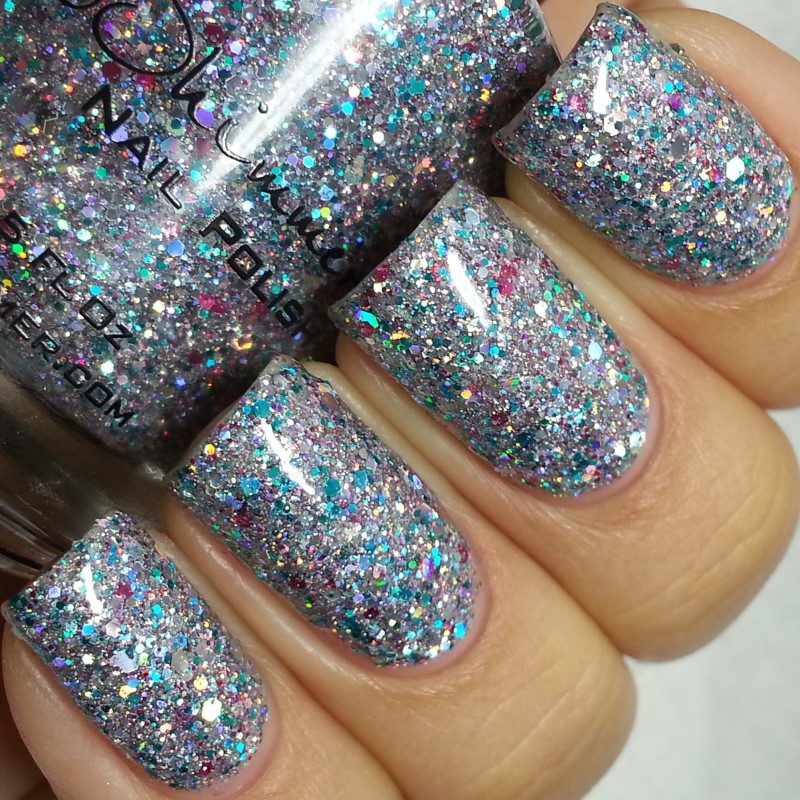
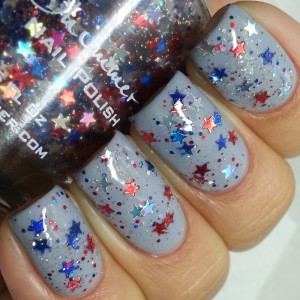
Oh Holo Night – A blingy holographic glitter topper featuring sliver and blue holo mini stars.

IMG_20151012_111641

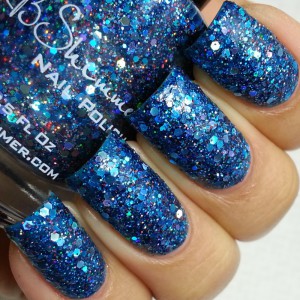
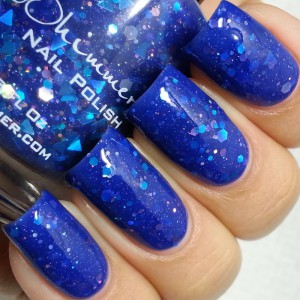
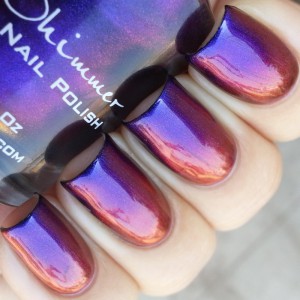
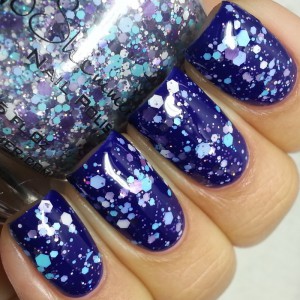
Claws and Effect – A dark purple leaning navy holo polish with blue/pink shifting glass flakes.

IMG_20151012_151831

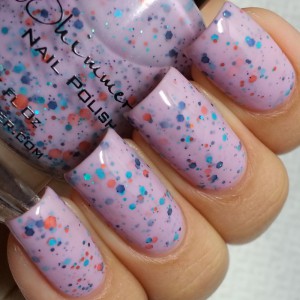
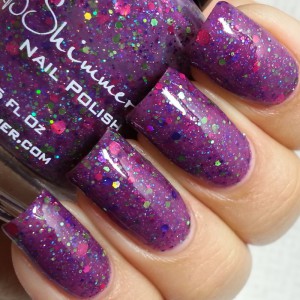
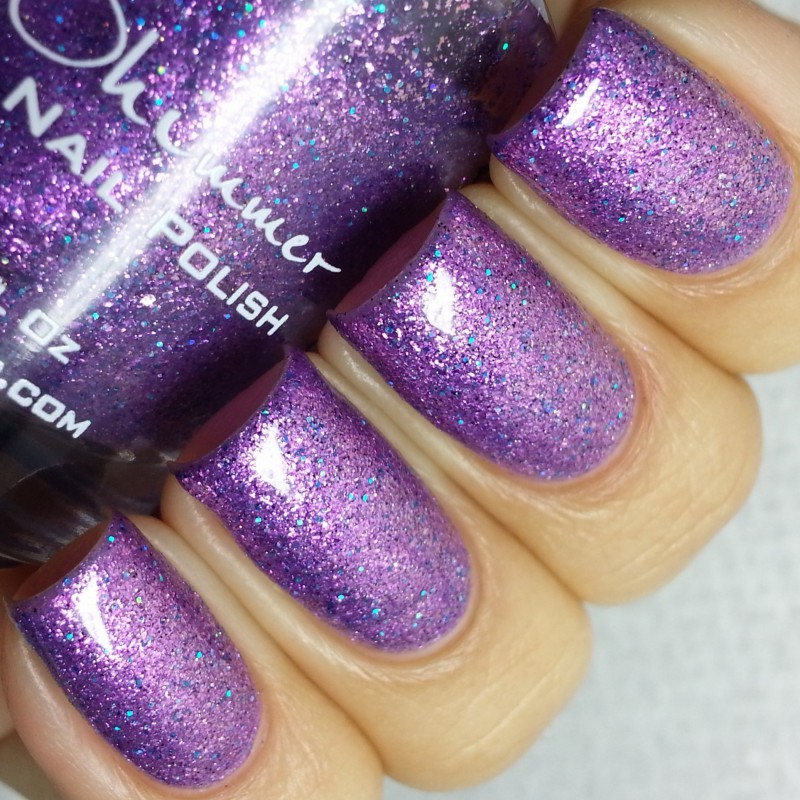
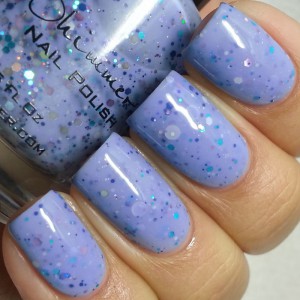
Brrr-tiful Dreamer- A muted grape leaning grey polish with aqua, sliver, purple and fuchsia glitters.

IMG_20151011_183429

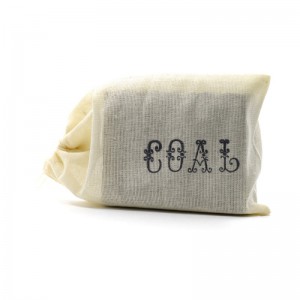
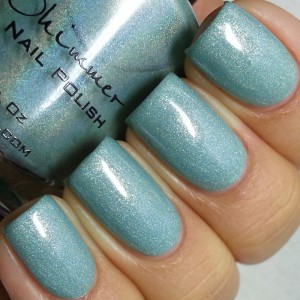
Coal In One – A charcoal gray linear holographic polish with 2 coat coverage.
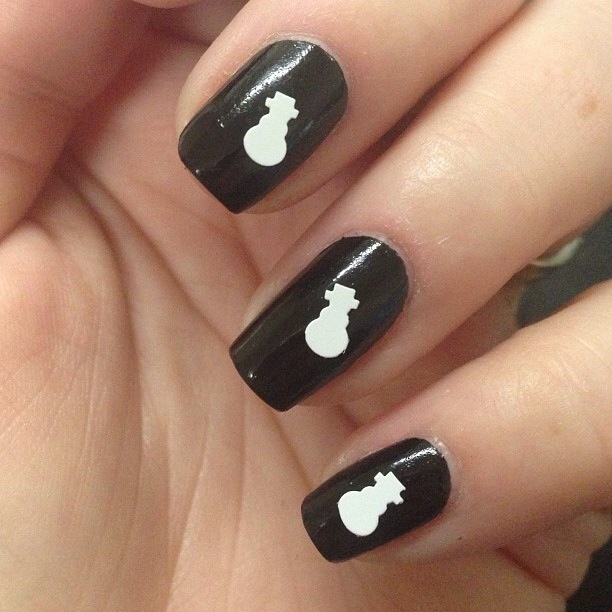
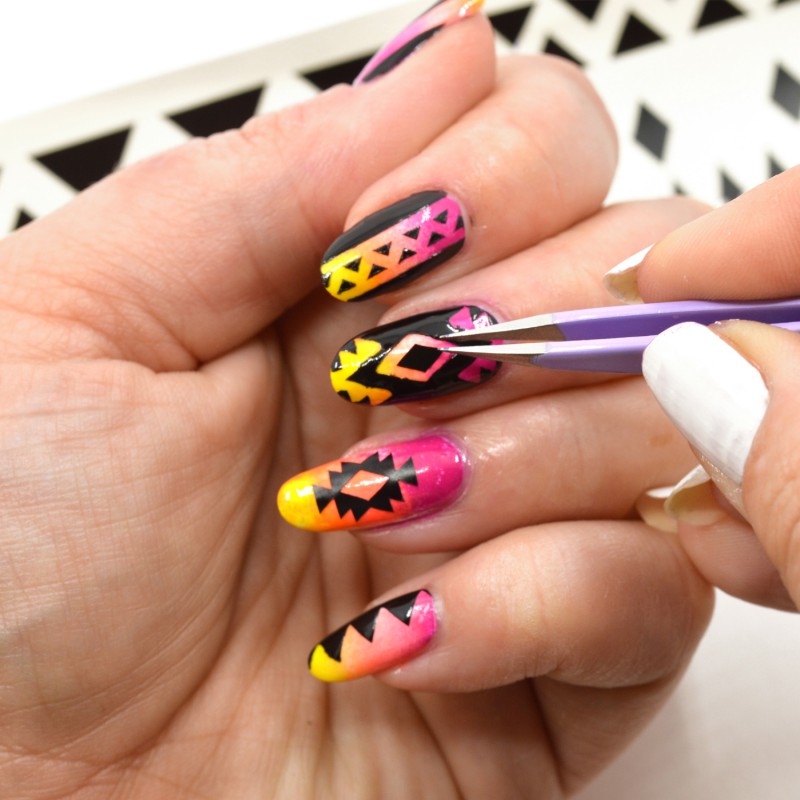
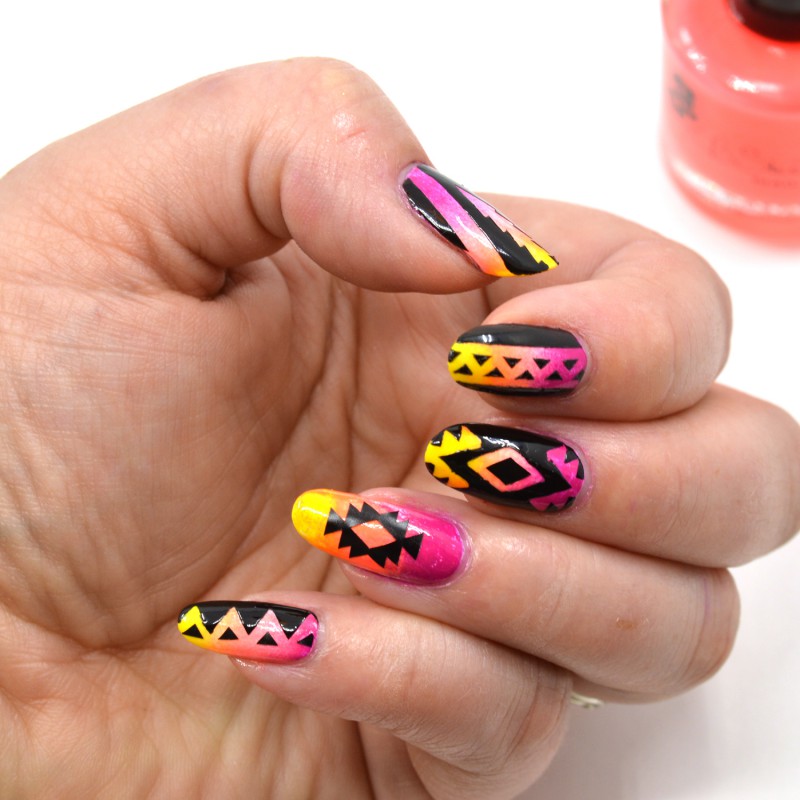
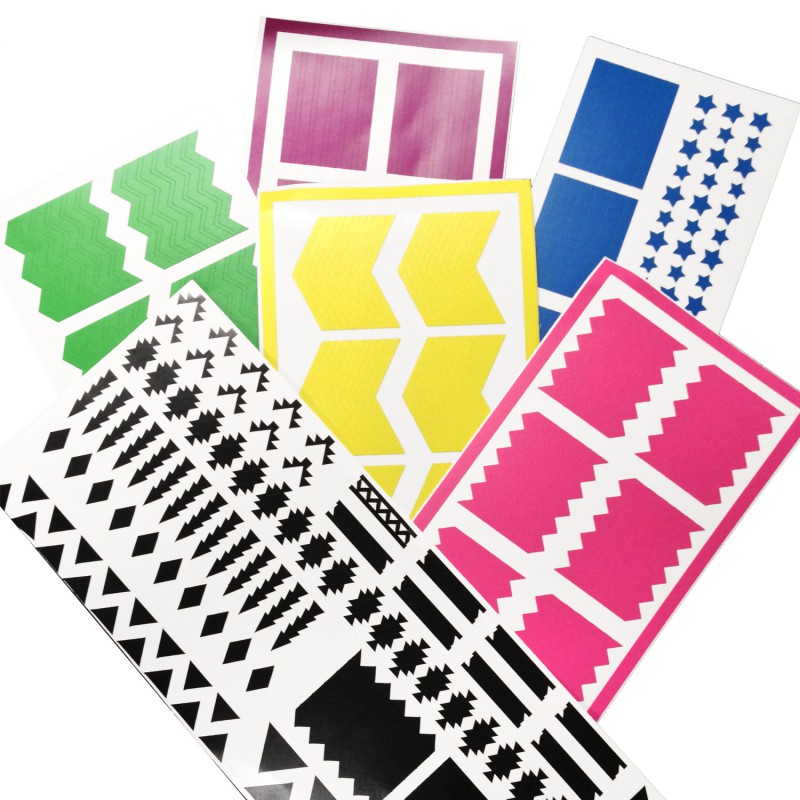
IMG_20151012_152950

WATER SLIDE DECALS

We have several new designs for winter and Christmas.
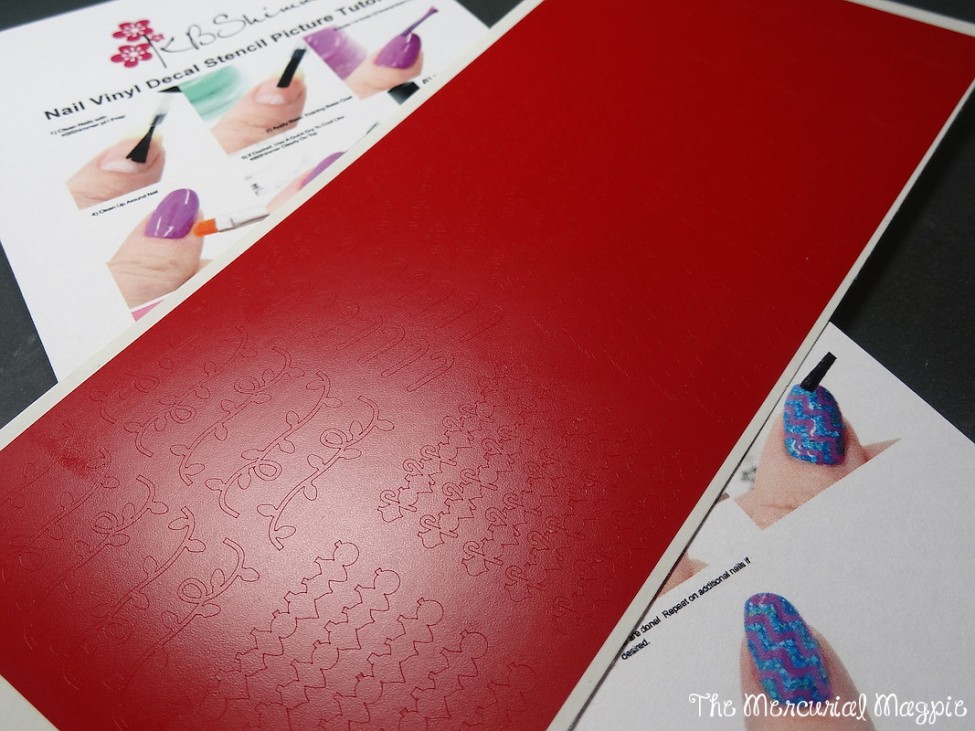
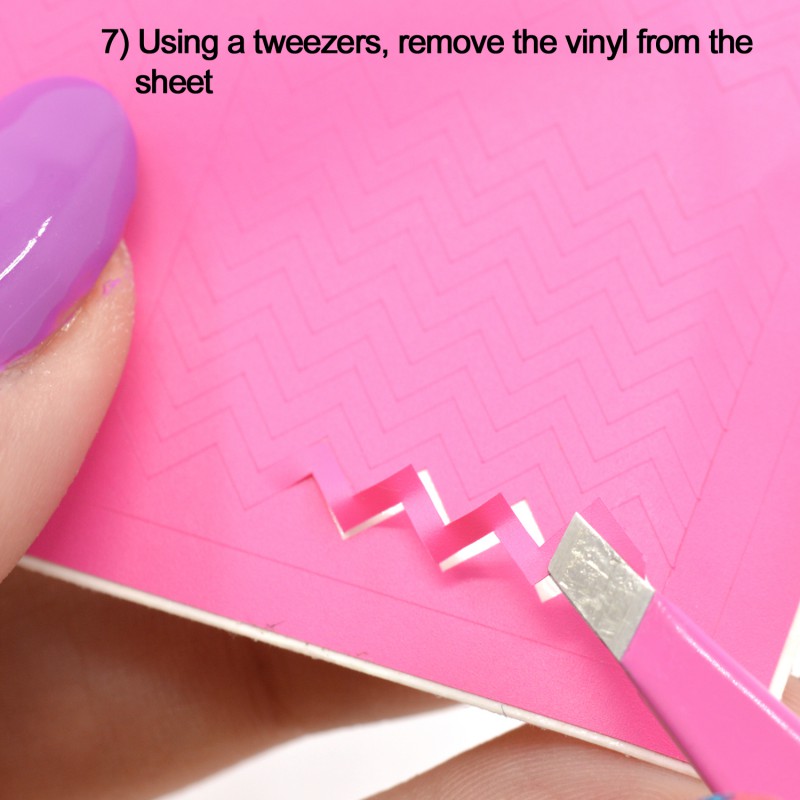
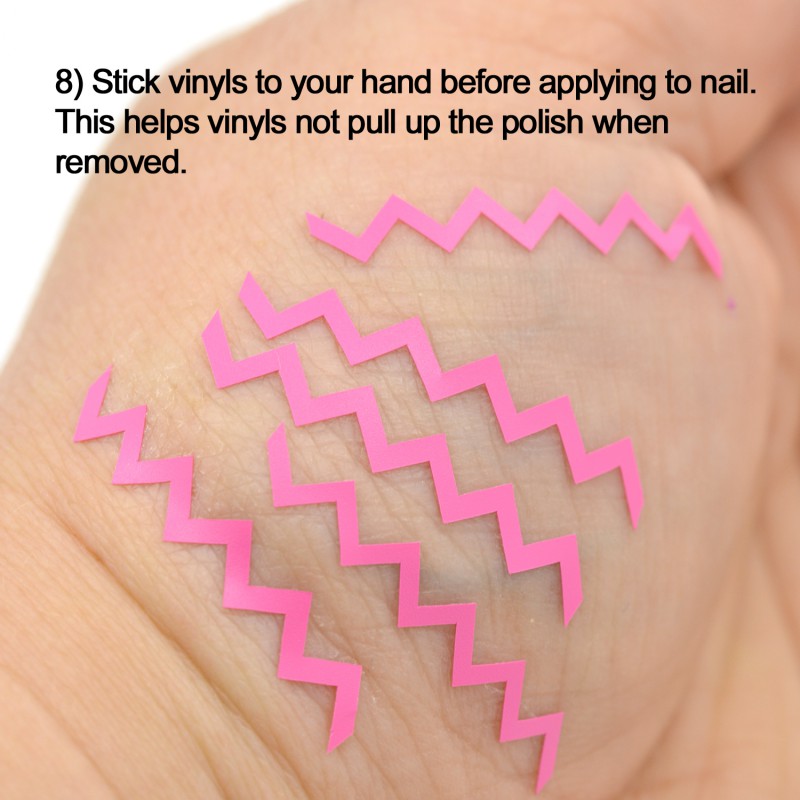
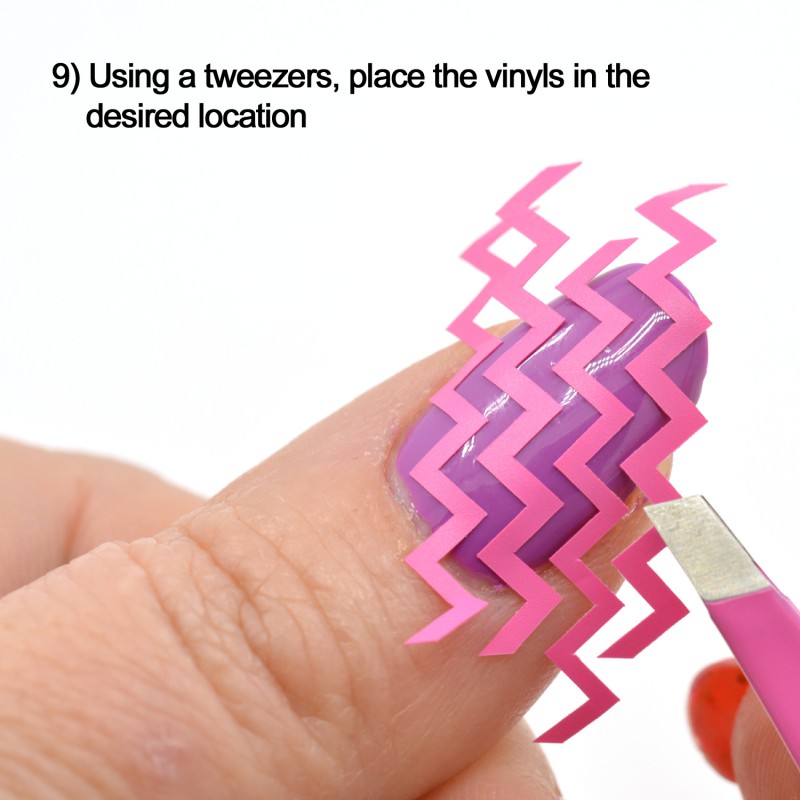
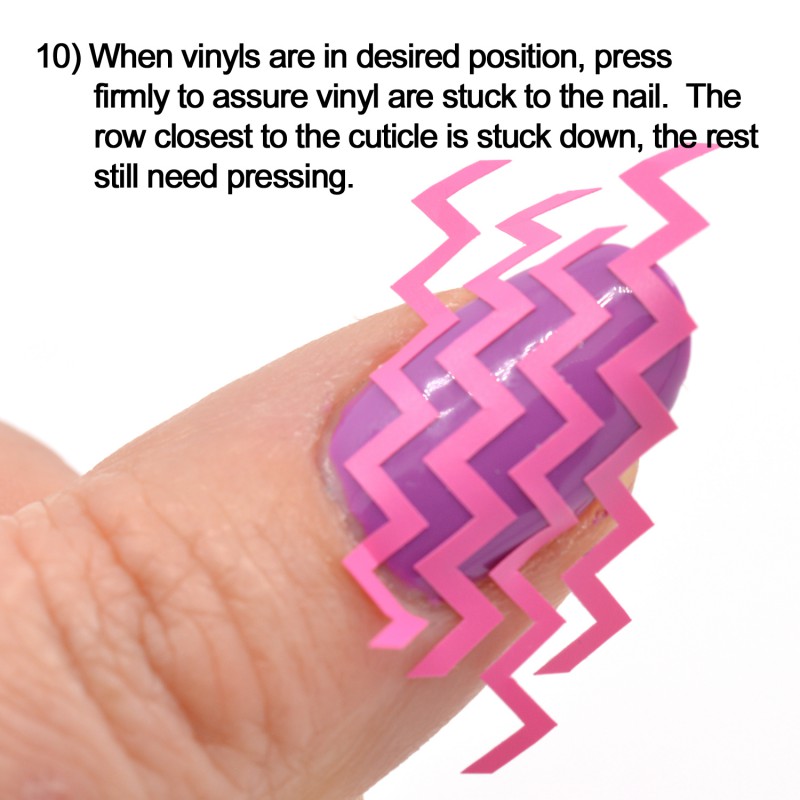
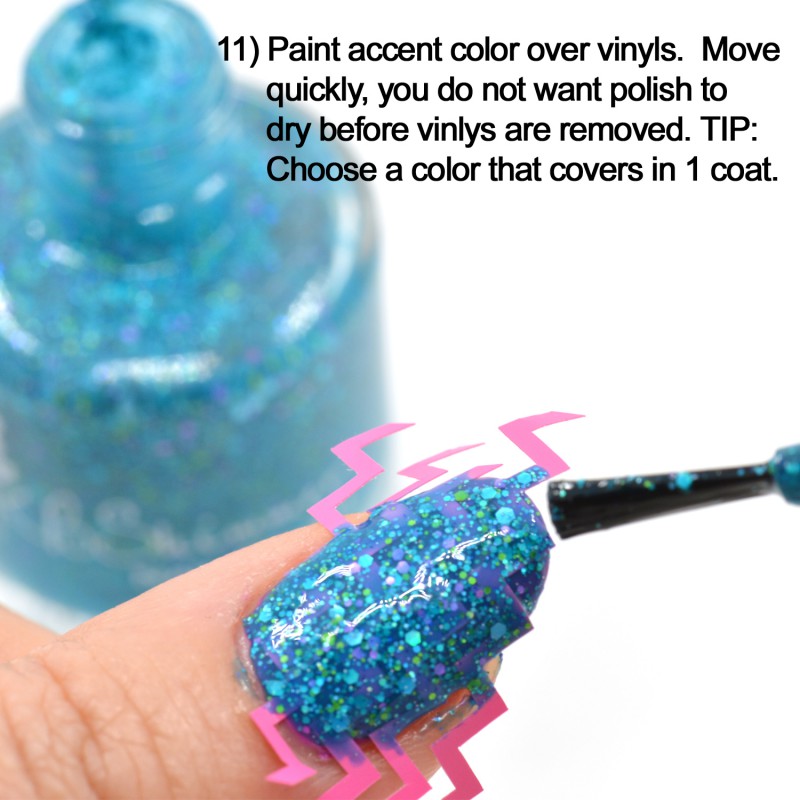
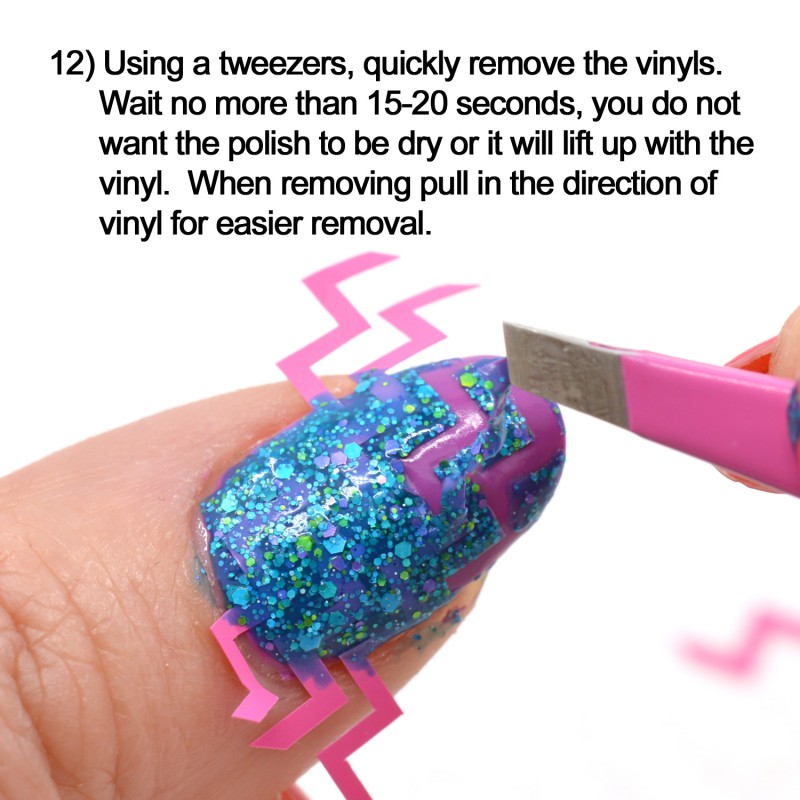
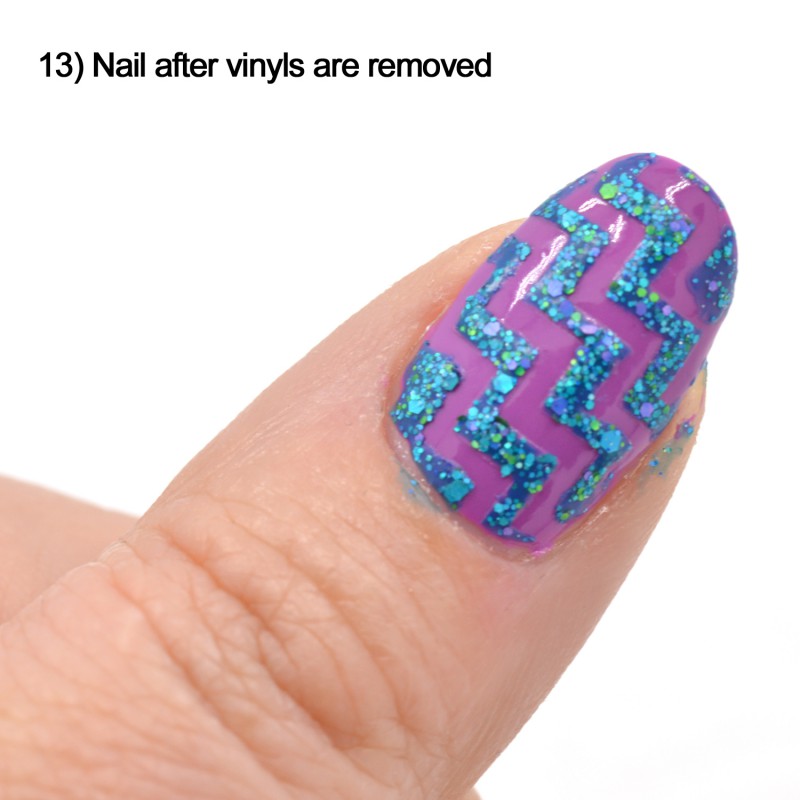
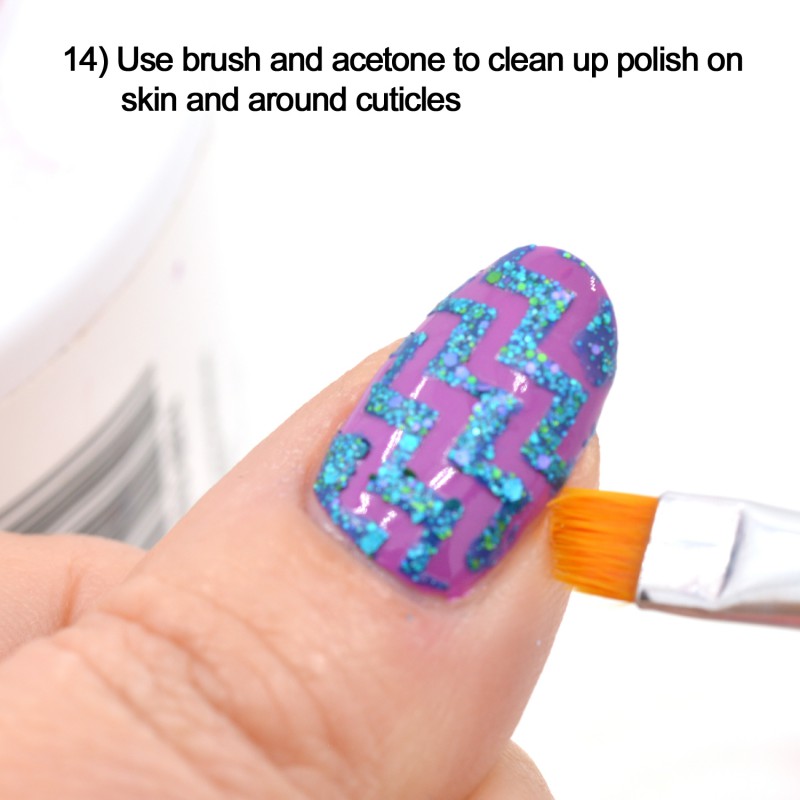
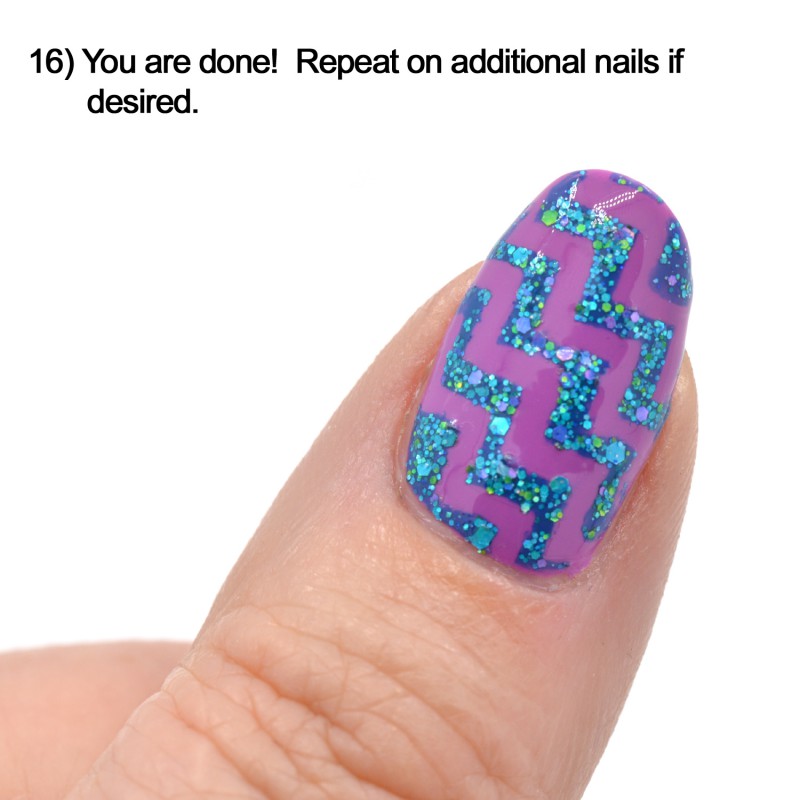
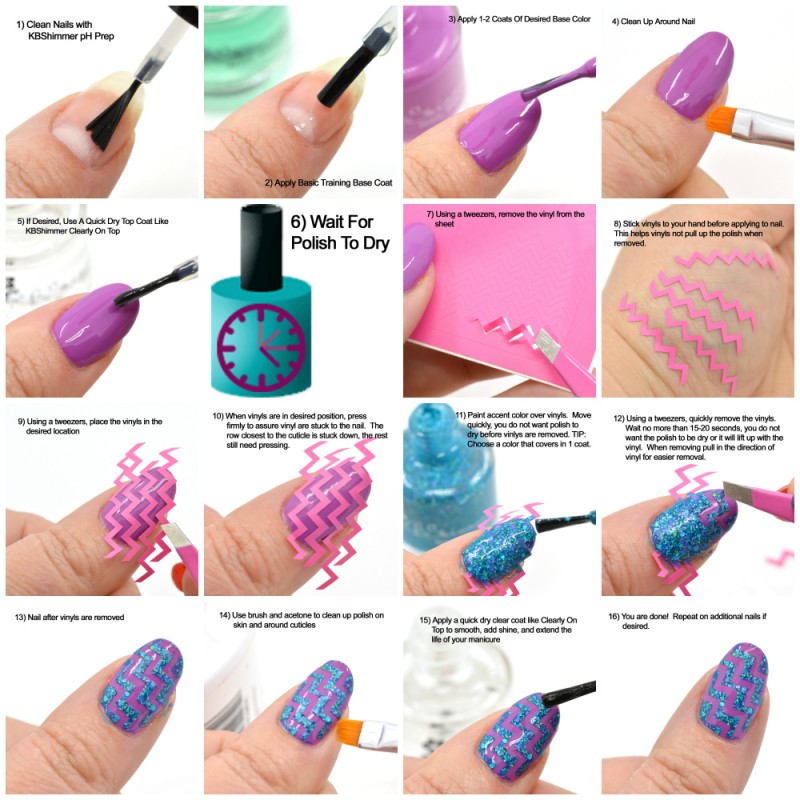
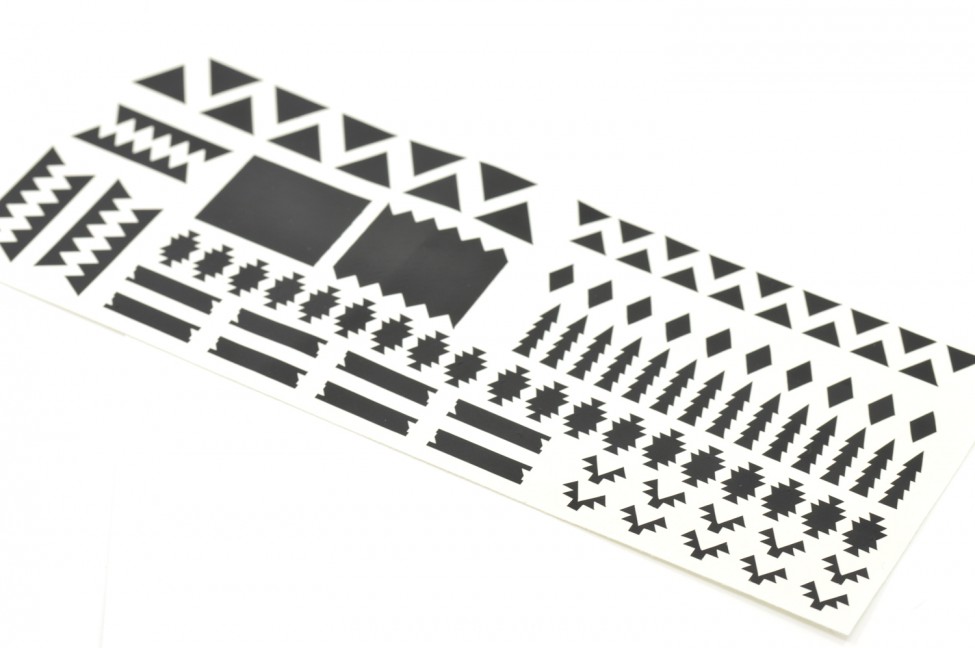
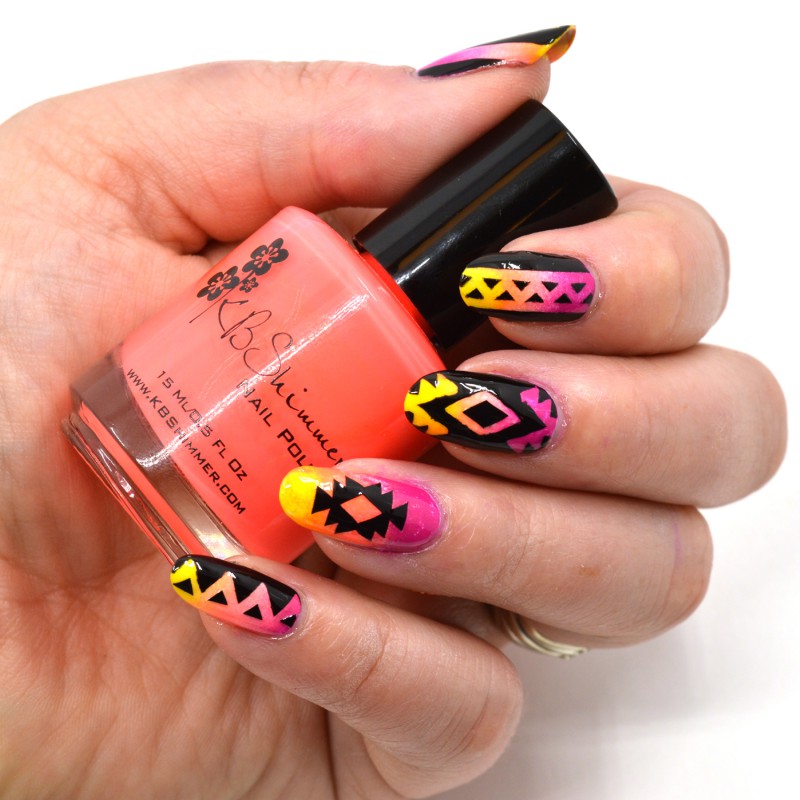
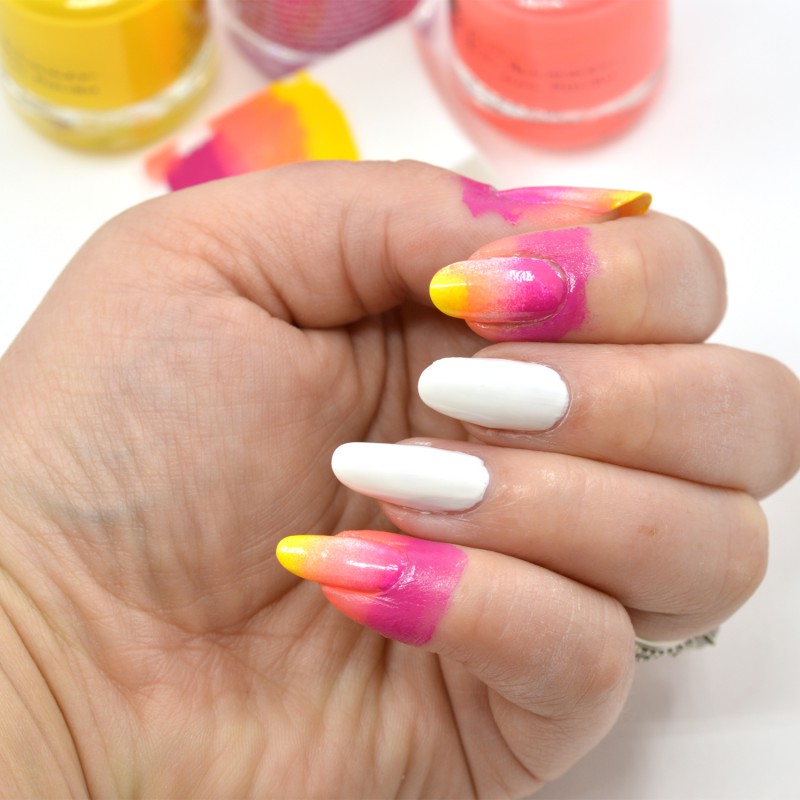
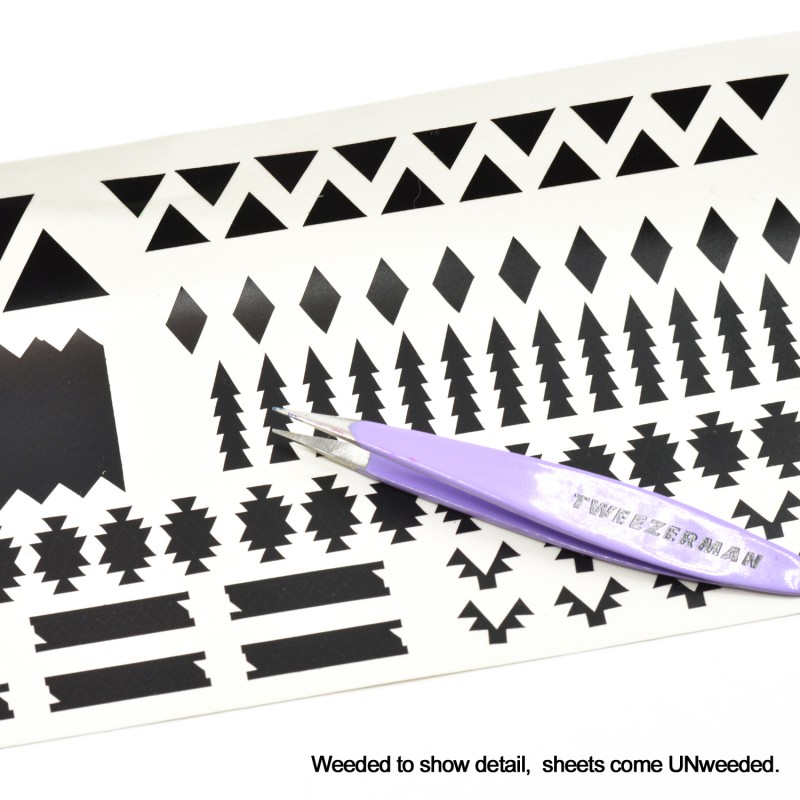
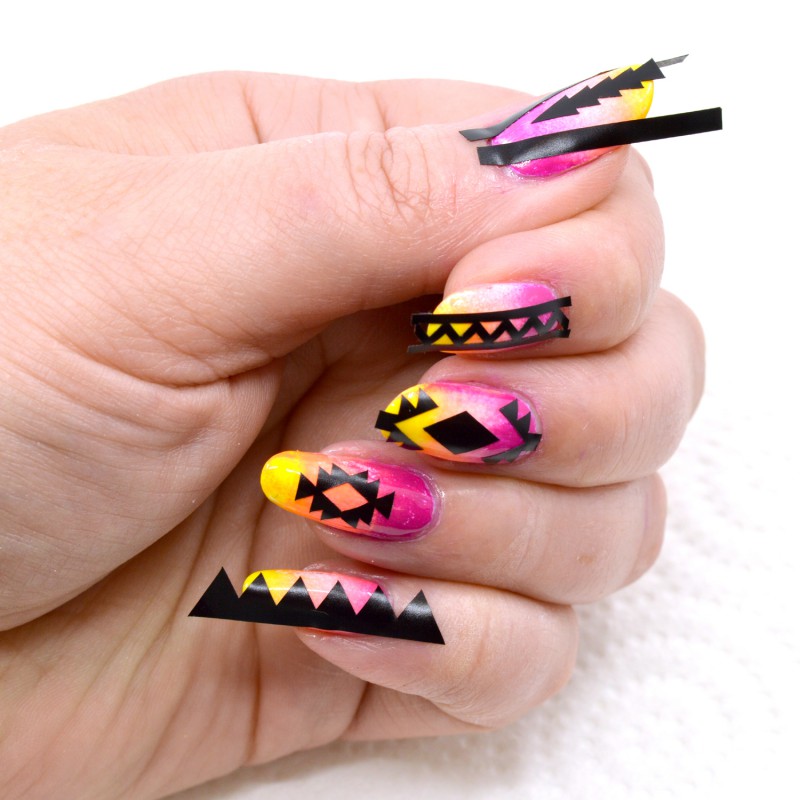
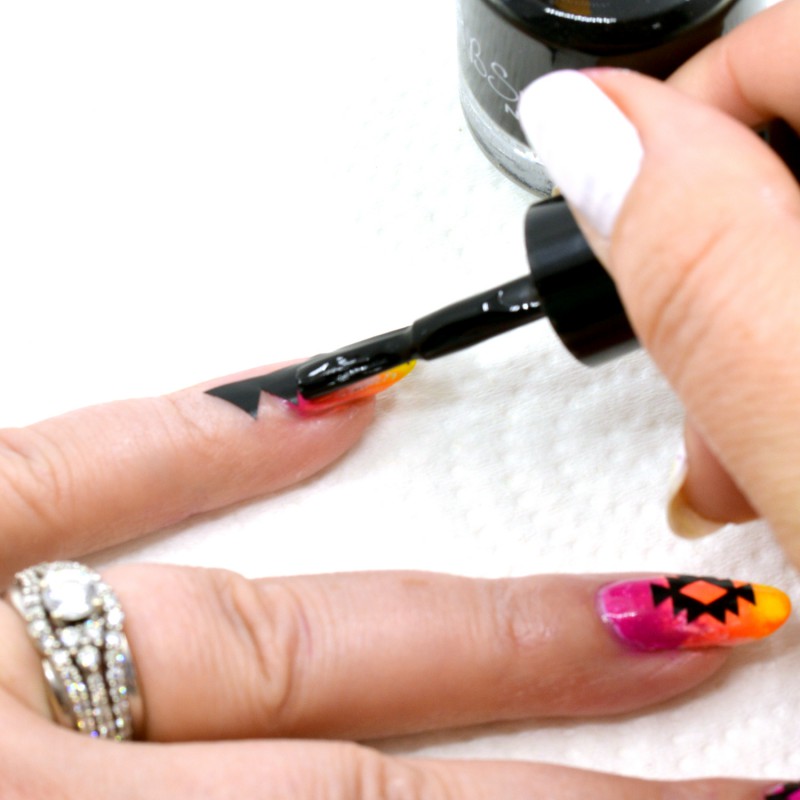
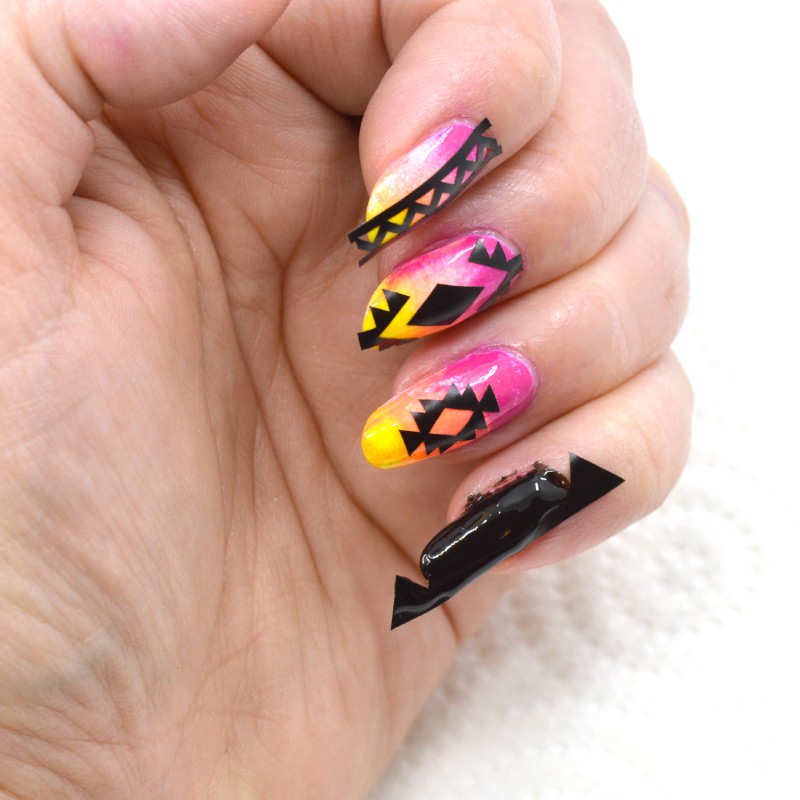
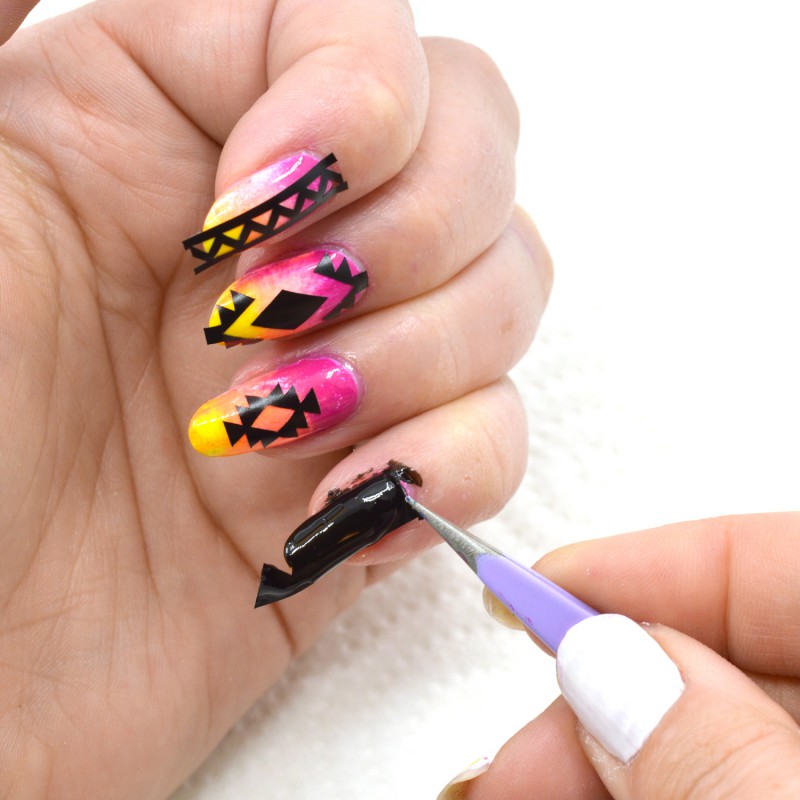
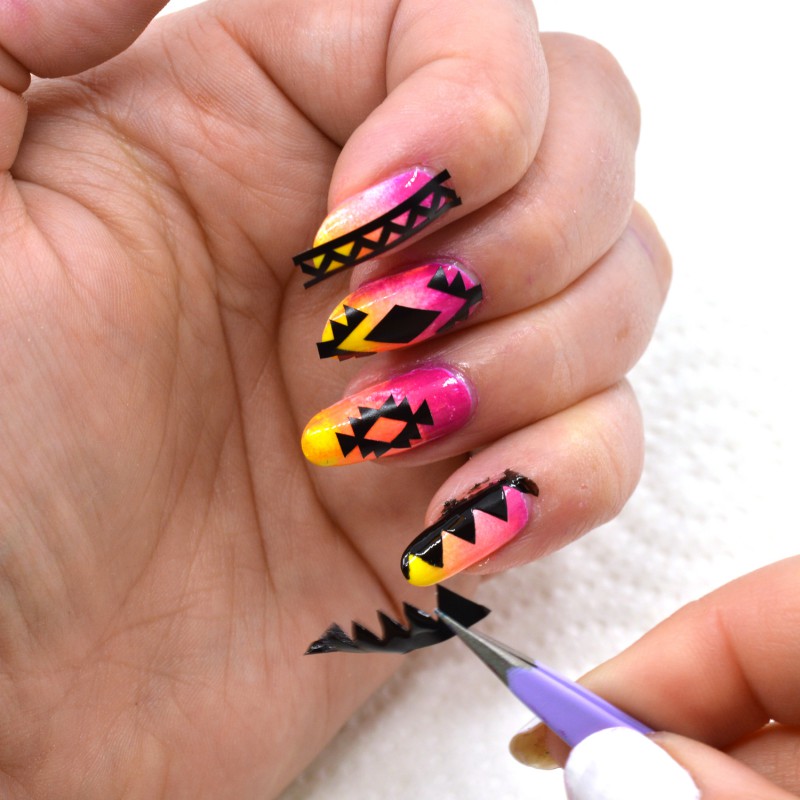
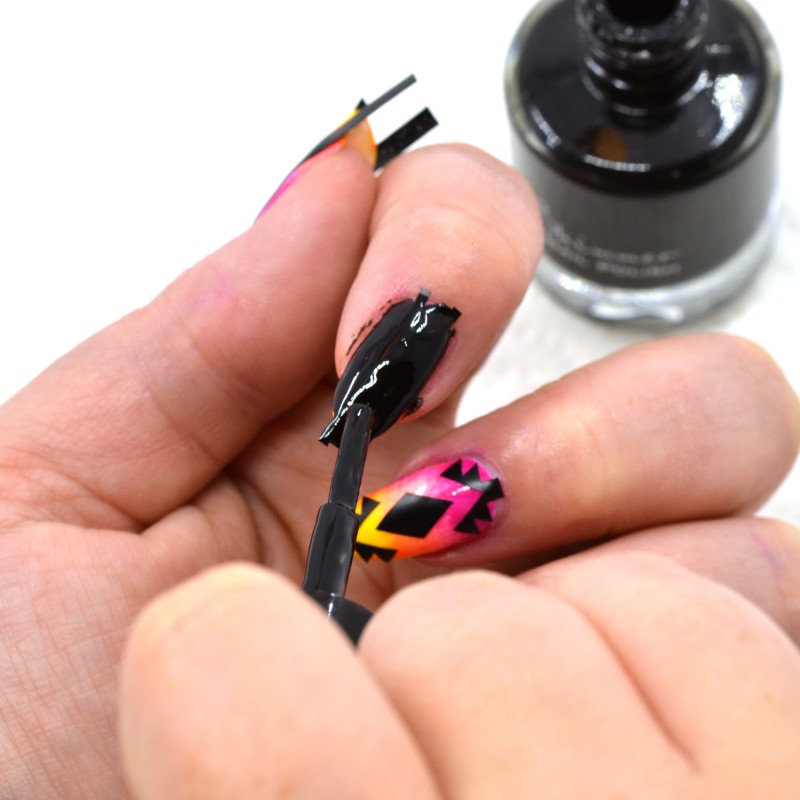
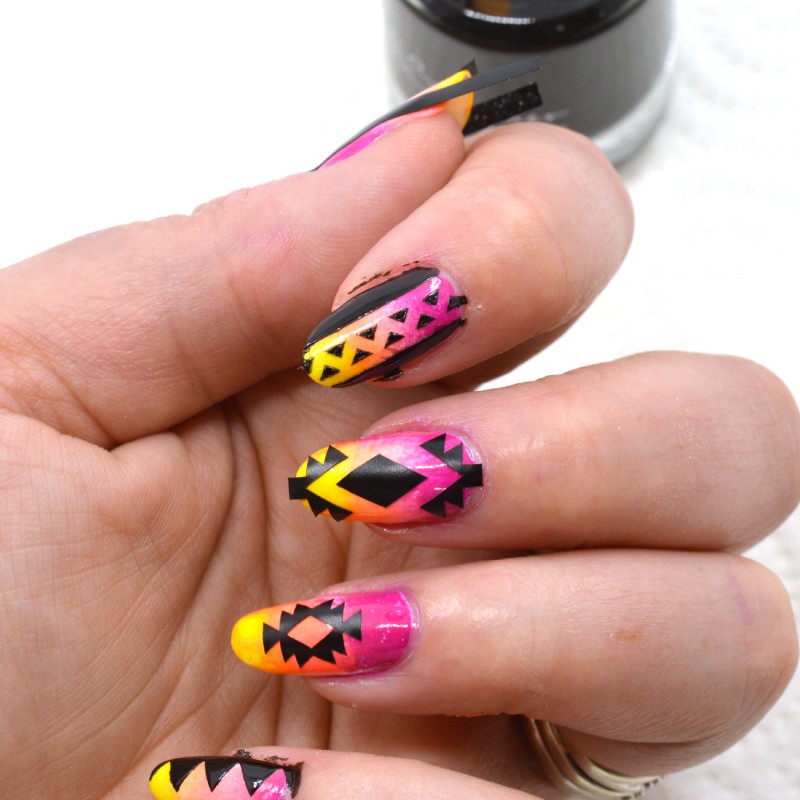
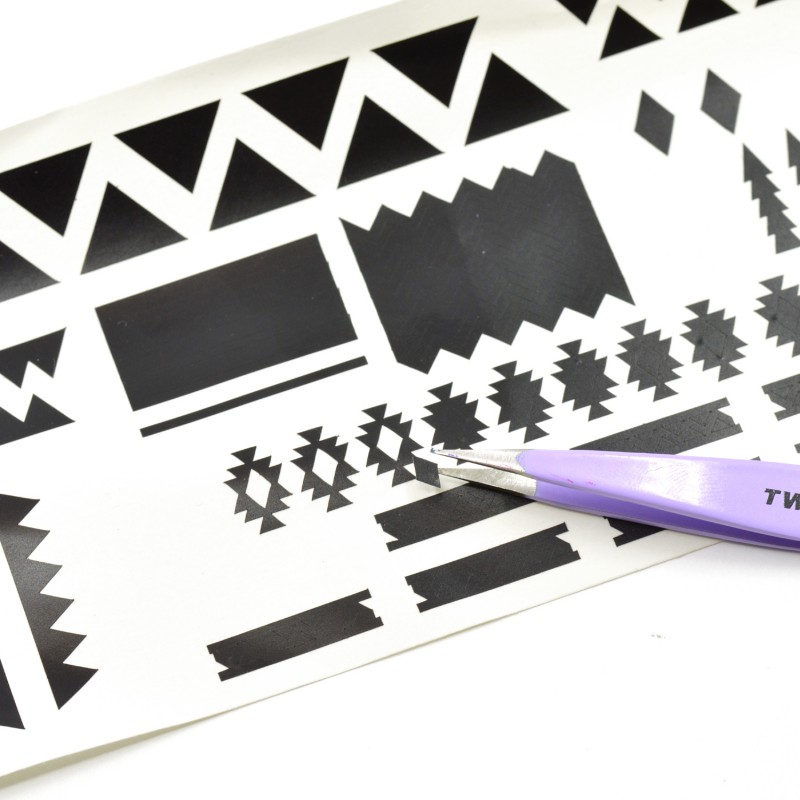
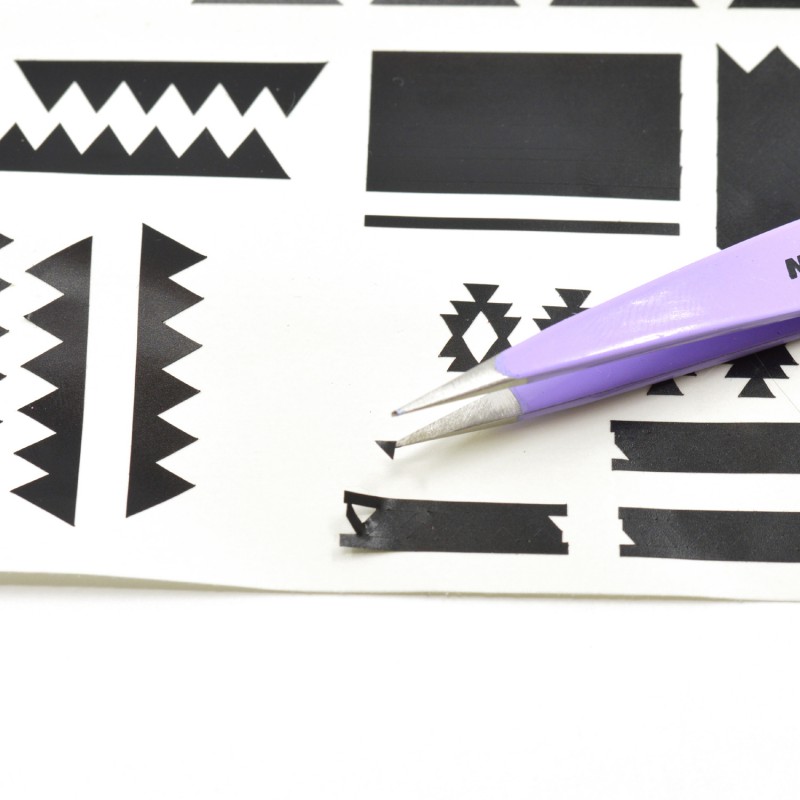
img055 img057


img056

img059


img061

img054


img052

img058


img053 img049


img060 img062


NAIL VINYLS

Let’s not forget the cat vinyls!

CatVinyl


CatVinyls2 CatVinyls1


NEW LOTION BOTTLES

We are also testing out a new bottle type.  We love the easy squeeze bottle that allow for easy dispensing and the small travel size.  Several scents are available.

Winter2015 024

MANI SHOTS

We will have limited edition winter scents coming out through the months of November and December, like Brown Sugar Chestnuts and Cafe Latte.

LimitedEditionManiShot

WINTER PROMO

So, are you excited about the winter collection launching Monday, November 2nd? We are! As mentioned above, in addition to all the new items for sale, this holiday season we have a fantastic promotion for you. If you spend $75.00 or more** on KBShimmer.com you will receive a KBShimmer lined zipper cosmetic bag in pink.

HolidayGiftBag

HolidayGiftBag2

This bag is loaded with goodies, including:

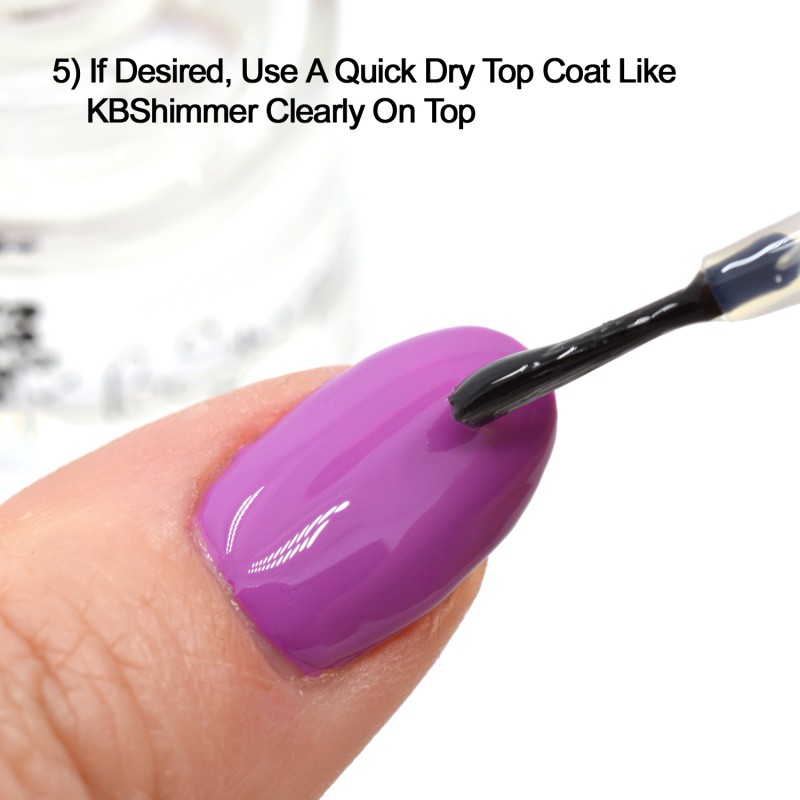
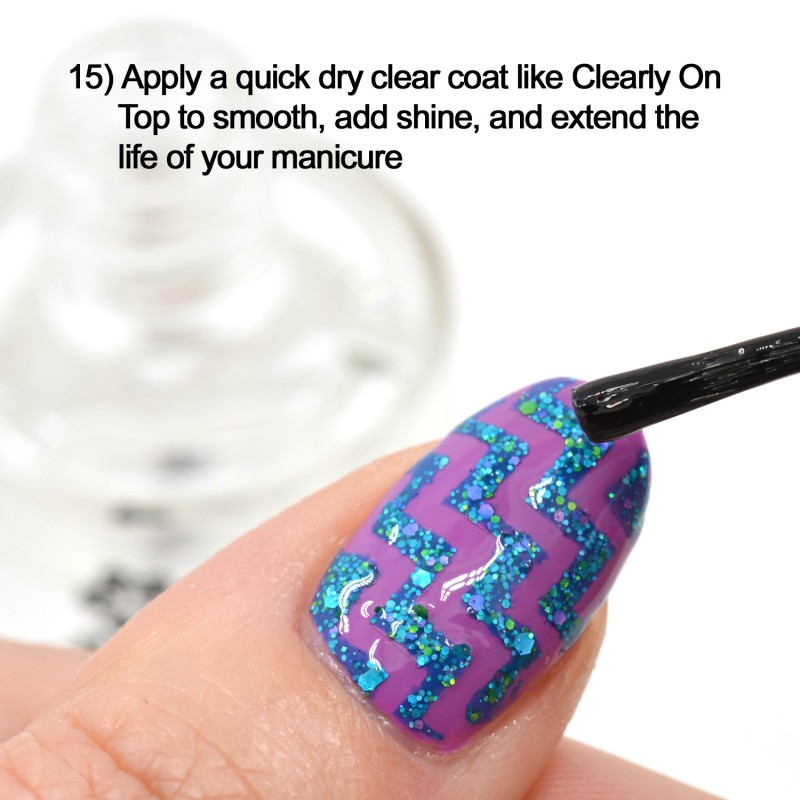
Full Sized Clearly On Top (Quick Dry Top Coat)
KBShimmer Emery Board
KBShimmer Magnet
Holiday Glitter Mix (Approx. 1000 glitter pieces)
.75 Mani Shot (scents vary)
Soap Sample (scents vary)
Lotion Sample (scents vary)
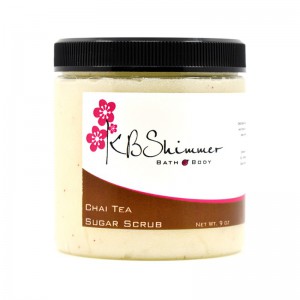
Scrub Sample (scents vary)

** Excludes tax and shipping. $75 total is based on cart subtotal before any discounts. Offer available while supplies last or through 12/31/15, whichever occurs first. Valid on KBShimmer only. Valid only on orders starting when holiday collection is launched.

Computers, Colors and Neons Oh My!

We have had a couple questions/complains lately regarding polish colors matching when compared in person to photos on the screen.

I wanted to explain our color matching/batch making/blogger photo process.

865276-paint-splatter-background

For every polish, we make a prototype batch.  That prototype batch sits in our office, goes back and forth to our house for me to use, and generally bangs around for 4-6 months, if not longer before released.  This batch generally has had tweaks and changes made, but the final recipe has a 12-24 bottle or so batch made and left to sit to ensure we are happy with the final recipe and everything is stable.  Our recipes are very specific and are done by weight for all colorants, and by dry measurements for glitters.  This ensures we can duplicate recipes exactly.

Closer to release, generally 2-3 months before release we scale up that prototype batch to gallon size batches(or larger amounts),  making between 200-500 bottles.  We verify that it matches the original samples and that we are happy with how it scaled.  This batch is used to pull samples we use to compare every future batch.  We also send our bloggers and media samples from this batch, and anyone that orders during release would get from this first large batch.

When we run out, we go back the original recipe and reproduce according to that recipe.  We then compare against the original sample to ensure that the color matches.  If they don’t match, we discard.  When when the batches don’t match, it is often human error, but sometimes it could be due to a slight change in the pigments from suppliers if we did have to use a different supply batch.  It happens, dye lots can have variances, that effects even large polish companies.  We generally buy ingredients in such bulk that we use the same colorants for many many batches, so that does not happen, but if it does, we then can try to tweak to get a match if it is close, or in some instances go with the new color (like Witch Way which changed slightly a few years ago due the pigment changing).  But overall, we try to match each batch exactly to the original sample but recognize that when using dyes and natural pigments, slight variations can occur.  And I do mean slight.

When we send out to bloggers, we send to over 40 different bloggers.  We try to send 1-2 months ahead of time (we try but sometimes that time is shorter).  This gives us time to gather photos from the bloggers to use for our listings.  But, those photos don’t always come in before we go live.  So we choose from the selection we get to find 5-10 photos that we think match best for our listings.

This is where is get tricky.  I myself have 2 computers, and several mobile devices.  And let me tell you, not a single one of those show colors the same way, which is frustrating as I have to do my best to guess how they will look on most computers.  Do I try to match with my iphone? My laptop? Pick something in-between?  Then you think about all the phones, the computers, and all the settings and all the ways people tweak monitors I don’t know how anyone ever matches colors online!  Heck, I have a Pantone color book, and do you know that I can not get the colors from them online to match what my book directly from them shows?

pantone-book-11

Plus, I have photos from up to 40 people to choose from.  That is 40 different combinations of cameras, lighting, skin tones, editing on their end, etc.  Those 40 different people probably tried to match photos to what their eyeballs saw compared to the polish in person.  And did you know that not everyone sees colors the same?  What a level of trickiness this brings to the table.  I have even on rare occasion edited photos with blogger permission to better match when they themselves had said the colors were off.

And that is for a normal polish.  Some colors (blues, purples, neons, etc.) screw with cameras and are near impossible to get to reflect correctly in photos (Periwinkle In Time I am looking at you).  I could go on and on about how those type of colors are out of range for digital cameras, but bottom line is, they suck to get accurate photos of.  Which makes a collection like our pastel neons horrible to get to show correctly online. We do try and put notes on listing where we think the photos are off, but notes don’t always get read either.

I can only assume that other brands have this issue.  I know I have heard complaints about Zoya colors not matching, but I am not sure about other Indies.  I myself have had color matching issues with clothes, home decor, and other items purchased online.

I will leave you with two photos as examples.  This is the folder of blogger photos for Eyes White Open and for Rum Me The Right Way.  Same batch for all the bloggers, so many variations!  If this can happen with a basic color like white, imagine how hard it is with other colors!

EyesWhiteOpen RumMeTheRightWay

We do everything in our power to make sure that our photos show as correctly as possible to make it easy to shop online, but there are limits to what we can do.  I do want to keep bringing awesome collections with blues, purples, neons, etc, but hesitate knowing people will complain about the photos.  It makes it hard to go beyond the “safer” easier to photograph colors.  And I really want to bring out a bright neon collection that marbles too!

I guess I just wanted to explain a little more about the process and what goes into getting polishes ready for the web and some of the challenges we face 🙂  Thank you if you stuck with me so far!

Color Me Chic: 5 Ways to Match Your Jewelry and Nails

Color Me Chic: 5 Ways to Match Your Jewelry and Nails

by Jade McCampbell of Jewelry TV | Jun 01, 2015

Color Me Chic: 5 Ways to Match Your Jewelry and Nails

Summer is all about vibrant color and fun in the sun. Kick up your color this summer by matching your polish with colorful gemstone rings and bracelets! Jewelry TV has partnered with KBShimmer to bring you perfect pairs of nail polish with juicy, gemstone jewelry. KBShimmer is your one stop shop for dynamic nails – from holographic shimmer to multichrome metallics your mani is sure to shine!

Turquoise Waters

The color turquoise is always a summer staple – it immediately brings me to memories of floating in the pool on hot summer days, or looking out on beautiful, blue water at the beach. Take one look and you’ll know that this Glacier Topaz™ jewelry is anything but cold! They match perfectly with the “Laugh Myself Lily” nail polish – a soft turquoise color inspired by floating water lilies.

Topaz and “Laugh Myself Lily” KBShimmer Polish (SKUS: ANH195, EOH249, DOCZ199, DOCZ812B)

Topaz and “Laugh Myself Lily” KBShimmer Polish (SKUS: ANH195, EOH249, DOCZ199, DOCZ812B)

Lilac Love

Rose gold and lilac collide in a gorgeous match! I love how light and airy this combination is. Kelsey’s orchid amethyst jewelry in rose gold over sterling silver absolutely glow with her holographic, purple-pink manicure. The ring to the right was probably my favorite of the shoot – I’m truly a sucker for lilac colored gems and this ring is even more luscious in person, if you can believe it!

Orchid Amethyst and “Thistle Be The Day” KBShimmer Polish (SKUS: MAE040, STJ494, STJ279)

Orchid Amethyst and “Thistle Be The Day” KBShimmer Polish (SKUS: MAE040, STJ494, STJ279)

 Keeping Chrome

Mirrored sunglasses are everywhere right now, and with the help of Mystic® Topaz jewelry and “Look on the Nightside” nail polish you can keep the chrome even when your shades come off. It’s amazing that KBShimmer has a polish that imitates the shifting shades of my Mystic® Topaz Rings and bracelet– from green, to violet, to blue! Try this look and you’re sure to stand out this summer, the nail polish alone is a conversation starter!

Mystic Topaz and “Look on The Nightside” KBShimmer Polish (SKUS: ANH161, JWH108, MKH065, JWH109)

Mystic Topaz and “Look on The Nightside” KBShimmer Polish (SKUS: ANH161, JWH108, MKH065, JWH109)

Punch of Purple

Jewel tones aren’t off limits this summer. Add a little guilt-free drama to your ensemble with these striking deep purple amethyst rings. Personally, I love all shades of purple and the darker hues give a rich and exotic feel. Even if you don’t have a vacation planned to an exotic locale this summer, you can put these on and still feel like a jetsetter! These rich amethyst hues pair perfectly with “Pigment of My Imagination” polish.

Amethyst and “Pigment of My Imagination” KBShimmer Polish (SKUS: STZ028B, STI881, STZ028R)

Amethyst and “Pigment of My Imagination” KBShimmer Polish (SKUS: STZ028B, STI881, STZ028R)

Pretty in Pink 

Melissa is pretty in pink with her pink Bella Luce® and Pure Pink™ Mystic® Topaz rings and bracelets. No color is quite as flirty and feminine as pink! Her pink jewelry and manicure capture the fun, carefree spirit of summertime. Spend an afternoon in the sunshine and you’ll see how they peachy rose-colored polish, “Blush Money”, shimmers with hints of gold!

Melisssa RED

Pink Jewelry and “Blush Money” KBShimmer Polish (SKUS: MLH186, BJJ900, BJK082, BJK294)

Who doesn’t love a fresh manicure and new jewelry? No one! Get out there and make a statement this summer. It’s as easy as a fresh coat of polish and a cocktail ring!

Nail hands all together

Jade


Do you want to win a KBShimmer prize pack and $300 Jewelry TV shopping spree?  Click the linked picture below to find out how!

SparkleShimmer_Banner

KBShimmer Behind The Scenes Tour

Ever wonder if KBShimmer polishes are made by little elves in trees with magic dust, or if our products come out of a big factory in China?  Well, though we often come out of our place looking like we were sprinkled by Tink, KBShimmer is based right here in the USA, in Terre Haute, IN.  Most of our ingredients are sourced and made right here in the USA (including our nail polish base). And I (Christy) still personally make each soap bar, bottle of lotion, and mani shot that heads to your door; while my husband and staff help with scrubs, cuticle oils and the glitter nail polish.  Any products we offer that are not personally made by us (top coat, base coat, nail tools, etc) are carefully sourced or we had them custom designed/made for us!  No elves in trees involved.

Here is your ticket to the behind the scenes tour of the KBShimmer “factory”, I hope you enjoy!

Photo Oct 23, 2 23 24 PM

When you walk in our front door, you enter into our office areas.  Here we have Krishna’s desk, Krishna is not only our customer service guru, she handles our bookkeeping and is our Sister-In-Law.  She most often works from home now as she has a young baby.  My “photo studio” is also in the front room.

Photo Oct 23, 2 20 34 PM

Here my office.  Yes, I work in a state of disorganization!  I can’t help it.  My mind goes 100 miles per hour, so that means I rarely stay focused enough to put stuff away.  My desk is also always littered with polish prototypes.  These photos were taken back when we were finalizing Spring, back in October of 2014.

Photo Oct 23, 2 20 45 PM

Off the office area, we have a small kitchen area we use for curing soaps. Look at those empty shelves, we have a lot of soap to make!

Photo Oct 23, 2 24 14 PM

Next we have the shipping area.  This is Sami and Rhonda’s domain.  They handle all our shipping and are the reason you get your packages shipped crazy fast!

View from our 2nd floor looking down at the shipping area.

Photo Oct 23, 2 21 38 PM

Another shipping areas shot from above.  Hi Sami!

Photo Oct 23, 2 21 35 PM

A closer shot of the shipping table.  The shelves hold the polish and products ready for shipping. You can also see the post office totes we use to take packed orders to the post office.

Photo Oct 23, 2 17 33 PM

Bath and Body products ready for shipping, a pallet of wholesale boxes, and a small sink and area for cleaning supplies.

Photo Oct 23, 2 17 42 PM

Side shot of the shipping tables.  In front retail orders get packed, and the back, wholesale orders are packed there.  You can also see the orange pallet jack in the background.

Photo Oct 23, 2 17 51 PM


Closer look at our retail shipping set up.  Boxes are pre-taped by Sami and are ready for packing orders!

Photo Oct 23, 2 18 11 PM

Next we have the production area.  Our production area is split into two sides, with a table for pouring polish and labeling bath products in between.  The right side is our polish area, and the left is for bath and body. Hi Rhonda!

Photo Oct 23, 2 22 29 PM (1)

Photo Oct 23, 2 20 10 PM

We start with a shelf of empty bottles, jars for lotions, scrubs, etc, and brushes and caps for polish.

Photo Oct 23, 2 18 19 PM

Here is a closer look at the polish side.  You can see the red fire cabinets that we store polish base in, and a larger drum of polish base.  You can also see the table we mix on, some of our liquid color pigments, and the shelves where we house the glitters and powdered pigments.  We also have a few boxes with glitters that still need to be put away.

Photo Oct 23, 2 18 28 PM

This is a bit old, but at one point we did have all our glitter put away.  We have added two more shelves since then for glitter.  I may have a glitter problem 😉 Not the best video, but you get the idea.  If the video below does not show, you can follow this link: Youtube

[youtube]https://www.youtube.com/watch?v=XeqzPfAHYOI[/youtube]

Some of our glitters are mixes we pre-make, like the mix for Oh Spalt! ®

File May 17, 10 34 08 AM

Here are the gallon containers we use for mixing up polish, and the squirt bottles we use for filling bottles.

Photo Oct 23, 2 19 53 PM

Here is Rhonda capping bottles.  You can also see our filling machine we use for really large batches off to the right.

Photo Oct 23, 2 19 48 PM

Then is my area for bath and body production.  You can see our shelves with ingredients.  Here I also have buckets of lye mixed up for soap making as at time the soap shelves were really empty!

Photo Oct 23, 2 19 24 PM


Here I have raw ingredients for soaps, lotions, scrubs, etc.  Our big mixer for larger batches of scrubs.

Photo Oct 23, 2 19 39 PM


Here is our mixer again, and another production table for bath products and an oven.  You can also see a pallet of empty polish bottles here.

Photo Oct 23, 2 19 42 PM


Here is our dish washing station with clean dishes on racks.

Photo Oct 23, 2 19 13 PM

Here is our 2nd floor balcony.  We store shipping supplies up there, like packing peanuts.

Photo Oct 23, 2 21 09 PM

Our second floor has turned into a storage area, along with holding Jason’s office.

Photo Oct 23, 2 21 56 PM

Photo Oct 23, 2 21 53 PM

Photo Oct 23, 2 21 49 PM

Jason’s office area. Since he does a lot of our polish making, he is not up here often!

Photo Oct 23, 2 22 08 PM

Last we are back down to the shipping area, where we have our bay door for deliveries, and storage of shipping supplies.

Photo Oct 23, 2 17 17 PM

Photo Oct 23, 2 17 22 PM

Are you still with us?  Good!  What behind the scenes tour is complete without demos of products being made?

Here is video of us mixing up Laugh Myself Lily: If you can’t see the video below, you can follow this link: Youtube

[youtube]https://www.youtube.com/watch?v=6VNF_GhdcL8[/youtube]

And here is our filling machine and capper in use.  We use the capper more then the filling machine, but both are fun to watch! If you can’t see the video below, you can follow this link: Youtube

[youtube]https://www.youtube.com/watch?v=NDPk0RqaxRo[/youtube]

I hope that you have enjoyed the behind the scenes tour of KBShimmer.  Now watch your step and exit to the right please.  And come back soon, we have enjoyed having you on this tour!

Winter Collection 2014

WinterCollege2

Winter can not come fast enough here at KBShimmer headquarters, at least when it comes to polish collections!  We have a huge winter line up for you, with 12 new polishes, 5 returning Christmas Classics, and fantastic promos.  But enough with the text, lets jump into the new polishes!  BIG thanks to Gaby of LacquerLoon for the swatch pictures in this post.

Winter Release is 11/01/14, polishes (except for Spot Sign) will show out of stock until they are release.

New For 2014

Let’s Sleigh Together:  A pale gray creally, this muted polish features hex glitters in green, navy and pale mint, circles glitters in blueberry and micro holographic glitters for shine and sparkle. 2-3 Coats Recommended

Let's_Sleigh_Togehter_LacquerLoon_Swatch1

White Here, White Now (Texture):  This snowy white polish is a blustery addition to our textured collection.  Two coats offer more coverage than any blizzard.  Please note, the full textured effect does not show until polish is fully dry.

White_Here_White_Now_LacquerLoon_Swatch1

Holly Back Girl:  A white creally with a delicate sprinkling of red and green metallic glitters that almost appear like candy sprinkles on the nail. Best in 3 coats or layered over white.

Holly_Back_Girl_LacquerLoon_Swatch1

Pine-ing For Yule: 2014 Toys For Tots ® charity polish.  A holiday inspired glitter top coat, this polish is swimming with holographic triangle “Christmas Trees” and red star tree toppers.  Sliver holo hex and micro glitters complete this wintery polish.  For each bottle sold at KBShimmer.com from 11/01 until 12/25 $4 will be donated to Tots For Tots ®. 1 Coat Recommended.

Pine-ingForYule_LacquerLoonSwatch

Turnip The Beet (Texture):  A rich sangria colored base accents holographic glitters in magenta, purple and red making this a super sparkly textured polish.  2 Coats Recommended

Turnip_The_Beet_LacquerLoon_Swatch1

Dressed To Gild (Texture):  A gold cousin to Hexy Bikini, this textured polish is rich with holographic gold glitters.  Hints of lavender and lime glitters add depth and extra shine.  2 Coats Recommended

Dressed_To_Gild_LacquerLoon_Swatch1

Too Cold To Hold (Texture):  A rich sapphire blue base is filled with holographic sliver, blue, and green holographic glitters for a bejeweled textured look.  2 Coats Recommended

Too_Cold_To_Hold_LacquerLoon_Swatch1

Flake Dance: Sliver holographic snowflakes dance among a scattering of smaller silver holographic glitters.  Use over your favorite cream color for an instant wintery manicure.  1 dabbed on Coat Recommended, Glitter Placement may be needed.

Flake_Dance_LacquerLoon_Swatch1

Fallen Angle:  A vibrant royal blue jelly, this a-cute polish features holographic blue triangles, sliver holo hexes, and blue hex glitters with micro sparkles.  3 Coats Recommended

Fallen_Angle_LacquerLoon_Swatch1

Mauve On Over: A pale mauve creally base sets off a explosion of colored hexes in orange, navy and aqua. 2-3 Coats Recommended

Mauve_On_Over_LacquerLoon_Swatch1

Deja Brew:  Like a rich cup of java, or a quality cognac, this brown polish has red undertones that set off the linear holographic rainbow.  2-3 Coats Recommended

DejaBrewSwatch

Spot Sign:  Like a wild cat ready to pounce, this spotted polish is ready to bring out our wild side.  Black leopard spot shaped glitters are accented by black dots, small black hexes and micro holographic sparkle.  1 dabbed on Coat Recommended, Glitter Placement may be needed.

Spot_Sign_LacquerLoon_Swatch2

Returning Holiday Favorites:

Kringle All The Way: A glitter top with circle glitters in red, green, and silver.  1 Coat Recommended

Kringle_All_The_Way_LacquerLoon_Swatch1

Merry Pinkmas:  A light cotton candy pink polish featuring red, green and neon glitters in a variety of shapes.  2-3 Coats Recommended

Merrt_Pinkmas_LacquerLoon_Swatch1

All Decked Out: A Christmas Tree inspired polish with a deep forest green jelly base with a rainbow of hex glitters and a scattering of gold stars. 3 Coats Recommended

All_Decked_Out_LacquerLoon_Swatch1

Snow Way:  This snow inspired polish features a pale sky blue creally base with white glitters.  A micro sparkle glistens like fallen snow on a clear winter’s day.  3 Thin Coats Recommended, Let coats dry before moving onto next to avoid dragging.

Snow_Way_LacquerLoon_Swatch1

Sugar Plum Faerie: A soft plum violet crelly with berry, purple and lime colored metallic holographic glitters in different sizes. 2-3 Coats Recommended

Sugar_Plum_Faerie_LacquerLoon_Swatch1


Holiday Promos:

Free Shipping For All Orders over $40 on KBShimmer.com No code needed.  Runs from 11/01-12/31

Free With a $70+ Purchase, Holly Back Girl, a white Christmas crelly polish with red and green glitters.  Use code HBGFREE to receive free polish and free shipping with $70+ purchase. Runs from 11/01-12/31

Free samples!  While supplies last, we will be sending out a sample in each order.  Samples may include scrubs, lotions, vinyl nail decals, soaps, etc.  Orders will also include a branded emery board.

Free Snowman Glitter!  The first 400 orders will receive a bag of 1000 snowmen glitters perfect for winter nail art.

Photo Oct 25, 4 23 01 PM

Other New Items:

It is not just nail polish that is new for winter.  We have new cuticle oil scents, a new scrub scent, and a Christmas/Winter themed vinyl nail decal sheet.

We now have a total of 6 cuticle oil scents, Lemongrass, Pink Sugar, Raspberry Vanilla, Chai Tea, Peppermint, and Unscented.

CuticleOilPens

Chai Tea!

Chai Tea is now available as a sugar scrub.  This warm spicy scent is perfect for fall and winter.

Chai Tea Sugar Scrub by KBShimmer

Christmas/Winter Vinyl Nail Decals

We have a new sheet with 72 fun vinyl pieces, including candy canes, snowflakes, holiday lights, peppermints and more!

kbshimmer-winter-2014-nail-vinyls-5


Christmas Vinyls.

Photo Oct 20, 7 36 21 PM

We hope that you find something to tickle your fancy this winter.  We are gift friendly, and Secret Santa friendly!  Just include a note that you would like us not to include the invoice.

Not sure what to give as a gift, don’t forget, we also have electronic gift certificates!

gift-card2
Don’t forget to enjoy our Spiced Pumpkin scent, perfect for holiday gift giving!

FallPumpkinPromo

Discontinued Colors:

This is alist of items that will be discontinued by the end of the year. We reserve the right to pull colors early if stock runs out and will not be discounting these colors.

Lottie Dottie
Excuse Me, I Blurpled
Spring Training
When The Doves Sigh
Shipwreck
Blinded By The Bright
Sea You Around
Grayscale
Urban Camo
Rush Flower Traffic
Ice Queen
Big Tan On Campus
Would Jubilee It!
Pretty In Punk
Goldie Rocks

In addition, Lump Of Coal Soap has limited stock left, so stock up early for your stocking stuffer soap!

LumpOfCoal1


Gel, Jelly, Crelly, What ?!?

Nail polish and nail art are rapidly growing beauty staples.  As nail polish grows, so does the terms we use to describe nail polish.  Have you wondered what a creally is?  What is the different between gel and jelly?  Listed below are some of the most used terms below with examples, hopefully this helps you navigate the polish world!

Did we miss anything, have a burning question?  Ask below in the comments and we will do our best to answer, and add to the post if needed!

Terms:

3 Free:   A polish that does not contain Toulene, Dibutyl Phthalate (DBP) & Formaldehyde in its ingredients.

4 Free:   A polish that does not contain Toulene, Dibutyl Phthalate (DBP) & Formaldehyde, and Formaldehyde Resin. KBShimmer is 4 Free.

5 Free: A polish that does not contain Toulene, Dibutyl Phthalate (DBP) & Formaldehyde, and Formaldehyde Resin and Camphor.

Boutique/Boutique Polish: Polish companies that may be owned and designed by one (or a few) people, but are made and bottled in labs. RBL, Cult Nails are examples. Some companies in this category may select predesigned polishes from a lab vs. designing on their own, but still often connect directly with the consumer.

Crelly:   A polish finish that can be layered to cover the nail line, but still has some sheerness to allow glitters to show through.

Example: Oh Splat!  A white crelly polish that has a rainbows worth of glitters that shine through.

IMG_20140120_173642

Crème/Cream:   An opaque polish with a glossy finish.  Usually opaque in 1-2 coats and that completely covers the nail line.

Example: Stonewashed, an opaque polish that covers in 1 coat.

StonewashedSwatch3

Duochrome:  A polish that shifts between two colors depending on the angle and lighting.

Example: Lilac Dreams (Now discontinued), a lavender polish that shifts to pink depending on angle

IMG_20140121_152526

Foil Method:   The technique used to remove glitter (and gel) nail polish.  A cotton ball/cotton pad and pure acetone is placed on nail, the foil is wrapped around the finger and cotton and left for 5-10 minutes.  Glitter or gel polish should slide right off.  Tutorial Here

FoilMethodRemoval

Gel: Polish that is cured or hardened with a special light. This polish is most often found in salons, and will not harden without the use of special lights.  This is a type of polish, not a finish.

Glitter Top Coat:   A type of polish finish that has glitter suspended in a clear base, best worn over a cream color.

Example: Clown Puke, our multi-colored glitter topper.

IMG_20140203_142715

Holo/Holographic:   A type of glitter that reflects and refracts light, giving off a rainbow shine when viewed in the light.

Example: Hexy BikiniIMG_20140712_173846

Indie or Indie Polish:   Nail polish that is designed, created, and sold by independent owners. Most often, this term is used to mean that polish is hand blended and bottled by the designer directly for sale to the public. Indie company owners often connect via social media directly with the consumer. KBShimmer is owned by Jason and Christy Rose, who still hand make most of the products offered, and are proud to offer unique glitter combinations to adorn your nails.  You can find Christy running the KBShimmer Facebook and Instagram Page.

Jelly: A colored polish that has a transparent finish that may show the nail line. Jelly polishes are not the same as gel polish.

Example: I Got A Crush On Blue, a blue jelly polish with holographic glitters

IMG_20140123_120901

Linear Holographic:   A version of holographic glitter finish that is so micro fine, when applied the glitters line up to form the rainbow effect in a line, strongest in sunlight or direct light.

Example: PT Young Thing, a silver linear holographic polish

IMG_20140514_064233

KBShimmer PT Young Thing outside

Mainstream:   A polish made by a large company such as Zoya, China Glaze, OPI, which can be found in larger stores such as Wal-Mart, Ulta, Sally’s Beauty. These polishes are mass made and there is little, if any direct interaction between the owner(s) and consumers.

Multichrome:   A polish that shifts between multiple colors depending on the angle and lighting.

Example: Pigment Of My Imagination, a polish that shifts from golds, to reds and orange, to blue and indigo depending on the angle.

IMG_20140205_102945

Nail Line/Visible Nail Line (VNL): The nail line is the area where the nail passes the skin at the tip of the finger, often this area is whiter in color and therefore can show if polish is sheer or if too few coats of polish are used.

Example: You can see the slight VNL on the ring finger, this is our jelly polish, Bell Of the Mall

kbshimmerbelleofthemall2

Quick Dry: A type of polish that is designed to dry to the touch in 1-2 minutes, and get fully hard within 5-10 minutes. Clearly On Top is a Quick Dry Top Coat, but KBShimmer polishes themselves are not quick dry.

Example: Clearly On Top

ClearlyOnTop1

Texture: A glitter polish that dries to a rough, bumpy finish.

Example: Partners In Lime

IMG_20140513_075932

Vinyl Nail Decal: A sticky nail art sticker made of vinyl that can be left of the nail to create nail art.

Example: Tribal Pieces from the Tribal Vinyl Decal Sheet.

Gradient Tribal

Vinyl Nail Stencil: A vinyl nail piece that is intended to be placed on a nail, then removed to show the color underneath in a pattern.

Example: Wavy Lines

KBShimmer Anniversary Trio Nail Art 3

Big Thanks to all the bloggers who have sent us photos to use, including The PolishAholic, Nail Polish Wars, Adventures in Acetone and LacquerLoon.


And lets not forget to throw in a few memes.

589f0ef4bf7a99b168d28cc5e399bb76

10987331

NailPolishHappy

swatch-hand

Summer Fun Giveaway

KBShimmer Celebrates its 6th Anniversary with Special Edition Polishes
In celebration, KBShimmer is giving away a gift bag of goodies including a Kindle!

Join KBShimmer at the beach with the Special Edition, three-polish Anniversary set. To celebrate our sixth anniversary, KBShimmer is helping you get in the summer spirit with a beach themed giveaway pack including an Amazon Kindle Paperwhite with a $25 gift card, the polish set, a set of the brand new nail vinyl sheets, lotion, and a sugar scrub, all wrapped in a polka dot towel inside a large beach bag. The polish collection has two bright summer creams and a flashy textured holographic polish.

PrizePhoto

Beach Please: A bright, near neon pink cream with purple leanings. Beach Please is perfect for long summer days on the water. Covers best in 2-3 coats.

BeachPlease

Hexy Bikini: The latest addition to the KBShimmer textured polish line, Hexy Bikini combines holo glitters in silver, teal, and pink and reflects beautifully under the light of the sun. It’s perfect in two coats. Add a topcoat for even more sparkle.

HexyBikiniHolo

Shore Thing: Escape to tropical waters with this bright aqua-mint cream with blue-green undertones. Covers best in 2-3 coats. Shore Thing is so beachy, you’ll feel like you’re in a tropics no matter where you are.

ShoreThing2

The Limited Edition Beach Trio launches on August 1st, just in time for KBShimmer’s birthday. The two creams retail for $7.50 each, the textured polish for $8.75 and will be available at www.HarlowandCo.org and www.KBShimmer.com. For a limited time, this trio will be available for $21, only at www.kbshimmer.com. This giveaway will run from July 21 to July 31, winner must have a US shipping address.  Prize will be sent via FedEx with signature confirmation.  Use the Rafflecopter widget below to enter.

a Rafflecopter giveaway

How To Use KBShimmer Nail Vinyl Decals

We are so excited to now be offering our vinyl nail decal sheets in 6 different patterns (set for launch 06/20/14).  These are a new product for a lot of people, so we have a step-by-step tutorial below showing how to use the vinyl pieces as a peel off stencil.  To see how we use them as a leave on sticker, see our Tribal Nail Art post.


For a long lasting manicure, start with clean nails.  Use KBShimmer pH Prep to clean and prep nails for base coat.

DecalTutorialStep1

Follow by applying a base coat like Basic Training.  Let dry before moving on to next step.  Completely dry polish is key when using vinyl decals.

DecalTutorialStep2

Use a polish that applies in 1-2 coats.  You want polish to be dry, and too many coats will risk the bottom layers not being dry enough.  I am using Radiant Orchid for my bottom color.

DecalTutorialStep3

Cleaning up now will make final clean up much easier.

DecalTutorialStep4

I strongly suggest that you use a quick dry top coat like Clearly On Top to ensure your nails are dry before the next step.  Using a quick dry top coat will also make cleaning up any mistakes easier.

DecalTutorialStep5

Again, making sure the polish is dry is key for a good turn out.  Wet polish will pull up with the vinyl.

DecalTutorialStep6

I find using a tweezers to remove the vinyl from the sheet works best for me, preserving the manicure on my other nails!  Here we are using our Zig Zag Nail Vinyl Decals.

DecalTutorialStep7

Stick the vinyl to your hand to help remove some of the stick.  If they are too sticky, they can be difficult to remove, or can pull up polish.

DecalTutorialStep8

Using a tweezers helps me place the vinyl pieces, but you can use your fingers.  There are so many ways and design possibilities with these, but I have chosen to line them up for a repeating zig zag pattern.

DecalTutorialStep9

Press the vinyl pieces firmly.  Doing so will help polish not seep under the vinyl, leaving you with crisp lines.

DecalTutorialStep10

Now is the fun part.  Cover the vinyls with 1 coat of your accent color.  I love textures, holographic colors, polishes that cover well in one coat and have visual interest.  For this tutorial, I am using She Twerks Out.  If you want your color only in certain areas, or want different colors between the stripes, use the brush carefully apply polish between the vinyl pieces.  Since I am wanting the same color over the whole nail, I don’t worry about “coloring” between the lines.

DecalTutorialStep11

Once your coat of polish is on, you want to start removing the vinyl pieces as soon as possible.  If you wait too long, you risk pulling up the accent polish you just applied along with the vinyl pieces.  Only paint the accent color one nail at a time to prevent the polish drying before you can get the vinyl removed.

DecalTutorialStep12

Here is the nail after vinyl decals are removed.

DecalTutorialStep13

Clean up any polish you got on the skin and cuticle area.  If you used a quick dry clear coat before applying vinyl pieces, you can also use the clean up brush dipped in acetone to clean up any polish that may have bled under the vinyl.  Lightly dab polish you want to remove with the brush.  Repeat if needed, keeping brush damp, but not dripping wet with acetone.

DecalTutorialStep14

I now follow-up with Clearly On Top to smooth out the manicure, add shine and protect the nails.  Make sure to apply top coat to the very tip of the nail to reduce chips.

DecalTutorialStep15

Finished nails!!  Repeat on additional nails if desired, or use technique as an accent nail.

DecalTutorialStep16


We think our new nail vinyl decals are a easy way to add a fun look to manicures.  Do you have a manicure using KBShimmer nail vinyl decals and polishes?  Send it to us to share on our website and social media outlets.  customerservice@kbshimmer.com  We would love to see them!


NailVinylDecaCollegeNormall

Gradient Tribal Nail Art Using KBShimmer Nail Vinyl Decals

TribalSheetWeeded

Nail vinyl decals are a fun way to add art and design to your manicure.  Today, I am going to show you step by step how to create the summer look below using a gradient technique with Life Rose On, You’re So Shellfish and Chick Me Out along with Eclipse and our new Tribal Themed Nail Vinyl Decals.

Step34


First, start with a white base to make the gradient colors pop.  I used a white from Wet and Wild, but any white will do.  You can see the white on my middle two fingers.

Step1

Next, using a cosmetic wedge, paint on a stripe of each color.  I did this twice for each color as the sponge sucks in the polish.

Step2

Take the sponge and position above nail you want to paint.  In a dabbing motion, use sponge to apply polish to nails.  Try and move it top to bottom a tiny bit to blend the color.  Do this quickly and lightly, as too many dabs or lots of pressure will pick up the polish from the nail leaving bald spots.

Step3

Step4

Repeat on additional nails by again painting stripes on the wedge, touch up any blank spots around nail edge with corner of sponge.

Step5

Clean up fingers with acetone and brush.  Cleaning up now will make additional clean-up easier later in the process.

Step6


Here is the look after clean-up.

Step7

At this point, you can just let the colors dry.  But I like to use Clearly On Top to ensure that the polish is completely dry before moving on to the next step.

Step8

Either way, make sure to wait at least 20 minutes before moving on to the next step so vinyl decals do not ruin polish when removed later on.  Adding a top coat will also help smooth out the look of the gradient and, if you happen to get some polish that seeps under the vinyl decals, the clear coat will provide enough of a barrier between the gradient design that you can use a clean up brush and acetone to remove it.

Step9

When removing nail vinyl decals from the sheet, I like to use a tweezer to grab and place vinyl.  These fine point Tweezerman tweezers are my go to.  Some pieces may have additional cutouts inside that need to be removed before use.

Step10

I remove the desired vinyl pieces from the sheet and place on my hand.  I then remove and place on my hand once more for pieces I want to later remove (those being used like stencils).  This will help remove some of the adhesive that can pull up polish (if polish is not fully dry).

Step11

Using your tweezers, place the vinyl decals into nails in the desired positions.  Press firmly to ensure that polish will not seep under vinyl decals.  Some of these pieces will actually stay on the nail, but for longer pieces like straight lines, let one end overlap the nail for easier removal later.

Step12

We will start with the pinky nail. Paint on a coat of Eclipse, a black cream.  Use a polish that covers in one coat, as you do not want polish to dry before removing vinyl and do not have time for multiple coats.

Step13

Here is the pinky nail covered with paint.  Wait not more then 20-30 seconds before removing vinyl.  If using a quick dry polish, remove right after you finish painting.  Only paint one nail at a time, if you do more the polish may dry before all pieces are removed.

Step14

Using your tweezers, remove vinyl by pulling the free edge up that touches the skin or hangs off the end of the nail. Pull away from your nail in a steady motion.

Step15

Step16

Then, move onto the point finger nail and repeat process on that nail.

Step17

Step18

Step20

The thumb is next.  The thumb has three pieces to remove.

Step21

Step22

Step23

Next, we will move to the middle finger.  This finger has two pieces that overlap for easy removal, and in the middle, the large diamond will also be removed.  Since there are no areas of the diamond, we will use a different technique for removal.

Step24

Paint the nail like the others. Quickly remove both the upper and lower stepped vinyl decals.

Step25

Using the pointy tip of the tweezers, carefully pierce the center of the diamond vinyl.  “Hook” the tip of the tweezers, and pinch tips to help pull up the diamond piece.  You can also use a safety pin.  If you prefer, you can also try and catch the edge of the diamond and pull up to remove.

Step26

Here is it removed.  At this point, the ring finger has a vinyl piece on that we will be leaving in place as a nail sticker. Clean up excess polish on cuticles as done previously with brush and acetone.

Step27

We can also use the bonus smaller diamonds and triangles as accent pieces.  For the middle finger, we will be using a smaller diamond from inside the ring finger piece.

Step28

Center  in the blank diamond area and place on the nail with the tweezers.  Press down firmly.

Step29

From the pointer finger vinyl decal pattern, we can pull tiny triangles to use as accents on the pink nail.

Step30

Place on the pinky in desired positions.

Step31

When last decals are placed, ensure all pieces are stuck to the nail by pressing firmly and follow with 1-2 coats of Clearly On Top to add shine and a protective finish to the nails.  It is perfectly fine to use top coat over the vinyl decals to seal in place. Nail Vinyl decals are not reusable.

Step32

There you go!  A fun, summery tribal look made easy with vinyl decals.

Step33

Step34


2014 KBShimmer Summer Collection


Summer Collection Set For Release June 20th, 2014

We are excited to announce the addition of 12 new colors launching this Friday  10 glittery shades and two bold creams will be added.

We adore glitter top coats and with almost a dozen creams in our collection it was time to bring more glitter pairings to our line. We are adding 4 new glitter top coats that pair well with many of our cream polishes. In addition, we are bringing in two new cream colors, including a near neon peachy orange ideal for pedicures, and a cream inspired by the 2014 Pantone color of the year, Radiant Orchid. We are also bringing in more creally and jelly polishes to round out the summer collection.

In addition to polish, we are branching into nail art products with 6 varieties of nail vinyl decal sheets. Nail art is a booming area in the fashion and beauty industry. Even so, nail art is not always easy to create for the home polish lover. I struggle myself with more complicated designs.  With these nail vinyl decals, it is a breeze for the home user to create wearable nail art that looks professional.  Come back soon for nail vinyl tutorials.

Nail vinyl decal sheets will retail for $5 each. Each glitter polish will retail for $8.75 per 15 ml bottle, while the creams will retail for just $7.50 per 15 ml bottle.

BIG THANKS to Gabi from Lacquer Loon for the swatches below.  Follow her at https://www.facebook.com/LacquerLoon and on IG @lacquerloon

 SummerCollege

The Glitters & Holos:

 IMG_20140612_175248

SkinnyMixedPeelings

Mixed Peelings – A creamy off white polish with citrus and fruit colored glitters in neon green, lemon yellow and watermelon pink.

IMG_20140612_195639

SkinnyLookHighAndHolo

Look High And Holo – A raspberry jelly with a rainbows worth of holographic glitters in hexes and squares.

IMG_20140612_185746

SkinnyPeakMyInterest

Peak My Interest – A melon pink colored polish with triangle glitters in white, pink and dark aqua.

IMG_20140612_193114

SkinnySeaYouAround

Sea You Around- This deep emerald green near teal jelly features fuchsia and silver circle glitters, light blue squares hexes in a base with scattered fuchsia micro slivers and micro sparkle.

IMG_20140612_110045

SkinnyMintalVacation1

Mint-al Vacation- This light aqua seafoam has two personalities. In low light, is has a beautiful white shimmer, but in the sun or bright light, you can see a holographic rainbow of color.

PerwinkleInTimeLacquerLoon

SkinnyPeriwinkleInTime2

Periwinkle In Time – A periwinkle colored creally polish loaded with holographic glitters in aqua, navy blue, sliver and violet.

Glitter Top Coats:

IMG_20140612_223429 

SkinnyScribbleMeThis

Scribble Me This – A graffiti inspired glitter top coat featuring mini stars, triangles, and neon glitters.

IMG_20140612_223018

SkinnySweetWave

Sweet Wave – A Bright pastel candy inspired glitter top coat with white, mint, periwinkle and watermelon colored glitters.

IMG_20140612_220943

SkinnyRedWhiteAndBluetiful

Red, White & Blue-tiful – A limited edition top coat with mini red, holographic sliver and holographic blue stars. Small red, silver and navy blue glitters along with micro holographic sparkles complete this patriotic polish.

IMG_20140612_224002

SkinnyHappilyEverAster

Happily Ever Aster – A floral inspired glitter top coat with purple, lavender, light aqua and white glitters swimming in a sparkling base.

The Creams:

IMG_20140612_204336

Radiant Orchid – Radiant Orchid, 2014 color of the year, is the ideal shade to transition nails from spring to summer and even fall.  This pink toned purple has fuchsia and mauve undertones.

IMG_20140612_214310

SkinnyYoureSoShellfish

You’re So Shellfish – Near neon peachy orange perfect for summer pedicures.

Nail Vinyl Decals:

DecalCollege


KBShimmer products can be found at Http://www.KBShimmer.com. For sales outside of the US visit http://www.HarlowandCo.org.

KBShimmer was founded in 2008 by the husband and wife team of Jason and Christy Rose. KBShimmer offers unique and colorful nail glitter nail polishes that are Big 3 Free, with all glitter formulas being completely free of chemicals such as toluene, formaldehyde, formaldehyde resin and dibutyl phthalate (DBP). KBShimmer glitter polishes feature a flat glitter grabbing brush for easy application. KBShimmer also offers a 2-free quick dry polish top coat, olive oil lotion, sugar scrubs, lip balms, cold process soaps and other skin care products.

###

If you would like more information about KBShimmer, contact Christy Rose by emailing sales@kbshimmer.com or visiting Http://www.KBShimmer.com.

© 2014 KBShimmer. All rights reserved