Tag Archives: glitter

2014 KBShimmer Summer Collection


Summer Collection Set For Release June 20th, 2014

We are excited to announce the addition of 12 new colors launching this Friday  10 glittery shades and two bold creams will be added.

We adore glitter top coats and with almost a dozen creams in our collection it was time to bring more glitter pairings to our line. We are adding 4 new glitter top coats that pair well with many of our cream polishes. In addition, we are bringing in two new cream colors, including a near neon peachy orange ideal for pedicures, and a cream inspired by the 2014 Pantone color of the year, Radiant Orchid. We are also bringing in more creally and jelly polishes to round out the summer collection.

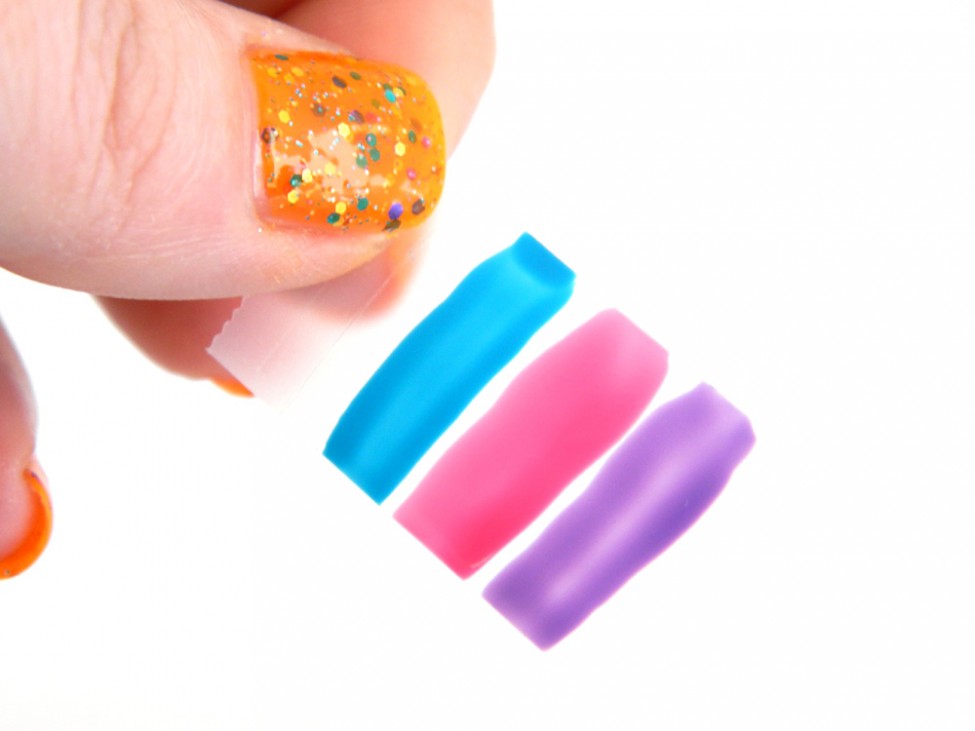
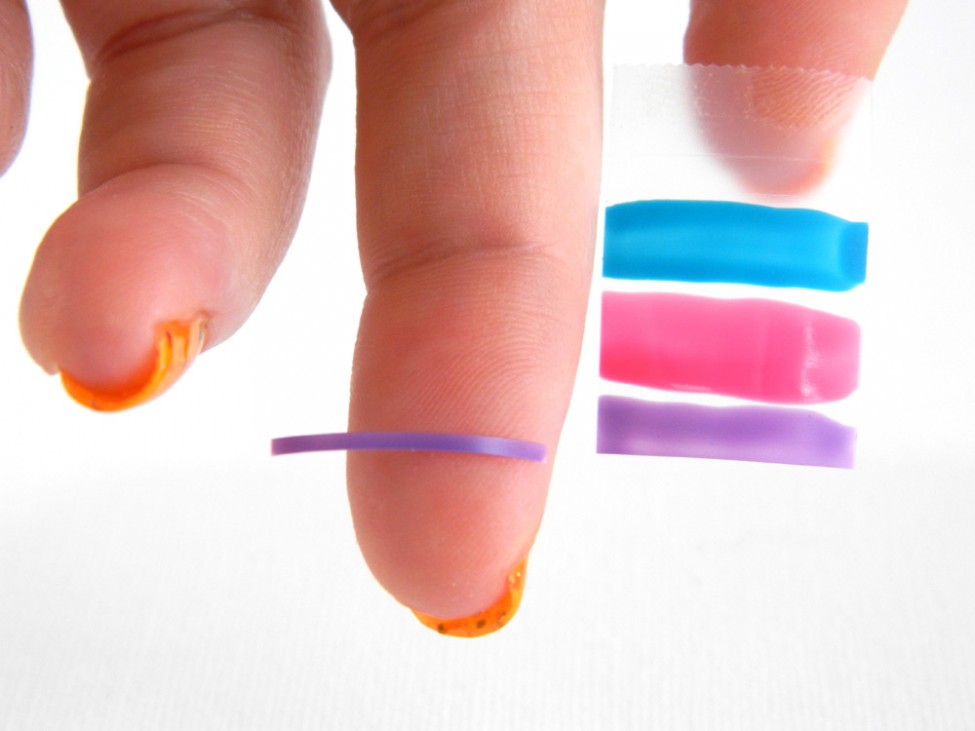
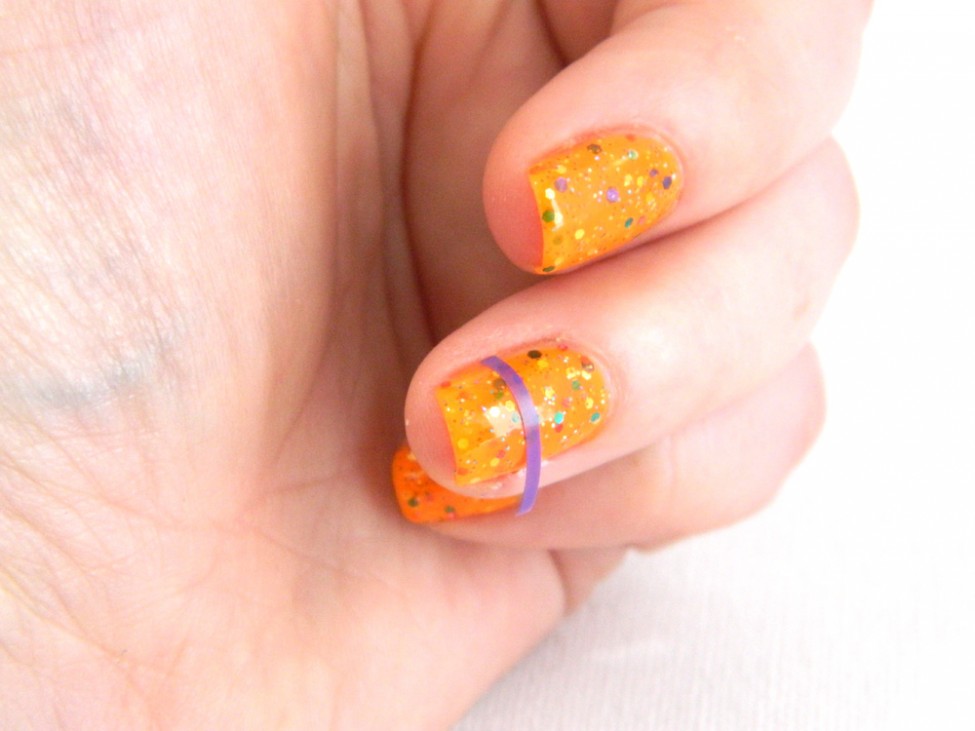
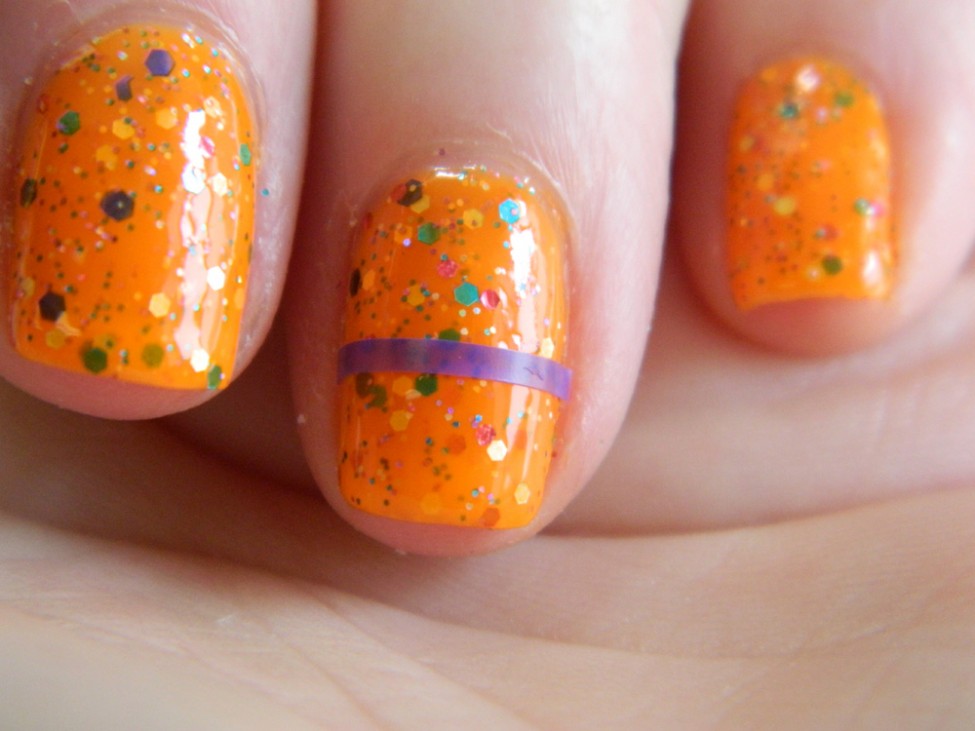
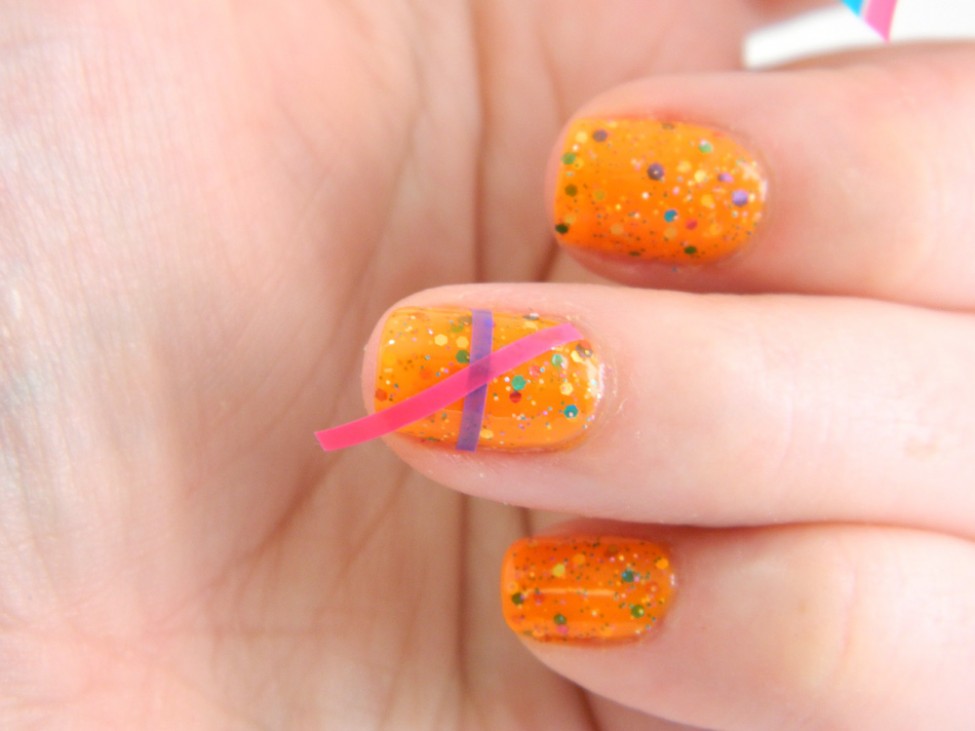
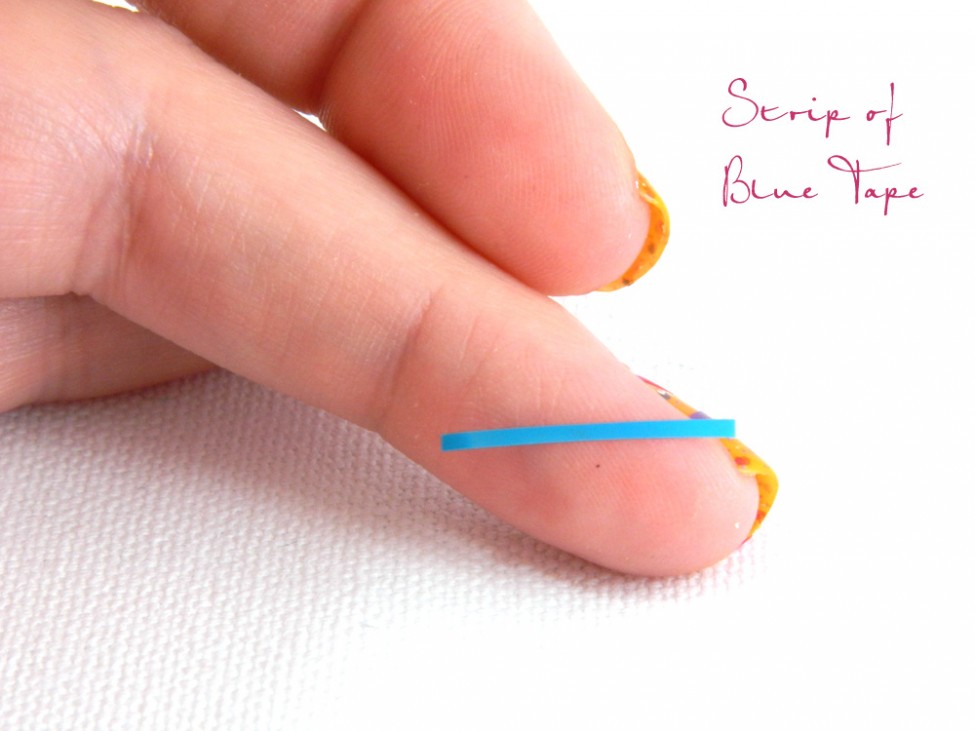
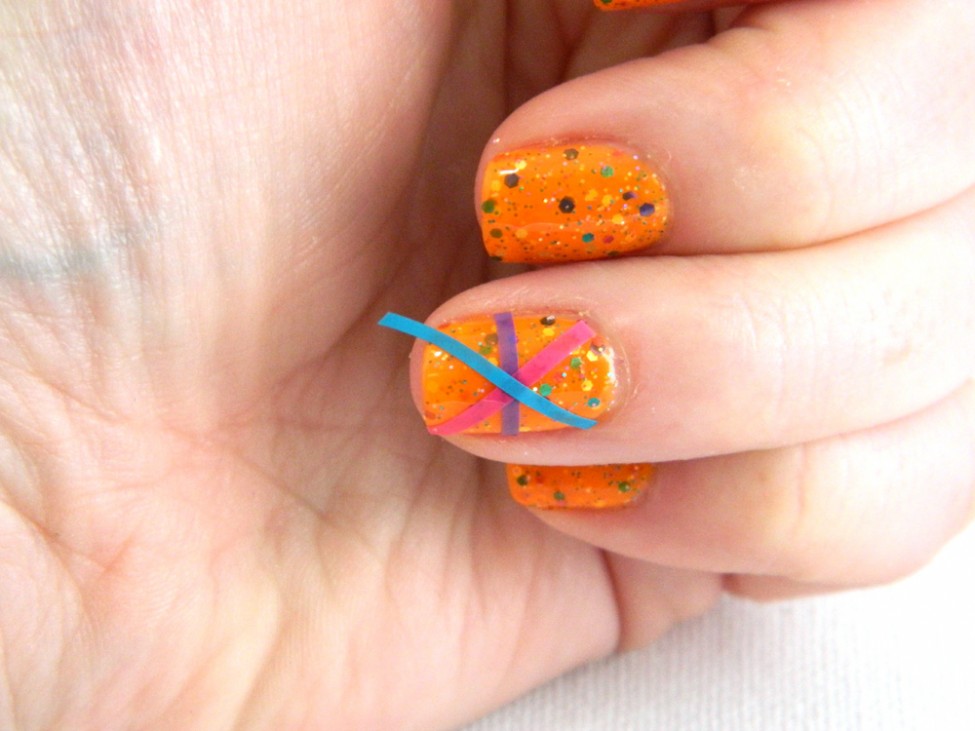
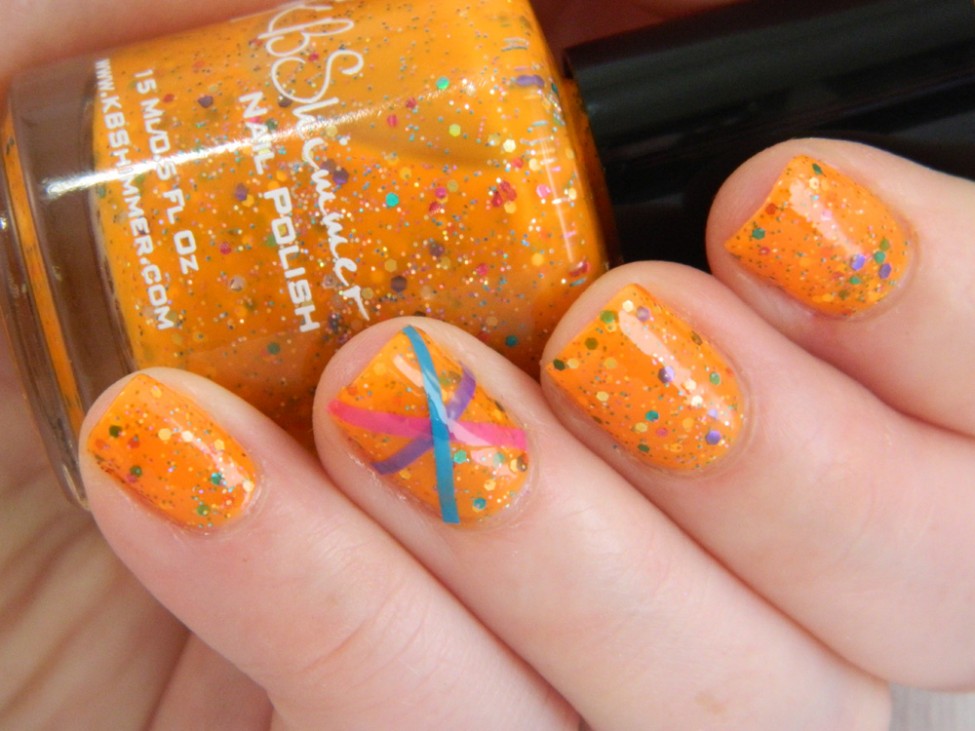
In addition to polish, we are branching into nail art products with 6 varieties of nail vinyl decal sheets. Nail art is a booming area in the fashion and beauty industry. Even so, nail art is not always easy to create for the home polish lover. I struggle myself with more complicated designs.  With these nail vinyl decals, it is a breeze for the home user to create wearable nail art that looks professional.  Come back soon for nail vinyl tutorials.

Nail vinyl decal sheets will retail for $5 each. Each glitter polish will retail for $8.75 per 15 ml bottle, while the creams will retail for just $7.50 per 15 ml bottle.

BIG THANKS to Gabi from Lacquer Loon for the swatches below.  Follow her at https://www.facebook.com/LacquerLoon and on IG @lacquerloon

 SummerCollege

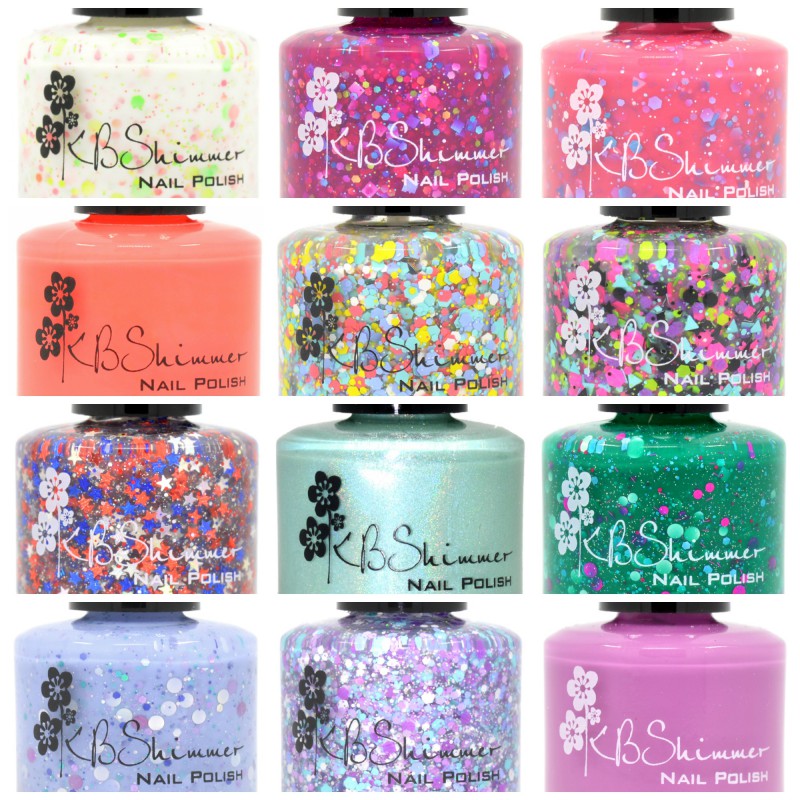
The Glitters & Holos:

 IMG_20140612_175248

SkinnyMixedPeelings

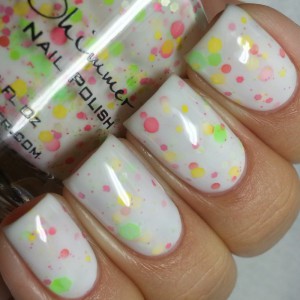
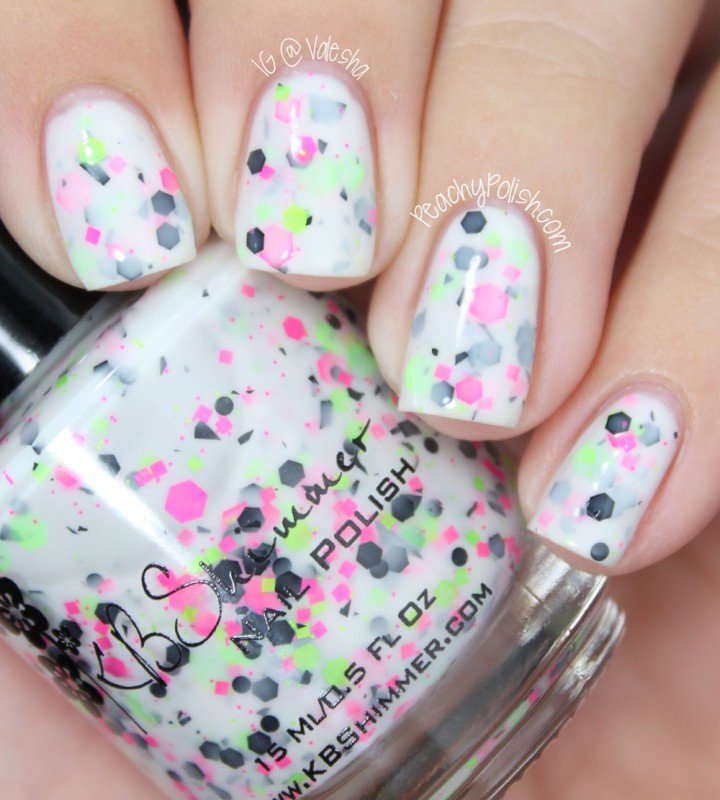
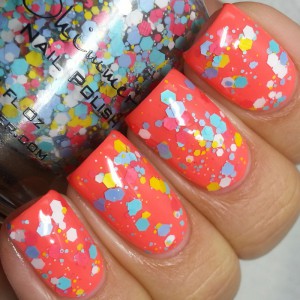
Mixed Peelings – A creamy off white polish with citrus and fruit colored glitters in neon green, lemon yellow and watermelon pink.

IMG_20140612_195639

SkinnyLookHighAndHolo

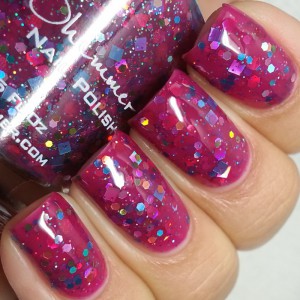
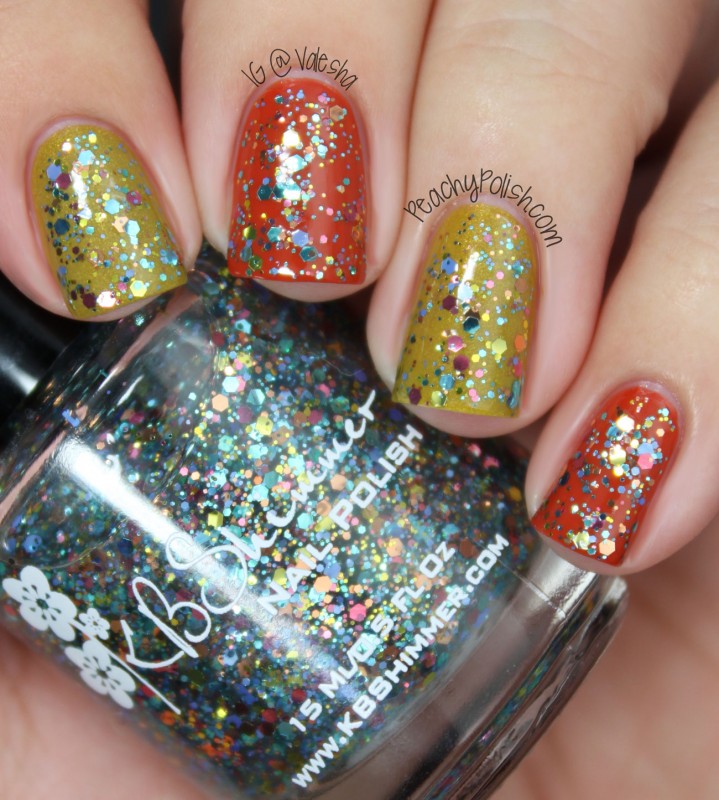
Look High And Holo – A raspberry jelly with a rainbows worth of holographic glitters in hexes and squares.

IMG_20140612_185746

SkinnyPeakMyInterest

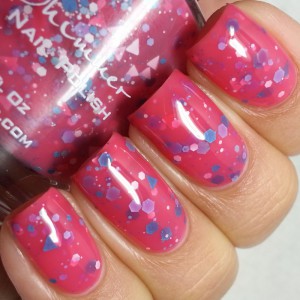
Peak My Interest – A melon pink colored polish with triangle glitters in white, pink and dark aqua.

IMG_20140612_193114

SkinnySeaYouAround

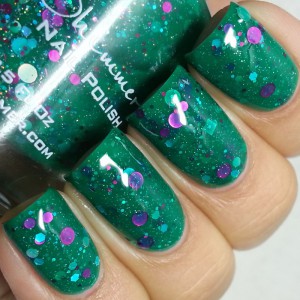
Sea You Around- This deep emerald green near teal jelly features fuchsia and silver circle glitters, light blue squares hexes in a base with scattered fuchsia micro slivers and micro sparkle.

IMG_20140612_110045

SkinnyMintalVacation1

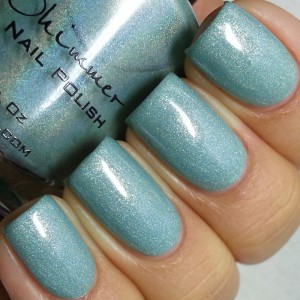
Mint-al Vacation- This light aqua seafoam has two personalities. In low light, is has a beautiful white shimmer, but in the sun or bright light, you can see a holographic rainbow of color.

PerwinkleInTimeLacquerLoon

SkinnyPeriwinkleInTime2

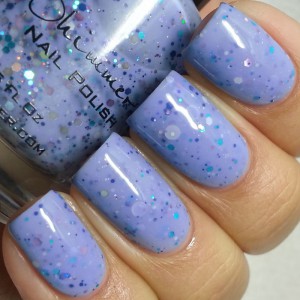
Periwinkle In Time – A periwinkle colored creally polish loaded with holographic glitters in aqua, navy blue, sliver and violet.

Glitter Top Coats:

IMG_20140612_223429 

SkinnyScribbleMeThis

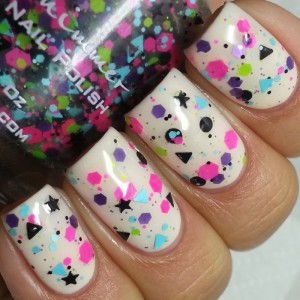
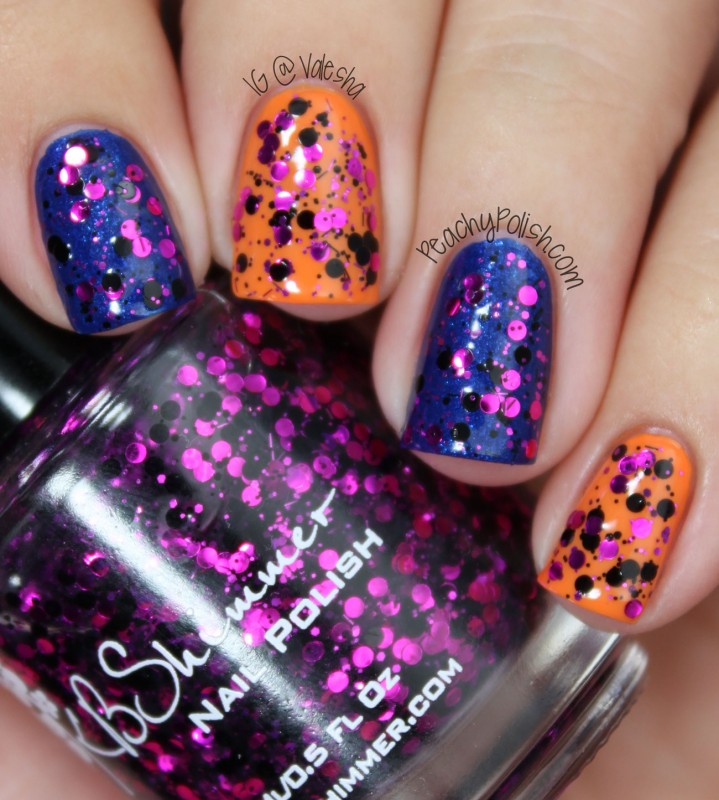
Scribble Me This – A graffiti inspired glitter top coat featuring mini stars, triangles, and neon glitters.

IMG_20140612_223018

SkinnySweetWave

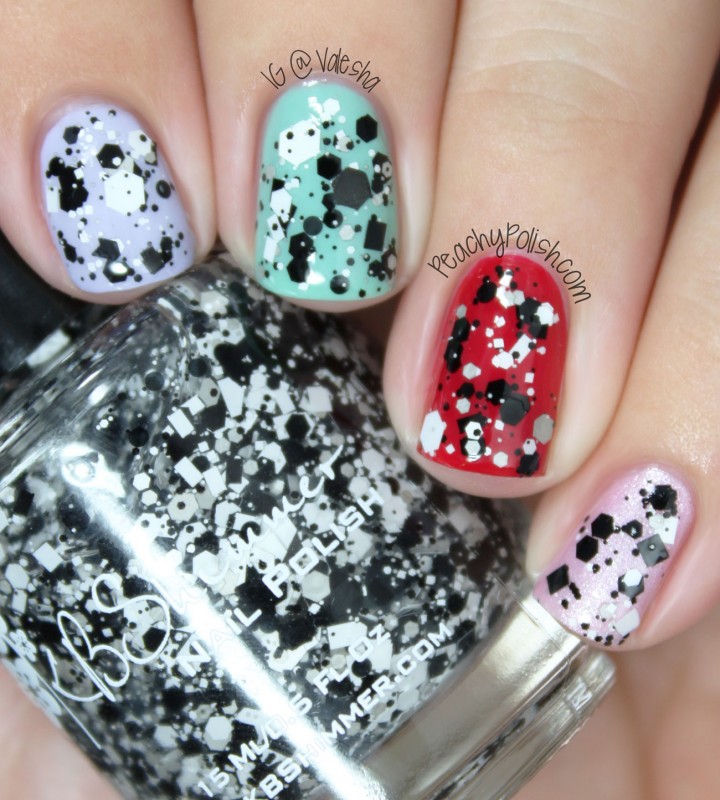
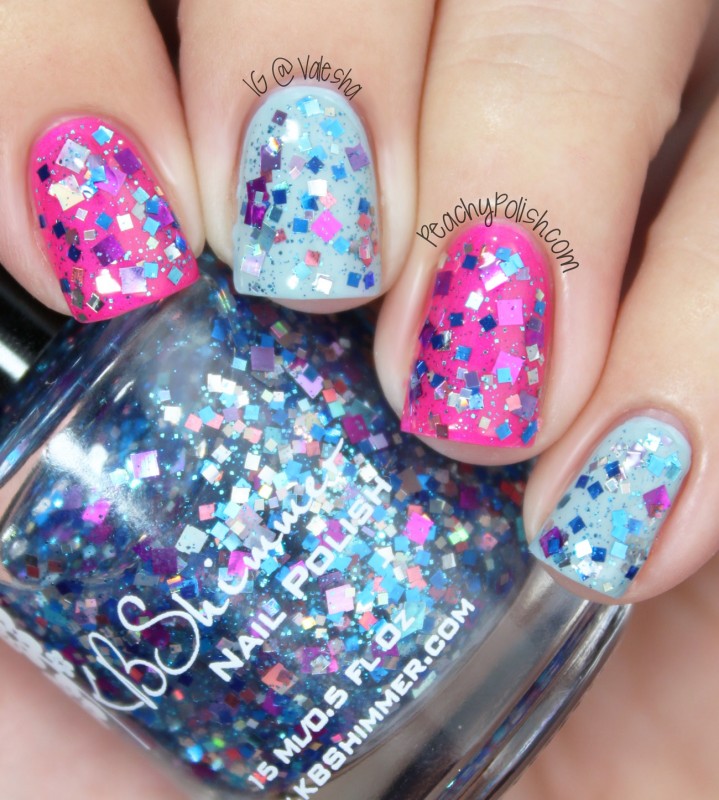
Sweet Wave – A Bright pastel candy inspired glitter top coat with white, mint, periwinkle and watermelon colored glitters.

IMG_20140612_220943

SkinnyRedWhiteAndBluetiful

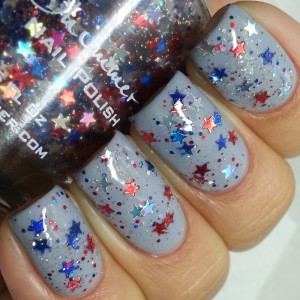
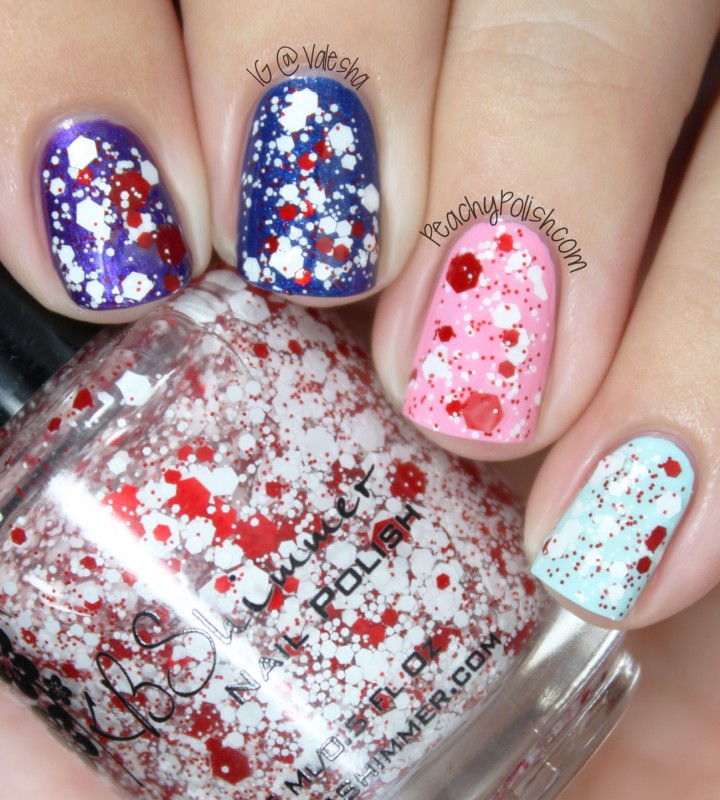
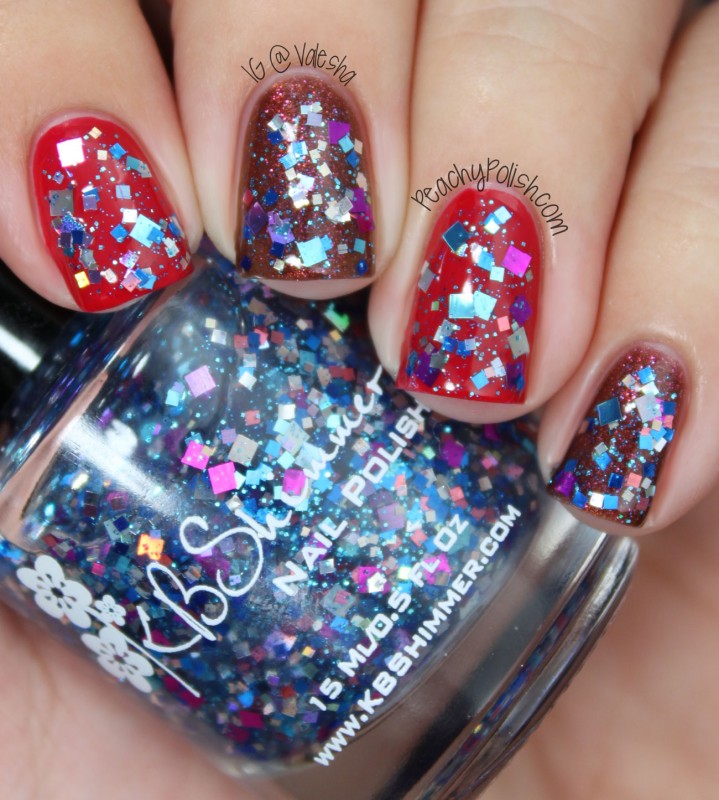
Red, White & Blue-tiful – A limited edition top coat with mini red, holographic sliver and holographic blue stars. Small red, silver and navy blue glitters along with micro holographic sparkles complete this patriotic polish.

IMG_20140612_224002

SkinnyHappilyEverAster

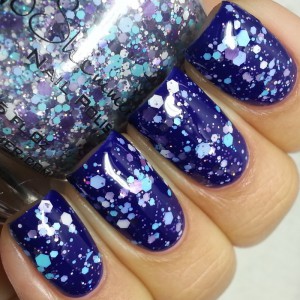
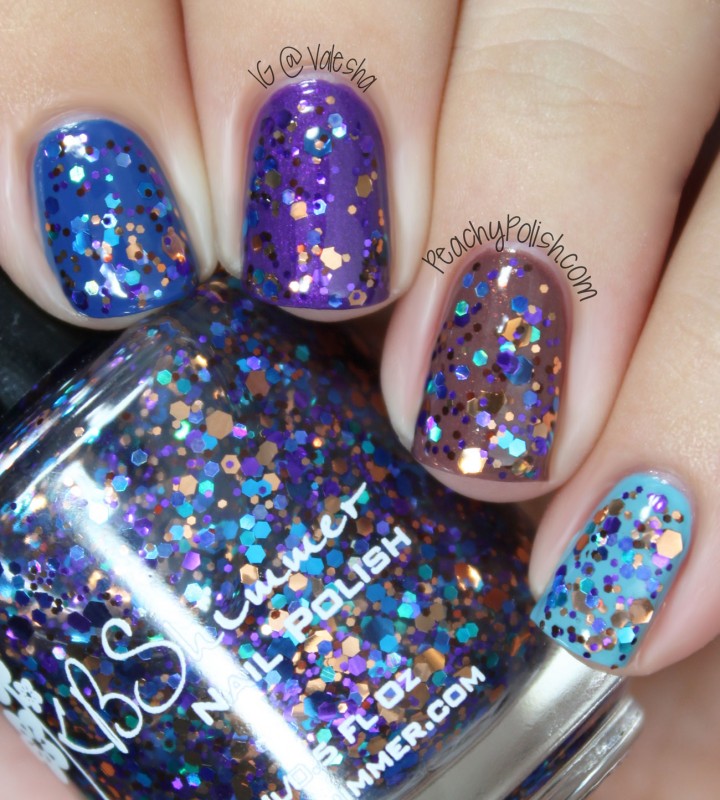
Happily Ever Aster – A floral inspired glitter top coat with purple, lavender, light aqua and white glitters swimming in a sparkling base.

The Creams:

IMG_20140612_204336

Radiant Orchid – Radiant Orchid, 2014 color of the year, is the ideal shade to transition nails from spring to summer and even fall.  This pink toned purple has fuchsia and mauve undertones.

IMG_20140612_214310

SkinnyYoureSoShellfish

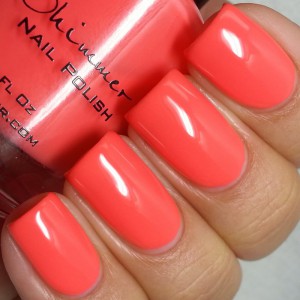
You’re So Shellfish – Near neon peachy orange perfect for summer pedicures.
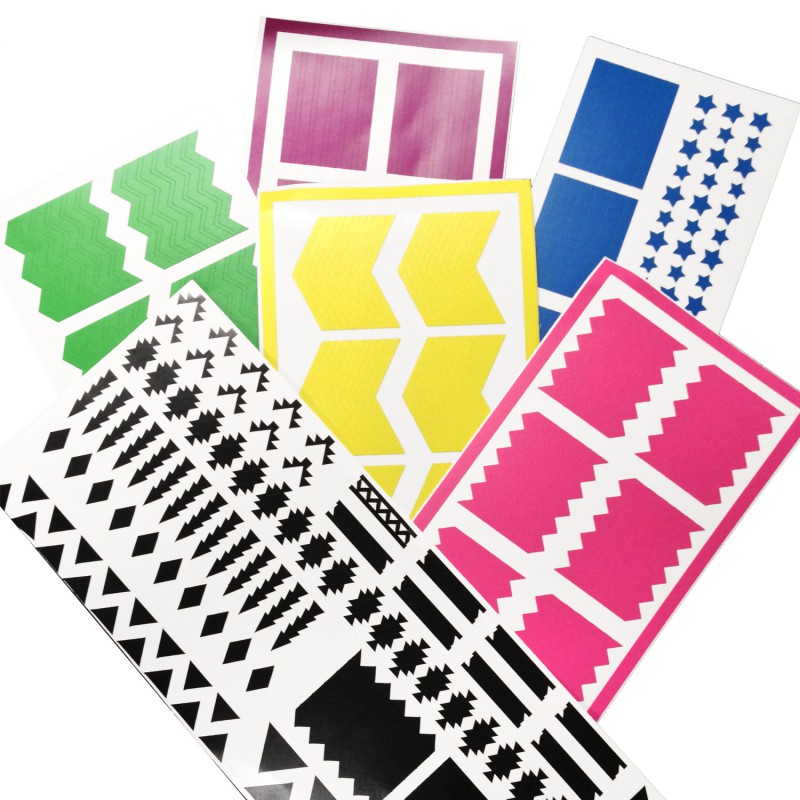
Nail Vinyl Decals:

DecalCollege


KBShimmer products can be found at Http://www.KBShimmer.com. For sales outside of the US visit http://www.HarlowandCo.org.

KBShimmer was founded in 2008 by the husband and wife team of Jason and Christy Rose. KBShimmer offers unique and colorful nail glitter nail polishes that are Big 3 Free, with all glitter formulas being completely free of chemicals such as toluene, formaldehyde, formaldehyde resin and dibutyl phthalate (DBP). KBShimmer glitter polishes feature a flat glitter grabbing brush for easy application. KBShimmer also offers a 2-free quick dry polish top coat, olive oil lotion, sugar scrubs, lip balms, cold process soaps and other skin care products.

###

If you would like more information about KBShimmer, contact Christy Rose by emailing sales@kbshimmer.com or visiting Http://www.KBShimmer.com.

© 2014 KBShimmer. All rights reserved

The Dos & Don’ts of Picking Undies!

Hi everyone!  My name is Valesha and I run a little blog called Peachy Polish.  I’m so excited to get to do a post on KBShimmer’s blog!  It is such an honor for me since KBShimmer is one of the first indie polishes that I fell head over heels for.  🙂

For those of you who don’t know, “undies” are polishes that are worn under glitter topcoats.  So I’m here to show you how I pick my undies!  This is by no means the be-all and end-all of picking out undies and there are infinite exceptions to my thoughts and ideas of what looks good.  I do spend a lot of time before I start swatching any polish, picking out undies I think will fit nicely with a particular glitter polish.  Choosing colors that look good together is something I’ve been meticulous about since I was a child.  My mom tells me horror stories of me being in complete disarray because my stirrup pants didn’t match my turtleneck.  Yep, I was one fashionable kid.  LOL!   I think picking good undies is the key to making your manicure pop so here are my personal do’s and don’t’s for picking out undies!


DON’T: Pick undies that make the glitter disappear.

While the undie choices here makes the glitter look very subdued (which is great if that’s what you are going for!) it also makes one color of glitter blend into the base.  If you want to show off a glitter polish to it’s full potential, you want to pick an undie that will make the glitter be the focal point.  Here I used one coat of “A Dot Mess” over Illamasqua “Obsess” and Essie “Licorice.”

KBShimmer A Dot Mess


DO:  Pick a color that let’s the glitter do the talking.

In these photos I used “A Dot Mess” over Zoya “Song” and Zoya “Arizona.”  I chose these two colors as undies because they really let the glitter be the star.  The colors of the undies compliment the colors of the glitter without overwhelming it.  Now, I would never wear this mani exactly like it is here because it is much too busy to use two base colors with a glitter that’s so detailed as it is but each undie on it’s own with “A Dot Mess” on top would be magnifico!

KBShimmer A Dot Mess

Here’s another fun example of letting the glitter do the talking.  A red and white glitter such as “Candy Cane Crush” is reminiscent of so many holidays so it’s visually appealing to layer this pretty glitter over a variety of colors.  A purple polish like OPI “Tomorrow Never Dies” topped with a coat of “Candy Cane Crush” is perfect for Valentine’s Day.  CCC on top of Zoya “Song” is a great combo for the 4th of July.  CCC over OPI “Pink Friday” is a tasty treat that reminds me of Valentine’s Day or a peppermint-y Christmastime treat!  And Essie “Mint Candy Apple” under CCC is like a bright and fun winter theme!

KBShimmer Candy Cane Crush


DO: Wear multicolored and neutral glitters over every color of the rainbow!

Glitters like “Clown Puke” have such an abundance of colors that you can basically wear it over any undie!  When in doubt, a multicolored glitter over white or black polish always makes a statement!  There really isn’t a don’t for this except that usually it looks best if you use an undie that’s complimentary to one of the colors in the glitter or use a neutral like black, white, gray or nude as the base color.  “Clown Puke” for example is bright and bold, so I choose bright and bold undies!  It wouldn’t have looked very good layered over a dark colored undie like maroon, for example.  From pointer to pinkie: Zoya “Darcy”, OPI “Who The Shrek Are you?”, Zoya “Zuza” & Butter London “Primrose Hill Picnic” all topped with a single coat of “Clown Puke.”

KBShimmer Clown Puke

When we are talking about neutral colored glitters, they can truly be worn over any color.  The sky is the limit when it comes to undie and glitter topper combinations.  “Grayscale” has white, black and gray matte glitters and would look amazing over every color.  I choose to layer it over (from pointer to pinkie) Face Shop “PP405”, Essie “Turquoise & Caicos”, Essie “She’s Pampered” & Zoya “Gie Gie.”

KBShimmer Grayscale

I would also consider silver to be a neutral, since it’s along the same lines of gray.  You can wear silver glitters over any color you can think of, as well.  I prefer wearing silver glitters over creme polishes as to not overwhelm the amazingness of the blingy silver, especially if the glitter is holographic.  We want to holo to do the majority of the talking here so I used one coat of “Ice Queen” over Essie “Snap Happy”, Dior “Mango”, Deborah Lippmann “Almost Paradise” & Nfu Oh! “JS15.”

KBShimmer Ice Queen


DON’T: Go too crazy when choosing a contrasting color!

Do we want the undies to contrast the glitter topcoat enough that the glitter won’t disappear?  Yes!  But bear in mind, you can go too far.  Pairing a pastel glitter like “Pastel Me More” with an olive green like China Glaze “Trendsetter” or a deep reddened orange like Sparitual “Clay” takes away from the fun and cheeriness of the glitter and isn’t aesthetically appealing.  The pairings do nothing for the undies or the glitter.  You want the undie to make the glitter better and vice versa!

KBShimmer Pastel Me More

The same goes for these combinations of “Squared Away” with Essie “She’s Pampered” and Cult Nails “Afterglow.”  The colors of the polishes and glitter just don’t do anything to make each other better.

KBShimmer Squared Away


DO: Choose an undie that’s in the same color family!

A great rule of thumb is to choose an undie that’s just a shade or two different from one of the colors of glitter, since we don’t want the glitter to disappear.  This is a good example of what I mean, each column starts out lighter at the top and gets darker as you go down but it doesn’t change in color tone (like an ombre!)  For this I did one coat of “Pastel Me More” over Essie “Where’s My Chauffeur?” and OPI “Pink Friday.”  Each of the polishes are just a shade or two off from one of the glitters in “Pastel Me More.”

KBShimmer Pastel Me More

Once again, the same goes for these combinations of “Squared Away” with China Glaze “Beach Cruise-r” and Face Shop “BL602.”  Each undie is a “one-off” of one of the glitters in the topper.  The undies really compliment the glitter, while still making the glitter bits stand out.

KBShimmer Squared Away

And here is one last example of using base polishes that are just one or two shades different from the colors in the glitter polish.  All of these are gorgeous combinations that are really eye catching!  I did one coat of “Bejeweled” over NCLA “Venice Beach Vixen”, Rescue Beauty Lounge “Pause”, OPI “Wooden Shoe Like To Know” & Zoya “Rocky.”KBShimmer Bejeweled

I hope that these are some useful pointers for those of you who might have a hard time trying to choose good undies!  I’d love to know, how do you like to choose undies for your glitter toppers?  Do you have a method you like to use or do you like using a randomly picked base color?

Thank you to Christy from KBShimmer for letting me come over and do such a fun guest post on the KBShimmer blog! ♥

Glitter Polish 101 – Tips for Application, Removal, and Everything Between!

I get questions often on how best to apply glitter polish, how to reduce chipping and extend wear, the best way to remove glitter polish.  Below are some of the tips and tricks I have compiled, plus two videos on application and removal.

What's-Your-Damage

First, I want to say that KBShimmer nail polish is not a Gel polish.  You do not need any special lights or machines for application.  KBShimmer polish is not a quick dry polish.  You many see the 60 second polish, or 90 second polish.  Ours is not that type either.  It is a regular polish, that will take time to dry.  For the best dry time, use thin coats, waiting in between each coat for at least a few minutes will help the polish dry.

Application Instructions

  • Roll bottles between hands before use.  Large glitter can sink to the bottom and polish can separate in the heat.  With our polish, you can shake it. Leaving the bottle upside down for a few minutes before application can help reduce “fishing” for larger glitters.
  • Wash hands and ensure nails are clean, use KBShimmer Nail Prep if desired.  Make sure hands and nails are dry after washing.
  • Use a base coat.  This will protect your nails from staining and aid polish in adhering to the nail.
  • To apply evenly, dab the polish on the middle of the nail, then sweep the brush to distribute.
  • Apply in thin, even coats.  Two – three coats are recommended for the best look, but some sheer polish may be best layered over other colors.
  • Glitter polish will feel rough on the nail once dry.  To achieve a smooth and shiny look, use a fast dry top coat like KBShimmer Clearly On Top.  Some polish may need two coats of top coat for that smooth, glass like finish.

[youtube]http://youtu.be/IMTKrBUs46c[/youtube]

Easy Removal

FoilMethodRemoval

  • Gather polish remover, cotton balls, and tin foil.
  • Cut or tear foil into palm sized pieces.
  • Soak the cotton balls with polish remover,
  • Place soaked cotton ball on the polished nail.
  • Cover tightly with tin foil.  Wait 5-10 minutes.  Twist foil around the nail and pull off.  Polish and glitter should come off clean.
  • If any residue is left, use more remover and cotton balls to remove the excess.
  • Wash hands to remove any stray glitter, preferably with KBShimmer Soap!

[youtube]http://youtu.be/LSHqLYbZ5ss[/youtube]


Why Does Polish Chip/Peel/Come Off My Nail

  • Top and base coats – Different top and base coats can cause polish to pop right off or chip. There is a base coat called Yellow Stopper that causes glitter polish to pop off, and Seche Vite top coat can also cause polish to peel away. Both shrink causing air to get under the polish and it will chip or pop off.  KBShimmer Clearly On Top and Basic Training both work for many people, and your favorite brand many work well too.  Layering a cream polish you know sticks under the polish.
  • Polish Thickness:   Apply in thin layers that can dry, instead of thick layers. Thick layers many not dry completely, never properly adhering to the base coat. I also like to apply the top coat, no matter the brand, while the last layer of polish is still tacky, but not wet, so they dry together.
  • Application- Make sure that you not only wrap the tip of your nail with polish, but that you wrap the tip of the nail with the top coat too. Exposed tips can greatly increase chips and decrease wear time.
  • Moisture in the nails (i.e. you polish after a shower or bath, wash your hands often or right before applying).  Your nails need to be dry before polish. Wet nails will contract when dry and polish will pop right off. The same happens if you spend a lot of time in the pool or with your hands in water, the nails will expand causing cracks and separation and the polish will then chip or peel.   If you plan on washing dishes, gloves are a manicures best friend.
  • Oil on the nails: Some people have very oily nails, and polish therefore will not stick well. You can try cleaning your nails before applying the base coat with a nail prep product like KBShimmer Nail PH Prep.  Make sure if you are using lotion that you wait a few hours for it to absorb before polishing. Also try using lotion a few hours before applying polish and don’t use moisturizing remover on your nails right before polishing.
  • Dry Nails:  The opposite of oil nails, if you have dry nails that peel, the base coat and polish will have a hard time sticking, as your nail will still peel letting air under the polish. Using a nail strengthener, moisturizing often (but not right before polishing) and never buffing nails will help improve nails to reduce peeling, therefore helping polish stick longer.
  • Body Chemistry/Nail Structure- Last, everyone has such different body chemistry, such different nails, that not every polish brand will work well for them. I have spoken to a few ladies that no matter the brand, polish never lasts more than a day. Some are having luck with the CND sticky base coat extending wear time. Myself personally, I have brands that I cannot wear more than a day without chips, but others that wear like iron. If you have long thin nails that flex, you might find my polish does not work as well as it is not super flexible, it is more stiff when dry then rubbery.

Caring For Your Polish

  • Storage – For best results, store polish in a cool, dark place with the bottle upright.  Polish, especially Indie Polish, can separate over time.  Storing upright helps the ingredients stay combined.  I also suggest giving the polish a quick shake every few months or so. Heat can hinder the suspension properties of the base, so not storing in your car, in the oven,  on your heater is a good thing.  Not to mention polish is flammable.  Some pigments can fade, and that is especially true when exposed to sunlight.  I take care to use pigment that don’t fade, but do the polish a favor and don’t store in sunlight.
  • Bottle Care – When you are finished using the polish, there is often a bit of polish around the neck of the bottle.  Taking a cloth, wipe the neck and thread of the bottle to remove left over polish and glitter.  If needed, use some acetone to help with the removal.  Have clean threads and a clean bottle neck will allow a good seal with the cap.  That good seal will help the polish to not evaporate and get gloopy over time.
  • Thinning polish.  It happens, polish is made of volatile ingredients that can evaporate over time.   That can lead to thick, gloopy polish.  It is fixable.  Start with polish thinner, NOT POLISH REMOVER OR ACETONE.  Add a few drops into the bottle, recap and shake, and check consistency.  Repeat until it is the consistence you desire.  When doing this, keep in mind that larger glitters or polish with a heavy glitter to base ratio will not be a smooth as a cream polish, and even thinner will not help that.

I hope that helps take the mystery out of glitter nail polish!  If you ever have any questions, feel free to contact us at customerservice at kbshimmer dot com.


Summer Fun Tape Mani

KBShimmer 24 Carrot Bold and Grayscale

Hello Everyone!  This is Crystal from Crystal’s Crazy Combos! I’m beyond excited to be guest hosting here on KBShimmer’s Blog!  Thank you to Jason and Christy Rose for having me here.  I thought it fitting to have a fun combo (like my blog name) featuring two of the upcoming polishes of the Summer 2013 Collection that release on 6/1/13.  The collection will also be reviewed on my blog soon!

Tape manis have always been so much fun for me!  I enjoy pairing a couple polishes, getting a fun look!  Today, I started with two coats of KBShimmer 24 Carrot Bold.  This picture was taken in my light box.

This is a bright neon orange with gold flecks in it.  It is a matte polish and applied perfectly!  The name is so cute too, making this a great polish to have for summer!  I have seen a lot of orange this summer, so I think that is going to be a popular color to wear.  This next picture is taken outdoors.

Close up.


I then added KBShimmer’s Clearly on Top top coat to 24 Carrot Bold.  I have found this to be one of the best top coats around!  I still love Wicked Fast by Cult Nails, but Clearly on Top is thicker and smooths out glitter better.  Seche Vite is a popular top coat too, but Clearly on Top doesn’t cause shrinkage and stays on a lot better for me.  I highly recommend it, plus the drying time is unbelievably fast.  Clearly on Top is perfect for tape manis, so you don’t have to wait as long to tape off.  This photo is in my light box.

This photo of 24 Carrot Bold was taken in the shade outside.

Close up.

I use scotch tape for my tape manis.  Any tape should work, and any kind, but I prefer the matte, clear finish.  I feel like it’s not as sticky, and I can still see it on the nail.

I usually use a decent size piece, enough to cover the nail diagonally.

I then apply the tape to my hand.  Yes, a little silly, but it helps remove the tackiness of the tape, so you’re not as likely to pull up the dry polish.

It should look similar to this.

It’s important to make sure your mani is dry, probably about 20 minutes if using Clearly on Top by KBShimmer.  Of course, the longer you wait, there is less of a chance for
smudges! If you are going to do a tape mani after wearing the polish for a day
or two, I recommend reapplying the top coat to prevent the tape from pulling
any of the original color with it!


The reason I like clear tape is because you can make sure the edges are flat against the nail.  I do each nail individually with tape, then apply the polish. Once applied, I remove the tape and move the next nail.

I’ve added Grayscale for the glitter over 24 Carrot Bold!  Here it is without a top coat.  You can slightly see the line of clear in the base of Grayscale.

I added a coat of KBShimmer Clearly on Top to seal in the glitter.  I love this combo!  Both 24 Carrot Bold and Grayscale will be reviewed on my blog soon!

Close ups!


For fun, I added a coat of Wax That by Cult Nails to bring it back to all being matte!  This is in the sun.

And in the shade!  Love this!

Close up!

I hope you enjoyed this look at how to do a fun Summer tape mani using the new KBShimmer Summer Collection polishes!

Again, you can find me at http://crystalscrazycombos.blogspot.com/!

Have a great day!

Much Love,
Crystal


*The KBShimmer polishes were sent to me for my honest review. All thoughts and opinions are that of my own.*

Orange Pop with Tape Stripe Accent Nail

This weekend I am attending a conference and wanted to try some nail art to accent my nail polish.  I have to say that I can not draw, or paint, nor do I have steady hands that would allow me to create nice dots or stripes by hand.  I remembered I saw someone on Pinterest use tape to create stripes and decided to give it a go.  I have to say I am quite pleased with how it turned out.  I took step by step photos to share.

To start, I chose Orange Pop to be my base color.  I used three coats of Orange Pop, and did one coat of top coat on all the nails before applying the “artwork”.  I selected three creams in teal, purple and magenta to compliment the glitters in Orange Pop.  The color of the blue polish is actually more teal in person.

I then gathered my scotch tape, a scissors and top coat.  The tape is my workshop tape, so you can clearly see that it is well loved, and “decorated” with splashes of polish.

MaterialsNeeded

I then painted three stripes onto the tape, without removing it from the holder.  I let the tape dry before removing.  I chose polishes that covered well in one coat, but you could add a second if needed.

PaintColorsOnTape

When dry, remove from holder.  I cut close to the last color so the tape was not so long it folded back onto itself.

RemoveTape

Then using your scissors, cut a strip of the first color.   I cut my strip to be 1mm wide.

CutIntoStrips

With the painted side up, sticky side down, stick the stripe onto your nail.   I stick the strip so that one edge lined up with the edge of my nail.  Do not press the longer edge down.

PurpleTape

Using your scissors, trim the long edge of the stripe to fit your nail.  It might be easier if you have cuticle scissors, but regular ones worked fine.  After trimming, press the rest of the stripe down.  Looking at the micro shot, you can see some of the glitters through the stripe, but you can not see that at a normal distance.

PurpleStripOn

 I then moved on to the pink, cutting a stripe from the tape.  I placed it on my nail at an angle so that it crossed over the purple stripe.

PinkStripOnNail

Again, trim down the strip and press down so it sticks to your nail.  Move on and cut the last strip, using the blue color.

BLueTape1

I then stuck the blue to the nail, going across the opposite direction of the pink, so that the stripes form a asterisk.

BlueStrip

Again, use the scissors and trim off the excess.

CuttingOffExcessTape

When complete.  Press down tape, ensuring all edges are secure on the nail.  Then cover with at least one coat of top coat to seal.  I did two coats to ensure it was smooth.

And here is the finished look!

Done

Not bad for having no art skills at all.  Next time I would probably do a second coat on the tape so the polish was a bit more vivid.  I think the pink blends in a bit too much.  There was plenty of painted tape left over, so repeating on the other hand would not be an issue.  I could also see myself using punches to create shapes from painted tape.  Maybe a scalloped nail edge or flowers.  I have to give props to all those out there that can create murals and designs freehand.  If you have any you created using KBShimmer polish, or with KBShimmer polish as a base, send it to CustomerService@KBShimmer.com.  I would love to share them on here!

Christy