Tag Archives: kbshimmer

Multi-Chrome Nail Art – Guest Post From Life In Lacquer

Hello!!

I’m Jade from Life in Lacquer and I am so happy to have been given the opportunity to post for you all today!

Life in Lacquer is a blog I write about nail polish and all related things! I am from the countryside in the UK and have been a nail technician since 2010.

I have recently become the proud new owner of 3 KBShimmer multi-chrome polishes. They make me think of all things futuristic so I thought I would so for a design featuring geometric patterns. They look like they could be designs for a spaceman’s costume!

IMG_0379IMG_0343IMG_0358

I used a white base and then hand painted on Pigment Of My Imagination. This polish so amazing! I see mostly purple but there are flashes of deep blue, gold and red. It’s like a super pretty oil slick! It was quite tricky to capture all the colours but I think I did a good job.

I then finished of the design by adding a black outline and little diamantes.

IMG_0368 IMG_0339

I CANNOT stop staring at these nails! I don’t think I am going to get much done and that to me is a sign of a great polish. Plus I now have it on my toes too. I may just paint everything with it HA!

It is opaque in three thin coats or you can you it as a topper over black.

IMG_0351   IMG_0364
I hope you have enjoyed my design and thanks for reading!

Jade x

Lifeinlacquer.blogspot.co.uk

IMG_0340 IMG_0345


P.S.

Thank you Jade for such a wonderful post!  Jade provided so many wonderful pictures I could not help but fill the post with them!  If you want to see more art and swatches from jade, head over to her blog, http://lifeinlacquer.blogspot.co.uk/ and Facebook https://www.facebook.com/LifeInLacquer.


“Extend-A-Mani” Guest Post By The Pointless Cafe

I’m so excited to be able to guest post here at KBShimmer’s blog! I live where there is no Autumn, so I pretty much keep Autumn on my nails the entire season. Today is no different!

I’ve done one of my “Extend-A-Mani” posts for you using KBShimmer polishes today.

Banner1

I was wearing Dior Cosmic Violine, which is a brown/burgundy crelly and had a bit of tip wear. What to do? Well KBShimmer makes errthang better, right?  So I pulled out Cocoa Nut, 24 Carrot Bold and Every Nook and Cranberry and went to work.

Pic2

On my thumb and ring finger, I just layered one coat of Cocoa Nut over the top. On the rest I did a really quick gradient over Cosmic Violine using 24 Carrot Bold and Every Nook and Cranberry. I use a plain make-up sponge and paint on strips of what I’m using and just dab over each nail a few times and Voila! I use an Elf concealer brush and straight acetone for clean-up around my cuticles.

First, here it is matted (I used butter LONDON’s Matte Finish)

Pic3

And then I used KBShimmer Clearly on Top top coat. I love matte finish, but in this case I preferred it shiny.

Pic4

And close-ups…

Pic5

I really love this mani. 24 Carrot Bold and Every Nook and Cranberry are great on their own but they also layer well and gradient well.  I do love versatility in a nail polish!

What do you think? Come on over to my blog, Pointless Café, and see me sometime! (Yes, I said that in my best Mae West voice.)

Thanks so much to Christy for having me! ♥

A Note from KBShimmer:  We are always excited to have guest bloggers, and Sheila does such amazing work!  Thank you!  Shelia used Cocoa Nut, a 2012 winter polish that was retired this spring.  Due to the many requests to bring this polish back, we have!  Cocoa Nut is now live on our site and will be available thru the end of the year.  So get this cool weather favorite while you can!

Glitter Polish 101 – Tips for Application, Removal, and Everything Between!

I get questions often on how best to apply glitter polish, how to reduce chipping and extend wear, the best way to remove glitter polish.  Below are some of the tips and tricks I have compiled, plus two videos on application and removal.

What's-Your-Damage

First, I want to say that KBShimmer nail polish is not a Gel polish.  You do not need any special lights or machines for application.  KBShimmer polish is not a quick dry polish.  You many see the 60 second polish, or 90 second polish.  Ours is not that type either.  It is a regular polish, that will take time to dry.  For the best dry time, use thin coats, waiting in between each coat for at least a few minutes will help the polish dry.

Application Instructions

  • Roll bottles between hands before use.  Large glitter can sink to the bottom and polish can separate in the heat.  With our polish, you can shake it. Leaving the bottle upside down for a few minutes before application can help reduce “fishing” for larger glitters.
  • Wash hands and ensure nails are clean, use KBShimmer Nail Prep if desired.  Make sure hands and nails are dry after washing.
  • Use a base coat.  This will protect your nails from staining and aid polish in adhering to the nail.
  • To apply evenly, dab the polish on the middle of the nail, then sweep the brush to distribute.
  • Apply in thin, even coats.  Two – three coats are recommended for the best look, but some sheer polish may be best layered over other colors.
  • Glitter polish will feel rough on the nail once dry.  To achieve a smooth and shiny look, use a fast dry top coat like KBShimmer Clearly On Top.  Some polish may need two coats of top coat for that smooth, glass like finish.

[youtube]http://youtu.be/IMTKrBUs46c[/youtube]

Easy Removal

FoilMethodRemoval

  • Gather polish remover, cotton balls, and tin foil.
  • Cut or tear foil into palm sized pieces.
  • Soak the cotton balls with polish remover,
  • Place soaked cotton ball on the polished nail.
  • Cover tightly with tin foil.  Wait 5-10 minutes.  Twist foil around the nail and pull off.  Polish and glitter should come off clean.
  • If any residue is left, use more remover and cotton balls to remove the excess.
  • Wash hands to remove any stray glitter, preferably with KBShimmer Soap!

[youtube]http://youtu.be/LSHqLYbZ5ss[/youtube]


Why Does Polish Chip/Peel/Come Off My Nail

  • Top and base coats – Different top and base coats can cause polish to pop right off or chip. There is a base coat called Yellow Stopper that causes glitter polish to pop off, and Seche Vite top coat can also cause polish to peel away. Both shrink causing air to get under the polish and it will chip or pop off.  KBShimmer Clearly On Top and Basic Training both work for many people, and your favorite brand many work well too.  Layering a cream polish you know sticks under the polish.
  • Polish Thickness:   Apply in thin layers that can dry, instead of thick layers. Thick layers many not dry completely, never properly adhering to the base coat. I also like to apply the top coat, no matter the brand, while the last layer of polish is still tacky, but not wet, so they dry together.
  • Application- Make sure that you not only wrap the tip of your nail with polish, but that you wrap the tip of the nail with the top coat too. Exposed tips can greatly increase chips and decrease wear time.
  • Moisture in the nails (i.e. you polish after a shower or bath, wash your hands often or right before applying).  Your nails need to be dry before polish. Wet nails will contract when dry and polish will pop right off. The same happens if you spend a lot of time in the pool or with your hands in water, the nails will expand causing cracks and separation and the polish will then chip or peel.   If you plan on washing dishes, gloves are a manicures best friend.
  • Oil on the nails: Some people have very oily nails, and polish therefore will not stick well. You can try cleaning your nails before applying the base coat with a nail prep product like KBShimmer Nail PH Prep.  Make sure if you are using lotion that you wait a few hours for it to absorb before polishing. Also try using lotion a few hours before applying polish and don’t use moisturizing remover on your nails right before polishing.
  • Dry Nails:  The opposite of oil nails, if you have dry nails that peel, the base coat and polish will have a hard time sticking, as your nail will still peel letting air under the polish. Using a nail strengthener, moisturizing often (but not right before polishing) and never buffing nails will help improve nails to reduce peeling, therefore helping polish stick longer.
  • Body Chemistry/Nail Structure- Last, everyone has such different body chemistry, such different nails, that not every polish brand will work well for them. I have spoken to a few ladies that no matter the brand, polish never lasts more than a day. Some are having luck with the CND sticky base coat extending wear time. Myself personally, I have brands that I cannot wear more than a day without chips, but others that wear like iron. If you have long thin nails that flex, you might find my polish does not work as well as it is not super flexible, it is more stiff when dry then rubbery.

Caring For Your Polish

  • Storage – For best results, store polish in a cool, dark place with the bottle upright.  Polish, especially Indie Polish, can separate over time.  Storing upright helps the ingredients stay combined.  I also suggest giving the polish a quick shake every few months or so. Heat can hinder the suspension properties of the base, so not storing in your car, in the oven,  on your heater is a good thing.  Not to mention polish is flammable.  Some pigments can fade, and that is especially true when exposed to sunlight.  I take care to use pigment that don’t fade, but do the polish a favor and don’t store in sunlight.
  • Bottle Care – When you are finished using the polish, there is often a bit of polish around the neck of the bottle.  Taking a cloth, wipe the neck and thread of the bottle to remove left over polish and glitter.  If needed, use some acetone to help with the removal.  Have clean threads and a clean bottle neck will allow a good seal with the cap.  That good seal will help the polish to not evaporate and get gloopy over time.
  • Thinning polish.  It happens, polish is made of volatile ingredients that can evaporate over time.   That can lead to thick, gloopy polish.  It is fixable.  Start with polish thinner, NOT POLISH REMOVER OR ACETONE.  Add a few drops into the bottle, recap and shake, and check consistency.  Repeat until it is the consistence you desire.  When doing this, keep in mind that larger glitters or polish with a heavy glitter to base ratio will not be a smooth as a cream polish, and even thinner will not help that.

I hope that helps take the mystery out of glitter nail polish!  If you ever have any questions, feel free to contact us at customerservice at kbshimmer dot com.


Summer Gradient by Kayla Shevonne

Hey there!

This is Kayla from Nails by Kayla Shevonne. I’m quite honoured to be posting on the KBShimmer blog today! I absolutely love KBShimmer nail polishes and it’s the indie brand that I own the most of by far! So when Christy asked me to write a guest post, I had a pretty good idea what type of manicure I wanted to do.

kbshimmerguest3wm

To create this bright and fun nail look, I first layed down a base of a plain white creme and let that dry completely. I then pulled out KBShimmer Don’t Pink Twice and 24 Carrot Bold, both of which are beautiful matte shimmer polishes from the Summer 2013 Collection, and I used the sponging method to create a gradient with them. Next, I added two easy coats of KBShimmer Grayscale, a super fun black and white glitter top coat that was also released with the Summer 2013 Collection. Finally, I finished the whole look off with the KBShimmer Clearly On Top Quick Dry Top Coat.

kbshimmerguest1wm

Don’t Pink Twice and 24 Carrot Bold blend together beautifully, so the mani looked pretty awesome even before I added Grayscale. But I think the contrast of the black and white glitter over the super bright pink and orange really makes the whole mani pop.

kbshimmerguest2wm

Thanks so much to Christy for inviting me to do a guest post on her blog. I hope to do one again someday. And if you’re interested in seeing more of my work, please visit my blog Nails by Kayla Shevonne.

kbshimmerguest4wm

Thanks for reading!

KBShimmer Says: Thanks Kayla for the stunning manicure and the guest post. Are you a blogger that would like show of your KBShimmer manicure in a guest post? Contact us at sales at kbshimmer dot com.

KBShimmer Summer 2013 Collection Launches June 1st

KBShimmer is excited to announce the release of the Summer 2013 Collection!

The summer lineup includes one glitter top coat, two glitter crellys in a white base and six bright, bold polishes, two in a matte finish.  KBShimmer will also be expanding their nail care line to include two scented cuticle oils and liquid nail prep. “Our new line was created to play off the bolder palette of summer, some inspired by the 80’s and 90s, but also to celebrate the patriotic season. One of our polishes plays off the color of the year, Emerald Green, and will ease people into the summer while two others were inspired by the fall 2013 Pantone colors Koi and Vivacious. Both will make for an easy transition through the summer and into the fall.  We are also excited to unveil two scented cuticle oils in an easy-applicator pen.  We hope to inspire and motivate people to go out in the sun and show off their nails!” says owner  and designer Christy Rose.

KBShimmer– SUMMER 2013 COLLECTION

What’s Your Damage? – White crelly polish with neon green, neon pink, and black glitters.

Don’t Pink Twice –Bright near magenta pink with subtle blue shimmer – matte

24 Carrot Bold –Orange red polish with gold shimmer – matte

SummerCollege1-1

Blinded By The Bright – Neon yellow polish with a scattering of hex glitters in the 6 primary and secondary colors

The Dancing Green –A almost neon green with blue undertones, accented by fuchsia, sapphire,  green and chartreuse glitters in different shapes and sizes

Totally Tubular – A blue-green crelly polish with fuchsia circle glitters in two sizes and fuchsia micro slices, aqua circle glitters and sapphire hex glitters.

SummerCollege2

Totally Razzical – A red-violet shade leaning towards the purple side of raspberry. Loaded with holographic hex glitters in magenta, silver and pink.

Grayscale – Black, White, and Gray glitters are suspended in a clear base. Circles, hexes, rectangles, and squares in so many sizes complete this glitter top coat.

Pimp My Pride – This white based polish features metallic red and blue glitters. Best worn in three coats, or 1-2 coats over your favorite white.

SummerCollege3

Basic Training – A 3-Free nail polish base coat

KBShimmer Nail Prep – A PH Balancing nail preparation

Cuticle Oil Pens – A mix of oils including argan, shea, primrose, and jojoba are combined with an essential oil blend designed for cuticles and nails.  Two scents will be available, Lemongrass and Pink Sugar.  Both are in a 2ml easy applicator pen.  Just twist until the brush is wet, and apply.

Clearly On Top will continue to be available.

NailCareCollection

Shipping June 1, 2013

KBShimmer products can be found at Http://www.KBShimmer.com.  For sales outside of the US visit http://www.HarlowandCo.org.

Summer Fun Tape Mani

KBShimmer 24 Carrot Bold and Grayscale

Hello Everyone!  This is Crystal from Crystal’s Crazy Combos! I’m beyond excited to be guest hosting here on KBShimmer’s Blog!  Thank you to Jason and Christy Rose for having me here.  I thought it fitting to have a fun combo (like my blog name) featuring two of the upcoming polishes of the Summer 2013 Collection that release on 6/1/13.  The collection will also be reviewed on my blog soon!

Tape manis have always been so much fun for me!  I enjoy pairing a couple polishes, getting a fun look!  Today, I started with two coats of KBShimmer 24 Carrot Bold.  This picture was taken in my light box.

This is a bright neon orange with gold flecks in it.  It is a matte polish and applied perfectly!  The name is so cute too, making this a great polish to have for summer!  I have seen a lot of orange this summer, so I think that is going to be a popular color to wear.  This next picture is taken outdoors.

Close up.


I then added KBShimmer’s Clearly on Top top coat to 24 Carrot Bold.  I have found this to be one of the best top coats around!  I still love Wicked Fast by Cult Nails, but Clearly on Top is thicker and smooths out glitter better.  Seche Vite is a popular top coat too, but Clearly on Top doesn’t cause shrinkage and stays on a lot better for me.  I highly recommend it, plus the drying time is unbelievably fast.  Clearly on Top is perfect for tape manis, so you don’t have to wait as long to tape off.  This photo is in my light box.

This photo of 24 Carrot Bold was taken in the shade outside.

Close up.

I use scotch tape for my tape manis.  Any tape should work, and any kind, but I prefer the matte, clear finish.  I feel like it’s not as sticky, and I can still see it on the nail.

I usually use a decent size piece, enough to cover the nail diagonally.

I then apply the tape to my hand.  Yes, a little silly, but it helps remove the tackiness of the tape, so you’re not as likely to pull up the dry polish.

It should look similar to this.

It’s important to make sure your mani is dry, probably about 20 minutes if using Clearly on Top by KBShimmer.  Of course, the longer you wait, there is less of a chance for
smudges! If you are going to do a tape mani after wearing the polish for a day
or two, I recommend reapplying the top coat to prevent the tape from pulling
any of the original color with it!


The reason I like clear tape is because you can make sure the edges are flat against the nail.  I do each nail individually with tape, then apply the polish. Once applied, I remove the tape and move the next nail.

I’ve added Grayscale for the glitter over 24 Carrot Bold!  Here it is without a top coat.  You can slightly see the line of clear in the base of Grayscale.

I added a coat of KBShimmer Clearly on Top to seal in the glitter.  I love this combo!  Both 24 Carrot Bold and Grayscale will be reviewed on my blog soon!

Close ups!


For fun, I added a coat of Wax That by Cult Nails to bring it back to all being matte!  This is in the sun.

And in the shade!  Love this!

Close up!

I hope you enjoyed this look at how to do a fun Summer tape mani using the new KBShimmer Summer Collection polishes!

Again, you can find me at http://crystalscrazycombos.blogspot.com/!

Have a great day!

Much Love,
Crystal


*The KBShimmer polishes were sent to me for my honest review. All thoughts and opinions are that of my own.*

Orange Pop with Tape Stripe Accent Nail

This weekend I am attending a conference and wanted to try some nail art to accent my nail polish.  I have to say that I can not draw, or paint, nor do I have steady hands that would allow me to create nice dots or stripes by hand.  I remembered I saw someone on Pinterest use tape to create stripes and decided to give it a go.  I have to say I am quite pleased with how it turned out.  I took step by step photos to share.

To start, I chose Orange Pop to be my base color.  I used three coats of Orange Pop, and did one coat of top coat on all the nails before applying the “artwork”.  I selected three creams in teal, purple and magenta to compliment the glitters in Orange Pop.  The color of the blue polish is actually more teal in person.

I then gathered my scotch tape, a scissors and top coat.  The tape is my workshop tape, so you can clearly see that it is well loved, and “decorated” with splashes of polish.

MaterialsNeeded

I then painted three stripes onto the tape, without removing it from the holder.  I let the tape dry before removing.  I chose polishes that covered well in one coat, but you could add a second if needed.

PaintColorsOnTape

When dry, remove from holder.  I cut close to the last color so the tape was not so long it folded back onto itself.

RemoveTape

Then using your scissors, cut a strip of the first color.   I cut my strip to be 1mm wide.

CutIntoStrips

With the painted side up, sticky side down, stick the stripe onto your nail.   I stick the strip so that one edge lined up with the edge of my nail.  Do not press the longer edge down.

PurpleTape

Using your scissors, trim the long edge of the stripe to fit your nail.  It might be easier if you have cuticle scissors, but regular ones worked fine.  After trimming, press the rest of the stripe down.  Looking at the micro shot, you can see some of the glitters through the stripe, but you can not see that at a normal distance.

PurpleStripOn

 I then moved on to the pink, cutting a stripe from the tape.  I placed it on my nail at an angle so that it crossed over the purple stripe.

PinkStripOnNail

Again, trim down the strip and press down so it sticks to your nail.  Move on and cut the last strip, using the blue color.

BLueTape1

I then stuck the blue to the nail, going across the opposite direction of the pink, so that the stripes form a asterisk.

BlueStrip

Again, use the scissors and trim off the excess.

CuttingOffExcessTape

When complete.  Press down tape, ensuring all edges are secure on the nail.  Then cover with at least one coat of top coat to seal.  I did two coats to ensure it was smooth.

And here is the finished look!

Done

Not bad for having no art skills at all.  Next time I would probably do a second coat on the tape so the polish was a bit more vivid.  I think the pink blends in a bit too much.  There was plenty of painted tape left over, so repeating on the other hand would not be an issue.  I could also see myself using punches to create shapes from painted tape.  Maybe a scalloped nail edge or flowers.  I have to give props to all those out there that can create murals and designs freehand.  If you have any you created using KBShimmer polish, or with KBShimmer polish as a base, send it to CustomerService@KBShimmer.com.  I would love to share them on here!

Christy

Welcome To The New KBShimmer Website And Blog!

Welcome To The New KBShimmer.com

You may have noticed we have a new website.  We here at KBShimmer have been working with a great team from Iceberg Web Design to build you a site that will make shopping easier and more rewarding.  There are some big changes you may notice right away, and some behind the scene changes that may not be noticed, but will make shopping with us even better then before! More about the changes below.

Customer Accounts:

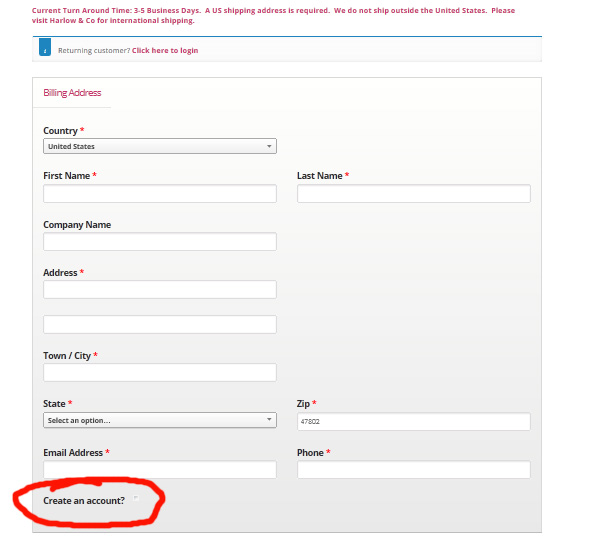
You will now have the option to set up an account on here.  Your personal information such as log-in, shipping information and order history will be stored on a secure site.  You will be able to log-in, see past purchases, see your order status, and more importantly, earn rewards on your purchases.  As always, your information is not shared with anyone outside KBShimmer, never used to spam you, and is never sold or shared with third parties.  Your credit card information is not stored and is also processed on a secure server.  To create an account during checkout, simply check the box at the bottom of the billing information section during checkout, or click the My Account Link anytime you are on the site.

AccountSignUp

Guest Log-in:

If you prefer to not create an account, your information will only be used to process your order.  You can uncheck the create an account box at the bottome of the billing information section during check out.

Customer Rewards:

You can now earn reward points on purchases.  When you make a purchase, points will be earned and stored in your account for later use.  See our rewards page for more information.

Better Order Tracking:

When you place an order, as always, you will receive an emailed invoice from us.  When your order is shipping, in addition to tracking information received from Stamps.com or PayPal, you will get an email from us letting you know your order is on the way.  With an account, you can also access your order status online.

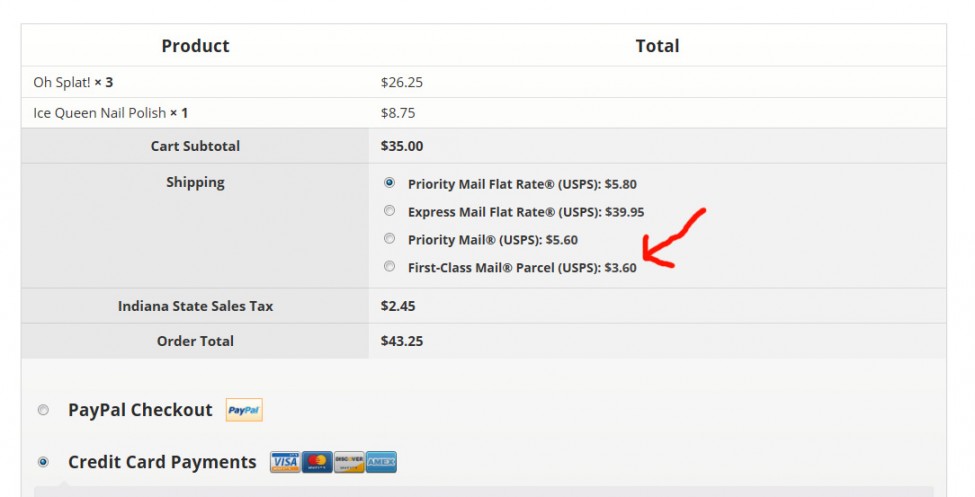
More Exact Shipping Options:

With the new site, we are pulling more detailed costs from the post office.  This will show the box sizes that your order will fit in, and costs based on weight and shipping type.  This will allow you to pick Express Shipping, First Class, or Priority based on your needs.   The shipping options will default to priority on top, but if you have a small order, look towards the bottom for the first class option.

Newshipping1

Real Time Inventory With Cart Holds:

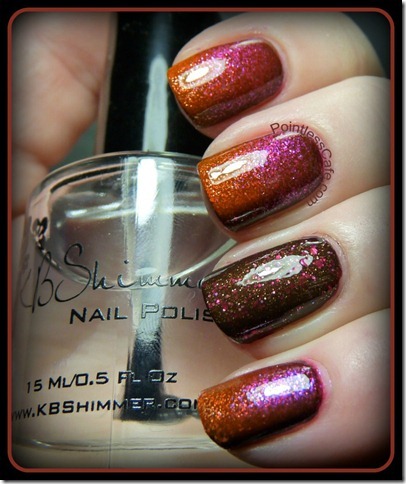
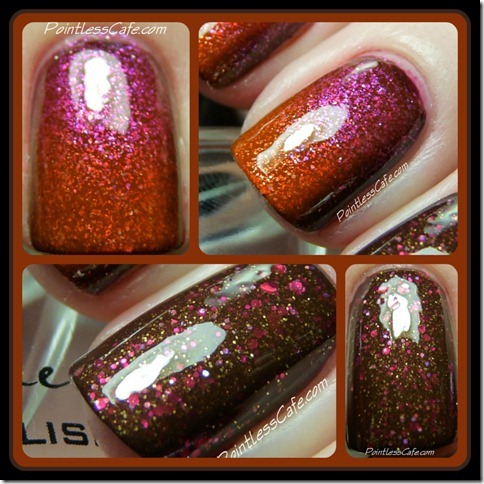
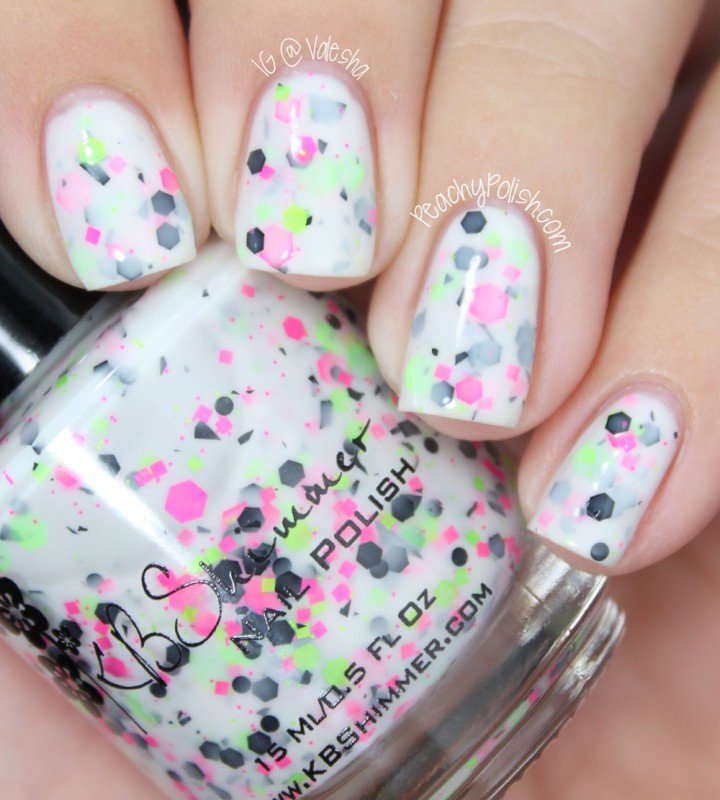
In order to reduce shipping delays, we will now be using inventory tracking.  If we are out of a bath bomb scent, or just sold the last Pink Sugar lotion made, it will show on the site as Sold Out.  This will help us fill orders in a more timely manner.  There is also a 15 minute cart hold.  Once you place an item in your cart, you will have 15 minutes to check out before that item is made available for someone else.  Don’t worry.  With nail polish we keep a large number in stock at all times and don’t anticipate lack of inventory.  During new releases, unless the polish is a limited edition, that feature will be disabled and all orders for polish will be filled.

Easy Social Media Sharing:

On each page, there is a icon bar with many of our favorite social media sites.  It is super easy to share on Facebook, Pinterest, Twitter and more.

Mobile Shopping:

KBShimmer.com is now mobile.   Shop on our site from your phone, Kindle, iPad or other mobile device with ease.


This is a new site, so there may be tweaks made, bugs we have not found, or typos still to be fixed.  If you have any problems, please do let us know at sales@kbshimmer.com.  We have several exciting guest blog posts coming soon, more exciting new to share, and of course new polish and products on the way soon so check back often for news.

Happy Shopping!

Christy & Jason
KBShimmer