Monthly Archives: March 2014

Stamping With The Spring Creams – Guest Post by Kirby of The Mercurial Magpie

Hey, everyone! I’m Kirby, the blogger behind The Mercurial Magpie!  I’ve been a big fan of KBShimmer ever since I discovered the world of handmade polish and I’m super excited to be posting here today!

So, let’s talk creams. To a polish lover, are they always the most exciting thing? Your first thought might be no, but I say…YES! You see, they’re incredibly versatile. On their own, they can be a nice palette cleanser or pop of color for an accent nail, maybe even a base for nail art! But oh, reader, their appeal for me doesn’t stop there. One word- stamping!

It’s the first question on anyone’s minds when they read about new cream colors- “Yes, yes, you claim it will fold my clothes, wash my car and have dinner on the table when I get home from work, but WILL IT STAMP?” Is that just me? It is? Oh. Well, regardless, it’s certainly the first thought that I had when the press release for these came out. I’m happy to report that for the most part, they do! I tested them all out and some of the lighter shades are very subtle if not stamped over a light base, but the darker colors all work perfectly. I have three combos to show you here today!  The first combination I did was to use Pansy-monium over My Life’s Porpoise. I used KBShimmer Clearly On Top as a top coat for each of these. I used a flower design from the Moyou London Suki 01 plate that kind of reminded me of the  KBShimmer logo.

kbshimmer-my-life's-porpoise-with-pansy-monium-stamping

The second combination I did was using Eclipse over Chick Me Out. This color combo was screaming for a bee stamp, but unfortunately I didn’t have one! What I do have is a plate full of awesome bird stamps, so I used a couple of designs from Messy Mansion’s MM14 plate.

kbshimmer-chick-me-out-with-kbshimmer-eclipse-stamping

The last combination I did was using Sky Jinks over A Touch Of Glass This felt like a very ocean-y duo so I decided to use this cute fish stamp from Moyou London’s Sailor 05 plate.

kbshimmer-a-touch-of-glass-with-kbshimmer-sky-jinks-stamping

There are plenty of ways these shades can be mixed and matched for stamping & I hope this post inspires you to try some out yourself! I’d love to see them if you do! If you’d like to see more from me (including some future KBShimmer-centric posts!) you can check out my blog (http://www.themercurialmagpie.com/), my Facebook (https://www.facebook.com/themercurialmagpie) and my Instagram (http://instagram.com/themercurialmagpie#).  Thanks for reading!

Using KBShimmer Polish With Gel Polish – Guest Post By Michelle of Manic Talons

Hi there!

I’m Michelle from Manic Talons and gel polish is my “thing”.  If you’re a gel user you know firsthand that gel polish is seriously lacking in certain finishes, such as crellies, unique glitter bombs, duo and multi-chromes, and linear holos.  All of these are areas that KBShimmer has covered in spades!  So I’m going to show you three ways to get the best of both worlds by pairing KBShimmer polishes with soak off gel polish.

 Layering Polish on Top of Gel

Layering is the simplest way to pair traditional polish with gel.

1)       Do a complete gel manicure start to finish.

2)       Once you remove the tacky layer from the final top coat, apply the KBShimmer lacquer directly on top of the gel.  There’s no need for a separate base coat as the gel takes care of that.

3)       Finish with a fast dry top coat and you’re done.

Layering in this manner is awesome for several reasons.  First, the gel provides serious strength to your nails.  Second, regular polish dries much quicker over gel, so the wet nail wait is decreased.  Third, regular polish applied in this manner over a soak off gel manicure wears like iron!  I have had regular polish last for over a week on top of gel with minimal tip wear.  Finally, you can remove the polish with non-acetone remover without harming the soak off gel manicure if you want to change things up!

Want to see a layered manicure?  I started with a basic white soak off gel manicure using Couture Ooh La La French.  I then applied two coats of Oh Splat! on top of the gel and finished with a fast dry top coat.  The result is this gorgeously opaque mani with incredible depth.

KBShimmer-Oh-Splat


The Regular Polish (RNP) Sandwich

The second way I like to pair regular polish with gel polish is to sandwich the regular polish between layers of gel.  This one can be a bit tricky, but once you know the method the possibilities are endless!  So, how do you create a successful RNP sandwich?

1)       Apply your soak off gel manicure.  This is your usual process with one slight modification.  When applying each layer of gel, be sure to wrap the tip a bit deeper than you might usually.  I like to wrap the gel so that it overflows approximately 1.5 mm under the tip of the nail.  If your nails are shorter, you may not be able to wrap quite this deeply, but wrap as deep as you can without getting the gel on the skin under your nail.

Wrapped-Tip

2)       After removing the tacky layer, apply a thin coat of your KBShimmer polish of choice.  Cap the tip as usual, but not quite as deeply as you did with the gel.  The trick is to leave a margin of gel exposed under the tip of the nail so that the final gel top coat can bond with it unobstructed.  Allow the coat of polish to dry before applying a second coat if needed.  At this point, you might choose to apply a fast dry top coat to speed things along, but it is completely optional.

3)       Now we wait for the polish to COMPLETELY dry.

Bottle-Clock

If you used only 1 thin coat, wait at least 1-2 hours before proceeding to step 4.  If you applied two or more coats or used a thicker coat, allow a minimum of 4-6 hours.  The dry time is crucial to creating a successful RNP sandwich.  If the RNP is not completely dry before adding the gel top coat, the top coat will chip off within hours.  Or worse, the RNP will wrinkle under the top coat and destroy your beautiful manicure.

4)       Once the RNP is completely dry, apply a layer of gel top coat.  Be sure to wrap the top coat deeply like you did with the base gel manicure.  This allows the top coat to grab the gel under the tip of the nail and completely seal in the RNP.  I usually apply two coats of gel top coat just to be sure I have completely covered the RNP, but that is definitely optional as it tends to add thickness to the nail.

5)       Remove the tacky layer, apply cuticle oil, and enjoy your longer lasting manicure!  I just removed a RNP sandwich mani from my right hand that lasted the full 2 weeks without a single chip.  It could have gone longer, but the growth was driving me nuts. 😉

Want to see an RNP sandwich?  I thought you might.  I started with a base gel manicure and used Couture Royalty as my gel color.  I then topped it with one coat of KBShimmer Clown Puke, waited for it to dry, and finished with two coats of soak off gel top coat.  The gel top coat pairs really well with this one and smooths the glitter effortlessly.  I seriously LOVE this polish!  Every time I dipped the brush, I discovered a new glitter I hadn’t seen before.  I’m quite certain there are more shapes, colors and sizes in the bottle that are not represented here!

KBShimmer-Clown-Puke

 Nail Art and Accents

The final way I like to use regular polish with gel is for basic nail art.  In this manicure, I did a RNP sandwich on the index and pinkie nails and dotted the middle and ring fingers with Pigment of My Imagination.  I also use RNP for stamping regularly.  When using RNP for nail art, it still needs to dry completely before adding the gel top coat, so the amount of time will depend on the thickness of the layers in the artwork.

KBShimmer-Pigment-of-my-Imagination

I hope you enjoyed this tutorial and learned a few new tricks.  I invite you to swing by my blog at www.manictalons.com for gel polish swatches and nail art combinations.

Thank you, Christy, for inviting me to share these methods!

~Michelle

St. Patrick’s Day Nail Art By MadamLuck

Hello everyone.  I am super excited to share today’s post with you.  Last week I saw some nail art by Suzann of Amateur Manicure on NailIt.com and I knew I had the perfect idea for some St. Patrick’s Day nail art.  I reached out to nail art expert Amanda from MadamLuck to bring my idea to life, and I have to say she did a stunning job!!!   Scroll down to see the steps to create this stunning manicure.

photo1-done

Amanda started with one coat of our new black cream, Eclipse.   Then using Bunny nail image plate HD-B for the clovers, she stamped those over the black use a white polish.  Now, here is the trick, with the white stamped over the black, you can layer a jelly polish, like Get Clover It, to create a stunning layered look.  Follow with a coat of Clearly On Top for a smooth, shiny finish.

photo1


Isn’t that lovely!  This technique can be used it so many ways.  I could see space stamping done with I Got A Crush On Blue over for a unique galaxy manicure, or Witch Way done up for Halloween.  What ever color, the white will make the jelly polish pop!

Do you love St. Patrick’s Day?  Here is a bonus manicure from MadamLuck using Daisy About You, Honeydew List, and Clearly On Top.  Striping was done with acrylic paint, and clover jewels complete this festive look.

photo2

Thank you so much Amanda for helping out with this post.  And if you love nail art, run over to Amanda’s sites to see any or stunning work.

You can find Amanda on:
Facebook – https://www.facebook.com/pages/MadamLuck/173882919339770
Instagram – http://instagram.com/madamluck

KBShimmer Spring Release…Details and Descriptions

We are very excited to announce the release of 16 new polishes to the KBShimmer polish line.  Included are 8 glitter polishes and 8 creams.  Polishes in the Glitter Collection will retail for $8.75 per 15 ml bottle, while polishes in the Cream Collection will retail for $7.50 per 15 ml bottle.   Read below for more details on the launch and the polishes themselves.  Read through for a fun contest and giveaway!

Launch Details and FAQ-

Spring release is on for this Friday, March 14th, midmorning.   Spring polishes will be easily located by the NEW icon, or by visiting this page – https://www.kbshimmer.com/product-category/nail-polish/spring-2014-nail-polish-collections/

Polishes will be on sale for at least 3 months, and should not go out of stock, so even if you don’t order the first day, the polishes will be available.

For this launch, we will be limiting the amount of each shade a customer can buy, to allow everyone’s orders to be processed in a timely manner. I know people do group orders, but we will be limiting the shades to 10 per color, per customer…, per day. This limit will be lifted April 7th.  We will also be limiting other shades the same way.  Multiple orders will not be combined and we reserve the right to cancel orders for those that try to skirt the limits.

Order processing times – We do anticipate a slightly longer processing time for orders during the launch.  We will start shipping orders on Friday, but please allow a 5-7 business day turn around time.  Those that have shopped during launches before know that most orders do get out much more quickly then that!

You may see the polishes on the site before launch, they will be listed as Out Of Stock until the launch.

You anyone has other questions feel free to ask below and I will answer this evening!

The Glitters & Holos – For quick dry time and smooth feel, follow with KBShimmer Clearly On Top.

SpringGlitters1SmallCircles

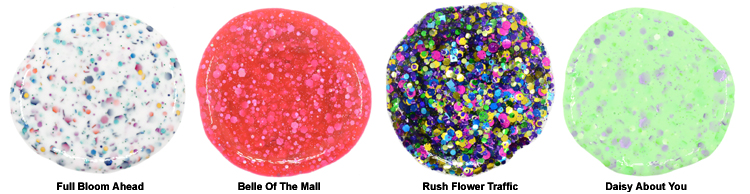
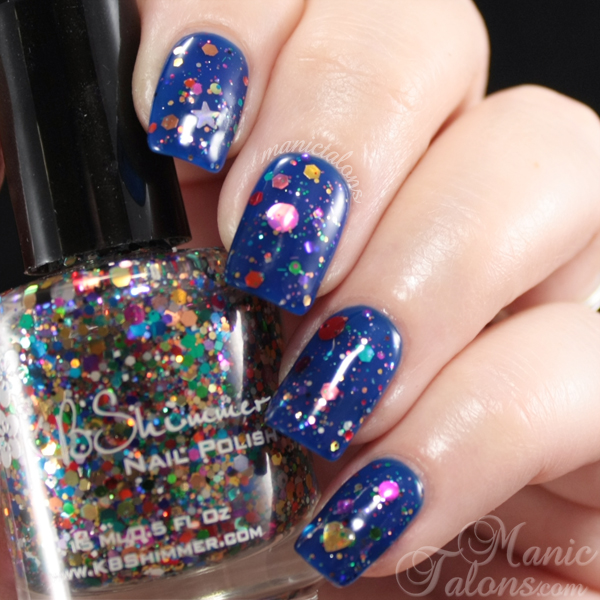
Full Bloom Ahead- When winter comes to a draw and spring is near, bulbs start peeking through the snow.  While waiting for spring to officially start, pops of purple, pink, yellow and blue litter flower beds across the nation. This white based polish is loaded with small, medium and large hex glitters in fuchsia, navy, teal, gold and orange; colors reminiscent of those floral tones that signal spring is near. Best in 3 Coats.

Belle Of The Mall- This coral toned pink polish is a fun color to brighten your day. This jelly like polish is loaded with holographic silver hexes in various sizes and is stunner in the sun.  To allow the glitters to shine this polish is more sheer then others and is best layered in three coats, or worn over a coordinating cream.

Rush Flower Traffic- One of the things most looked forward to in spring is the flower beds bursting to life.  This metallic glitter top coat represents the crocus, tulips, iris, and other spring flowers and plant life that brighten our day.  Fuchsia, gold, green, sapphire, and aqua glitters in hex and dot glitters fill this polish. Ideal as 1 coat over our Chick Me Out or Honeydew List creams, this topper can be worn over so many colors!

Daisy About You- A pale green creally, this spring polish features neon green hex glitters swimming among purple and lavender hexes and a scattering of lavender daisy glitters.  Best in 3 Coats.

SpringGlitters2SmallCircle

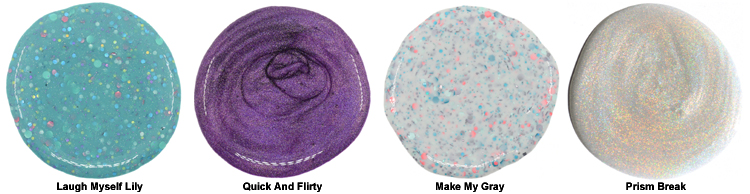
Laugh Myself Lily- A muted jade creally, this soft color was inspired by water lilies and the many paintings where lilies are the subject.  Swimming in the polish are holographic hexes in gold, pink, sliver, lavender and blue.  Pink and light aqua dots complete this muted polish.  To allow the glitters to shine this polish more sheer and is best layered in three coats.

Quick and Flirty- Every girl needs a good violet colored polish in their collection, and what better than one that comes with a rainbow!  This linear holographic offers full coverage in 2 coats, add a third for a deep lilac color.

Make My Gray – A pale shade of gray sets off glitters in turquoise, gunmetal, pale aqua and coral. Wear alone in 2-3 coats, or layer this over a grey like My Life’s Porpoise for a unique spring manicure.

Prism Break- We here at KBShimmer love rainbows, and nothing is more rainbow then holographic polishes!  This linear holo top coat was designed to bring maximum rainbow bling, while still allowing the color below to shine.  One light coat over any cream will turn your color into a holographic lover’s dream.  Add a second coat for a even more dramatic look.

The Creams – Ideal for wearing alone, under glitter polish, or for nail art.  For quick dry time, follow with KBShimmer Clearly On Top.

SpringCreams1Small

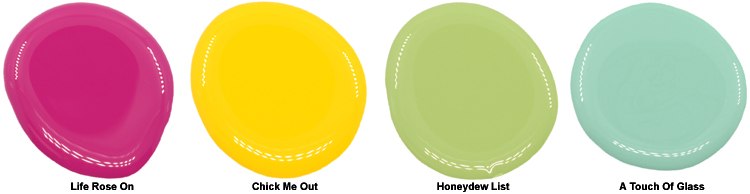
Life Rose On – This is my perfect pink, bright cheery, and it covers in 1-2 coats.  This vivid cerise polish has blue undertones, making it wearable for many skin tones.  Pair this with your favorite glitter topper or use in stamping for a girly manicure.

Chick Me Out- This bright yellow cream is the ideal shade to welcome warmer weather.  Full coverage in two coats, I love this under Rush Flower Traffic.

Honeydew List- Just like ripe honeydew, this dusty pastel green is perfect for spring or summer.  This is the ideal color to wear under Rush Flower Traffic, or pair with Ice Queen for a sparkly spring manicure.  Full coverage in just 2 coats.

A Touch Of Glass-  This light aqua mint cream reminds me of tumbled sea glass.  A pastel green with blue undertones and very subtle shimmer, this color is covers in 2-3 coats.

SpringCreams2Small

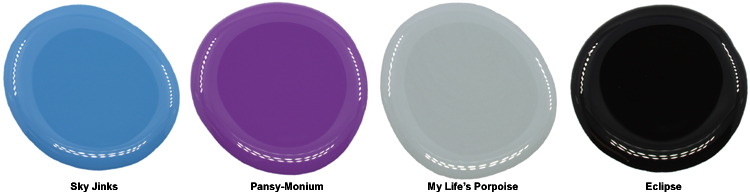
Sky Jinks- I love those days, the ones when there is not a cloud in site, and the sky is the most stunning shade of bright blue.  This medium blue cream with a hint of dustiness, reminds me of those perfect days.  Sky Kinks covers in 1 coat with careful application and is perfect in two.

Pansy-Monium- This pansy purple cream offers full coverage in just two coats.  With a slight red undertone, this purple will look great even on warm skin tones.

My Life’s Porpoise- No matter if you spell it gray or grey, this pale shade is a neutral that is fun to wear alone, or under bright toppers like U Rock My Heart.  This creamy shade covers fully in two coats.

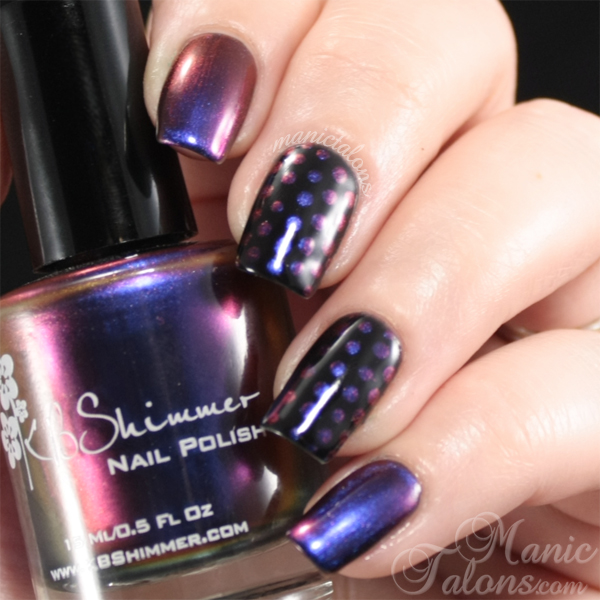
Eclipse- This is s true black cream, with careful application I get coverage in 1 coat.  Those with longer nails might need a second coat.  Pair with Prism Break or Clown Puke for a perfectly fun manicure, or use with Band Geek for a uniquely metallic look.

Thanks for entering all!  The winner has been notified.  Congrats Jill!

1. What is your favorite color from the glitter collection?

2. What is your favorite color from the cream collection?

3. Jason again had a hand in polish creation.  Which two polishes from this collection did he create?  Jason created Make My Gray and Prism Break.  Good work ladies on figuring that out.  Jason worked hard on Prism Break to get what we thought was the perfect balance of rainbow goodness without greying out the color below. Make My Gray is something he has been working on for a while.  He is drawn to the grey/teal color and with the pop of coral color, the polish was finally read for release.  I am very proud of he design work and look forward to seeing what else he comes up with!

Contest is now closed.  Thank you!


St. Patricks Day Art – Guest Post By Nidia of Lit From Within

Hi, I’m Nidia, and I run a little blog called Lit From Within.  I have loved KBShimmer polishes for a while, now, and jumped at the chance to show y’all a little nail art featuring one of these lovelies.

I’m not Irish, but I married an Irishman, and besides, who doesn’t like a little green on St. Paddy’s Day?  I was inspired by Robin Moses Shamrock nail art to show off a little o’ the green today.

I started with Deborah Lippmann Pearly Queen, a pale nude with green shimmer.  I just wanted the green pearlescent effect in the background.

Here’s the star! KBShimmer Get Clover It, a green jelly polish with light and dark green, blue, and gold glitters.

It can be tricky to get glitter exactly where you want it sometimes, so after laying down two coats of the polish, I painted a cosmetic sponge with another couple of coats of Get Clover It.  The sponge soaks up some of the base, and then you can dab the sponge on the nail, and it just deposits the glitter where it touches.

Genius, really.  Not my original idea, of course, but one I borrowed from Nail Wish.

Sinful Colors Pistache makes a nice light green contrasting line above Get Clover It.

A teeny nail art brush and some SOPI Give Peas A Chance, and there are the shamrocks, ready for St. Paddy’s!

Topcoat smooths out the nail art and makes sure that all the glitters are nice and shiny.

Bottle shot:  Deborah Lippmann Pearly Queen, Sinful Colors Pistache, and KBShimmer Get Clover It. (Not pictured, SOPI Give Peas A Chance.)

If you liked this nail art, and would like to see more from me, I invite you to check out my blog, Lit From Within, or any of my social media: Facebook, Google+, Bloglovin‘, Twitter, Pinterest, Instagram, or Pinterest.

Thanks again, Christy!

******

Thanks Nidia for the great post!  I hope this inspires a lot of nail art!

Elle – Guest Post By Peer Pressure Polish

Hi there!

My name is Jennifer and I run the blog Peer Pressure Polish.  You can find me at http://www.peerpressurepolish.com/. I am super excited to be guest posting over here and to showcase a lovely polish from KBShimmer.

I have been a huge fan of KBShimmer for a while now.  My first ever purchase was for Band Geek and The Square (which I don’t even think is available anymore, it wasn’t when I checked).  Since then I have had a lot of them on my wish list.  Elle had been the one that was on there the longest.  I added more when her Winter 2013 collection came out!

Anyway, this past holiday season I signed up for a Secret Santa swap and my partner got me TWO KBShimmers off my list!!!!! So happy!!!!

Elle is a grey based crelly polish PACKED with glitter.  The glitter colors are pink white and grey.  When I say it is packed with glitter, I mean it is just saturated with glitter.  I had so much glitter on the brush each time I went in, it makes for such a beautiful polish.  There was no fishing for glitter in this one.

I wore this polish for days with no chips or tip wear.  With the foil method it came off easily.

The pictures below are three thin coats over Duri Rejuvacote and topped with Rica’s Glossy Glam.

So let’s get on with the pictures so I can show Elle off to you!


So there is the über pretty Elle.  A lovely glitter polish that I know I will be wearing more.

A big thank you to Christy of KBShimmer for giving me this amazing opportunity to guest post here.

I look forward to many more purchases in the future!

If you would like to hear more from me you can always check out my link above or like my page at http://www.facebook.com/peerpressurepolish